Configuring additional ZwaveJS entities in Home Assistant over MQTT
This is a super quick “because the official docs didn’t make it super clear so here’s what ended up working for me” post.
After some very disappointing WiFi connectivity issues, I settled on a Zwave based thermostat to replace the Venstar thermostat.
After installing the Honeywell TH6320 and connecting it to the ZwaveJS gateway, a new `climate`` entity appeared in Home Assistant. From there, I was able to see/control:
- The current thermostat setpoint/mode
- The current air temp and humidity
- The current battery level / if the thermostat thought the battery was low
I knew that it was possible to adjust the the screen backlight from the thermostat itself so I was a bit confused when there was no such configuration entity exposed in Home Assistant.
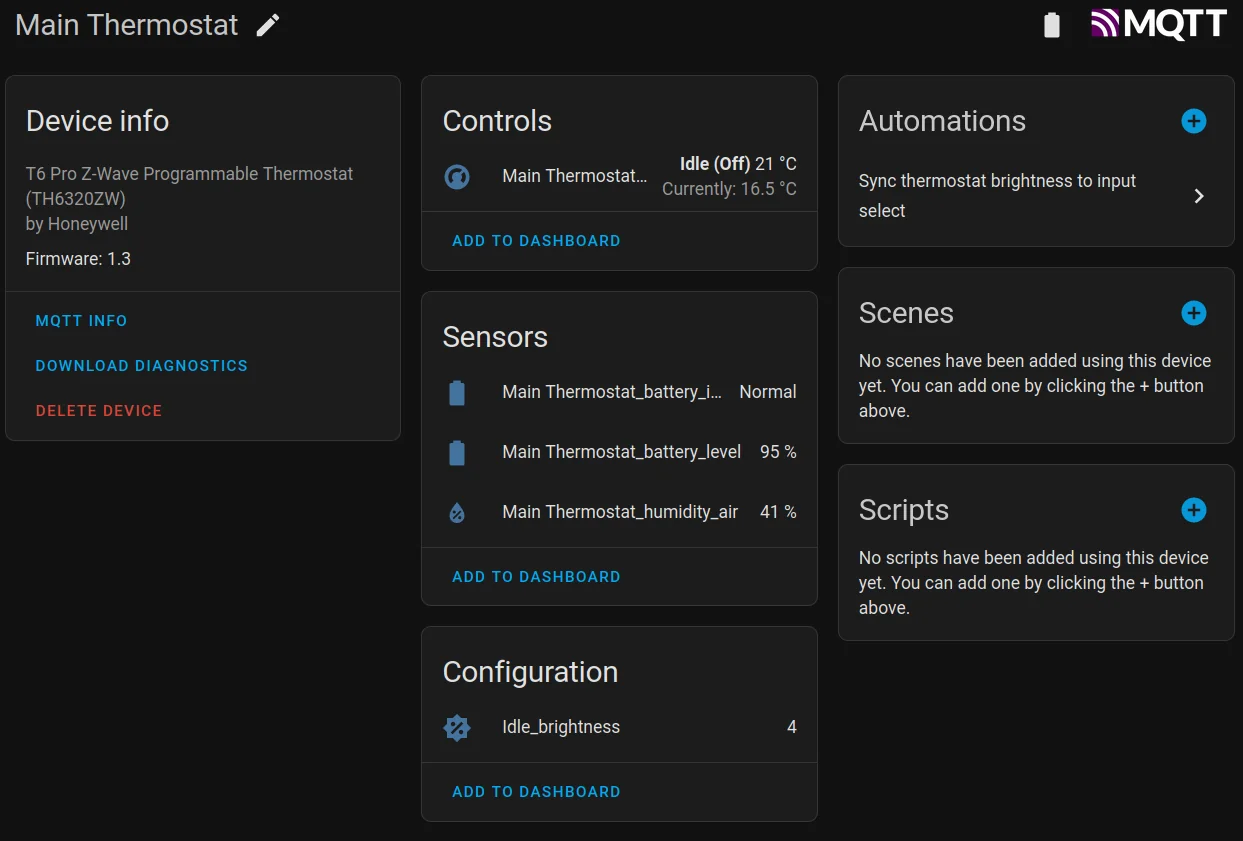
Note the `Idle_brightness` sensor. That's not part of the 'default' zwavejs2mqtt install.
After playing around with the ZwaveJS2MQTT web interface for bit, I discovered that it was possible to adjust the backlight brightness…and over 40 other settings under the Configuration v4 section.
I can totally understand why only the “core” functionality would be automatically exposed to Home Assistant; most of the 40+ knobs are things that do not need to be set beyond the initial installation.
So, How do I go about getting ZwaveJS2MQTT to automatically tell Home Assistant about the current backlight level?
Exposing ‘idle brightness’ to Home Assistant as a Sensor
From the Configuration v4 tab for the thermostat node, I found the input field [4-112-0-39] Idle Brightness which let me control the thermostat screen backlight level.
I don’t know what the numbers mean, but they are important / uniquely identify a specific setting.
[4-112-0-28] Minimum Cool Temperature, for example) then you will want to substitute your parameter setting ‘address’ as appropriate.After some more experimentation and trying to grok documentation, I figured out how to get ZwaveJS to advertise the current value for the backlight brightness as a sensor in Home Assistant.
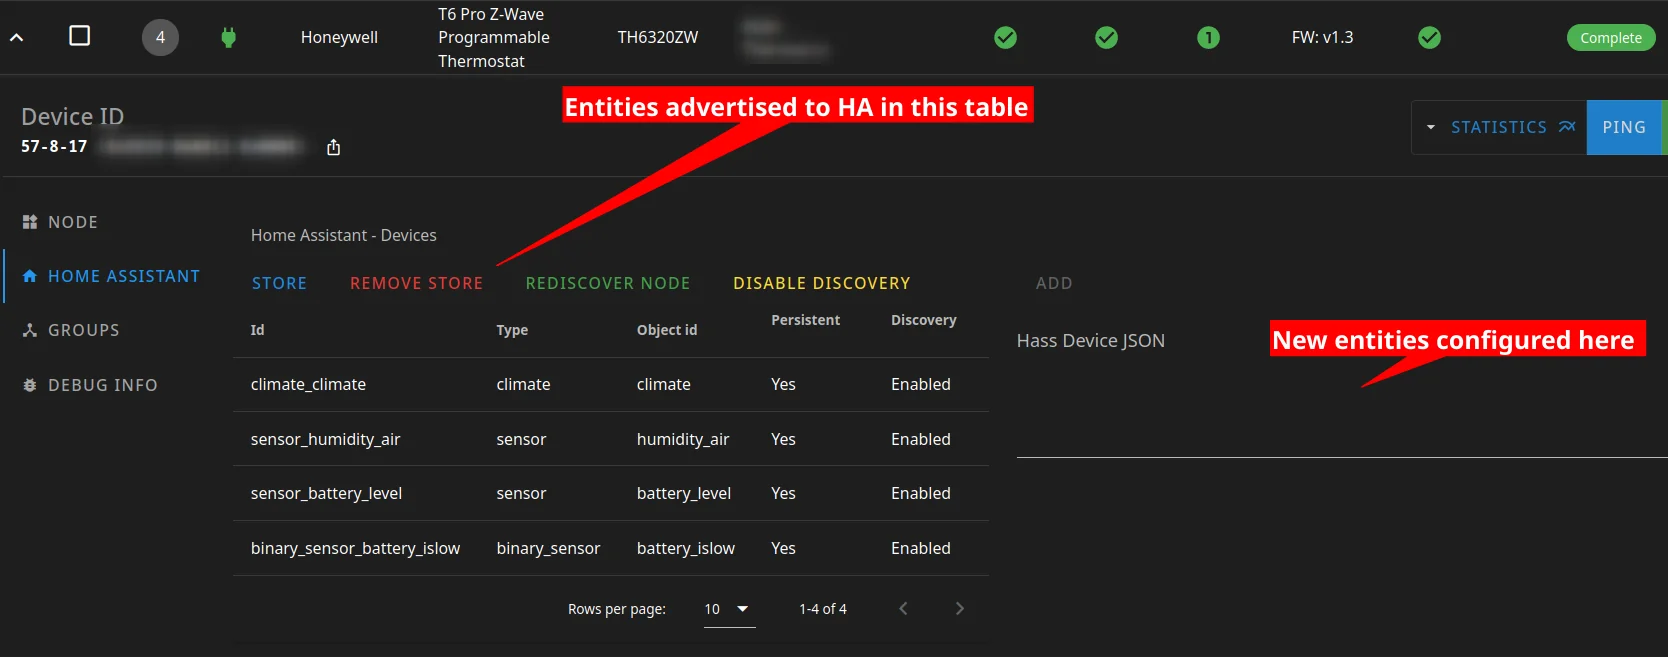
The 'HOME ASSISTANT' tab of my thermostats' page.
Here’s how to do it:
- Select the
nodein question from theControl Panelpage on the ZwaveJS2MQTT web UI. In this case, you can see that my thermostat is node4. Yours will likely be different. - Select the
Home Assistanttab from the left. You can see it selected in the above screenshot. - In the blank
Hass Device JSONbox, paste the JSON document that describes the sensor / entity you wish to expose to Home Assistant. I struggled for some time trying to figure out what the document should look like but was able to ‘reverse engineer’ a working payload by studying thesensor_humidity_airentity that was automatically created. - Then click the
ADDbutton that should have activated just above theHass Device JSON. A new row should appear in theHome Assistant - Devices table - Click the newly added row so the
Hass Device JSONfield is populated with the JSON document you have added. - Click the
UPDATEbutton that should appear just above theHass Device JSONlabel - Assuming no issues, this will send the MQTT message which tells Home Assistant about your new sensor. You may wish to use a MQTT broker inspection app to monitor the exact payload that is sent to the
homeassistant/...topic as well astail -f home-assistant.log. If Home Assistant gets the message, any validation errors will show up in the HA log. - Once you are satisfied with how the entity is presented in Home Assistant, click the
STOREbutton just below theHome Assistant - Devicesheading on the ZwaveJS2MQTT web UI.
When all is said and done, this is what you should see:
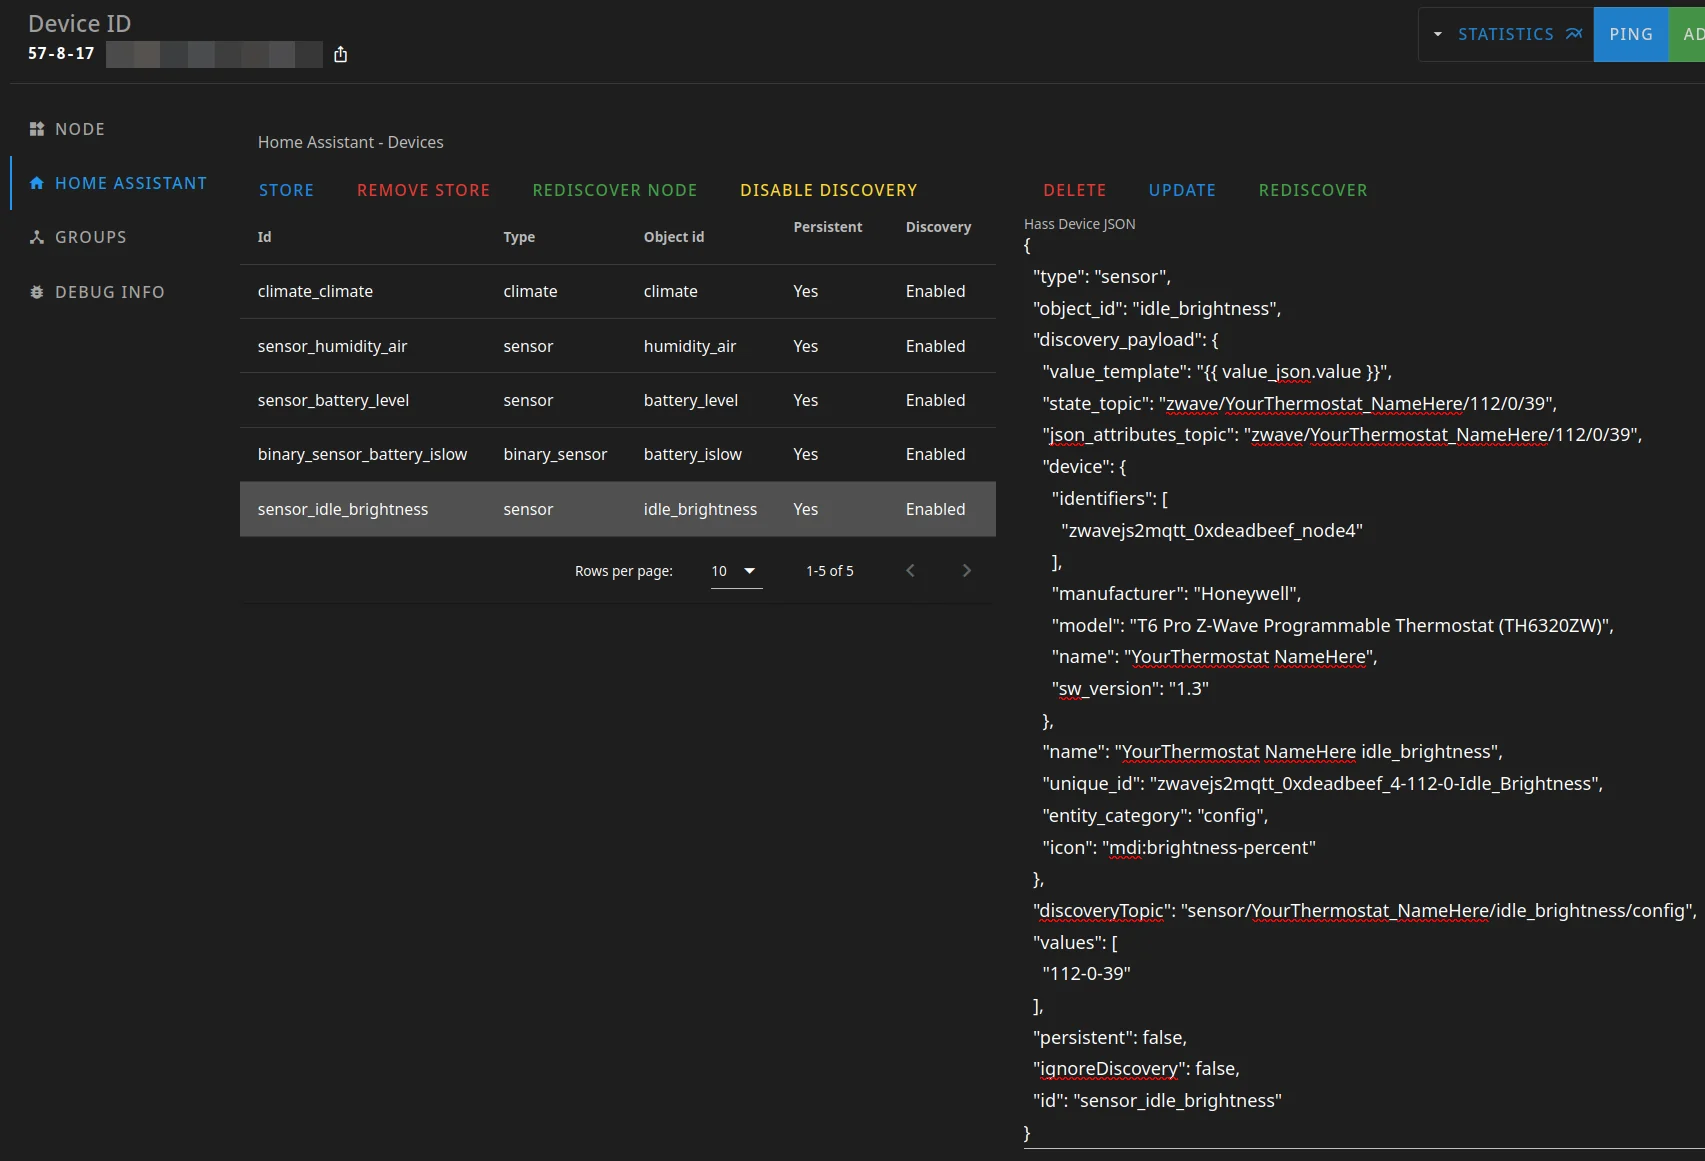
Example payload
Here is a (slightly edited) version of the JSON document I added via the Hass Device JSON entry.
{
  "type": "sensor",
  "object_id": "idle_brightness",
  "discovery_payload": {
    "value_template": "{{ value_json.value }}",
    "state_topic": "zwave/YourThermostat_NameHere/112/0/39",
    "json_attributes_topic": "zwave/YourThermostat_NameHere/112/0/39",
    "device": {
      "identifiers": [
        "zwavejs2mqtt_0xdeadbeef_node4"
      ],
      "manufacturer": "Honeywell",
      "model": "T6 Pro Z-Wave Programmable Thermostat (TH6320ZW)",
      "name": "YourThermostat NameHere",
      "sw_version": "1.3"
    },
    "name": "YourThermostat NameHere idle_brightness",
    "unique_id": "zwavejs2mqtt_0xdeadbeef_4-112-0-Idle_Brightness",
    "entity_category": "config",
    "icon": "mdi:brightness-percent"
  },
  "discoveryTopic": "sensor/YourThermostat_NameHere/idle_brightness/config",
  "values": [
    "112-0-39"
  ],
  "persistent": false,
  "ignoreDiscovery": false,
  "id": "sensor_idle_brightness"
}
I have replaced a few things in the example payload. You will want to retrieve the correct values for your payload from one of the automatically generated payloads. I used the sensor_humidity_air device as a starting point for my payload.
Ok, but what about writing to the thermostat?
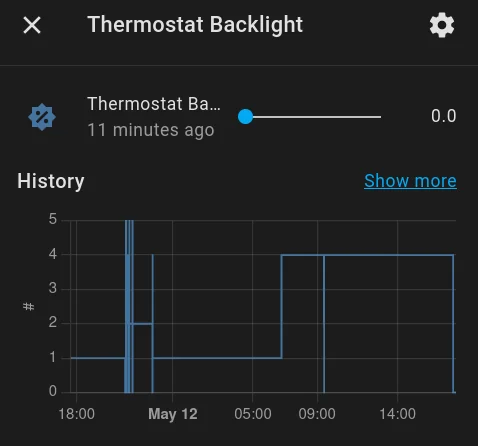
A basic 'helper' widget for use in Home Assistant Automations.
Once the sensor exists in Home Assistant, you will probably want to use it in an automation. Here is a simple automation that watches a basic number input widget and sets the backlight brightness for the thermostat based on what the widget is set to:
alias: Sync thermostat brightness to input select
description: An Example automation.
trigger:
  - platform: state
    entity_id:
      - sensor.yourthermostat_namehere_idle_brightness
    id: physical
  - platform: state
    entity_id:
      - input_number.thermostat_backlight
    id: virtual
condition: []
action:
  - choose:
      - conditions:
          - condition: trigger
            id: virtual
        sequence:
          - service: mqtt.publish
            data:
              topic: zwave/YourThermostat_NameHere/112/0/39/set
              payload_template: '{{trigger.to_state.state}}'
      - conditions:
          - condition: trigger
            id: physical
        sequence:
          - service: input_number.set_value
            target:
              entity_id: input_number.thermostat_backlight
            data_template:
              value: '{{trigger.to_state.state | float}}'
    default: []
mode: single
max_exceeded: silent
This works but it’s not automagic. We can do better!
More Automagic, More Better
The primary downside with the above automation is that the user (read: you) needs to create the input_number widget and then spend the time telling Home Assistant what to do when the value changes.
This isn’t a particularly difficult task - only ~30 lines of yaml… but what if we didn’t have to do that?
What if Home Assistant had a robust auto discovery mechanism that we could take advantage of to automagically set up a basic input widget that would transmit the necessary MQTT payload to adjust the backlight … automatically?
I have good news and bad news.
The good news is that we totally can do this. 🎉
The bad news is that ZwaveJS2MQTT does not appear to support the input_select type of entity that we’ll need to pull this off. 👎
I am not super familiar with the ZwaveJS2MQTT code base, but it looks like there is no validation on the JSON you enter under the Hass Device JSON field but there is some validation / filtering on the MQTT message that is sent for auto discovery. ZwaveJS2MQTT does not seem to support select components via MQTT so the payload that is sent to Home Assistant is incomplete and results in errors:
│ ERROR (MainThread) [homeassistant.util.logging] Exception in discovery_callback when dispatching 'mqtt_discovery_updated_('select', 'YourThermostat NameHere idle_brightness │
│ Traceback (most recent call last):
│   File "/usr/src/homeassistant/homeassistant/components/mqtt/mixins.py", line 724, in discovery_callback
│     await self._discovery_update(payload)
│   File "/usr/src/homeassistant/homeassistant/components/mqtt/mixins.py", line 886, in discovery_update
│     config = self.config_schema()(discovery_payload)
│   File "/usr/local/lib/python3.9/site-packages/voluptuous/validators.py", line 232, in __call__
│     return self._exec((Schema(val) for val in self.validators), v)
│   File "/usr/local/lib/python3.9/site-packages/voluptuous/validators.py", line 355, in _exec
│     raise e if self.msg is None else AllInvalid(self.msg, path=path)
│   File "/usr/local/lib/python3.9/site-packages/voluptuous/validators.py", line 351, in _exec
│     v = func(v)
│   File "/usr/local/lib/python3.9/site-packages/voluptuous/schema_builder.py", line 272, in __call__
│     return self._compiled([], data)
│   File "/usr/local/lib/python3.9/site-packages/voluptuous/schema_builder.py", line 818, in validate_callable
│     return schema(data)
│   File "/usr/local/lib/python3.9/site-packages/voluptuous/schema_builder.py", line 272, in __call__
│     return self._compiled([], data)
│   File "/usr/local/lib/python3.9/site-packages/voluptuous/schema_builder.py", line 595, in validate_dict
│     return base_validate(path, iteritems(data), out)
│   File "/usr/local/lib/python3.9/site-packages/voluptuous/schema_builder.py", line 433, in validate_mapping
│     raise er.MultipleInvalid(errors)
│ voluptuous.error.MultipleInvalid: required key not provided @ data['options']
While it would be nice if ZwaveJS2MQTT would support more device types, we have a pretty simple fix: use another device to publish a valid configuration payload.
And as it turns out, it’s trivial to get Home Assistant to publish an arbitrary payload to an arbitrary topic when it starts up.
alias: Autoconfigure Thermostat Backlight select
description: >-
  On HA start up, publish MQTT payload so HA auto-discovers the input_select to
  automate thermostat backlight brightness
trigger:
  - platform: homeassistant
    event: start
condition: []
action:
  - service: mqtt.publish
    data:
      topic: homeassistant/select/YourThermostat_NameHere/idle_brightness/config
      payload: >-
        {"options":["0","1","2","3","4","5"],"name":"MainThermostat idle_brightness","state_topic":"zwave/YourThermostat_NameHere/112/0/39","value_template":"{{'{{value_json.value}}'}}","command_topic":"zwave/YourThermostat_NameHere/112/0/39/set","command_template":"{{'{{value}}'}}","unique_id":"zwavejs2mqtt_0xdeadbeef_4-112-0-Idle_Brightness_Select","device":{"identifiers":["zwavejs2mqtt_0xdeadbeef_node4"],"manufacturer":"Honeywell","model":"T6ProZ-WaveProgrammableThermostat(TH6320ZW)","name":"MainThermostat","sw_version":"1.3"},"entity_category":"config","icon":"mdi:brightness-percent"}
mode: singleIf you look carefully, you will notice two things:
- The json payload has been escaped and turned into a string
- The templates inside the string are further escaped by wrapping them in
{{ 'and'}}.
Here is a pretty formatted JSON document:
{
   "options":[
      "0",
      "1",
      "2",
      "3",
      "4",
      "5"
   ],
   "name":"YourThermostat NameHere idle_brightness",
   "state_topic":"zwave/YourThermostat_NameHere/112/0/39",
   "value_template":"{{ '{{value_json.value}}' }}",
   "command_topic":"zwave/YourThermostat_NameHere/112/0/39/set",
   "command_template":"{{ '{{value}}' }}",
   "unique_id":"zwavejs2mqtt_0xdeadbeef_4-112-0-Idle_Brightness_Select",
   "device":{
      "identifiers":[
         "zwavejs2mqtt_0xdeadbeef_node4"
      ],
      "manufacturer":"Honeywell",
      "model":"T6 Pro Z-Wave Programmable Thermostat (TH6320ZW)",
      "name":"YourThermostat NameHere",
      "sw_version":"1.3"
   },
   "entity_category":"config",
   "icon":"mdi:brightness-percent"
}
Once the automation is created, save it. You can test your work by clicking “run actions” and monitoring the home assistant log file.
When the payload is properly escaped, you should see a new entity added to the Device page:
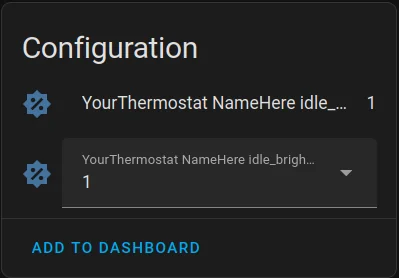
Automatically created!
When you select a brightness value from the drop down, the backlight brightness should change. That’s how you get a ’non standard’ thermostat configuration value to automatically show up on the correct device page.
You now no longer need the example automation from above. 😎.