Fixing Home Assistant discovery with Tasmota on the Treatlife DS03
Using ESPHome with the Treatlife DS03 from 2022-06.UPDATE: (2021-10-22): Tasmota 9.5.0 has been superseded by the new Tasmota 10.0.0 release. This release works perfectly with the rules/automation outlined below; you no longer need to avoid the problematic 9.5 release with the DS03. I am extremely grateful to every one of the people that contributes to the Tasmota project to keep it improving!
UPDATE: (2021-09-19): Multiple have gotten in touch with me seeking some support with this post. At present, there is a bug with the Tasmota 9.5.0 release which breaks the automation outlined below. If you are having trouble getting the steps below to work either use Tasmota 9.4 or the latest development release of tasmota 9.5 if you’re going to continue on with this post!
The Treatlife DS03 is one of only a few Tasmota compatible ceiling fan controllers available in the US. It’s internal architecture splits the task of dimming the lights and switching the fan speed electronics from communicating over the network.
A very resource constrained ESP8266 module handles the network comms while a dedicated microcontroller running it’s own software manages the user-facing buttons/indicator-lights as well as dimming the light and adjusting the fan speed. The two components communicate over a simple UART.
This is a totally reasonable way to build such a device, but for reasons that I don’t fully understand, Tasmota does not publish a completely functional auto-configuration payload for Home Assistant.
Home Assistant automatically discovers the full light/dimmer capabilities of the DS03, but for some reason does not see that the DS03 is capable of running a fan at 4 different speeds; Home Assistant only allows for turning the fan on/off.
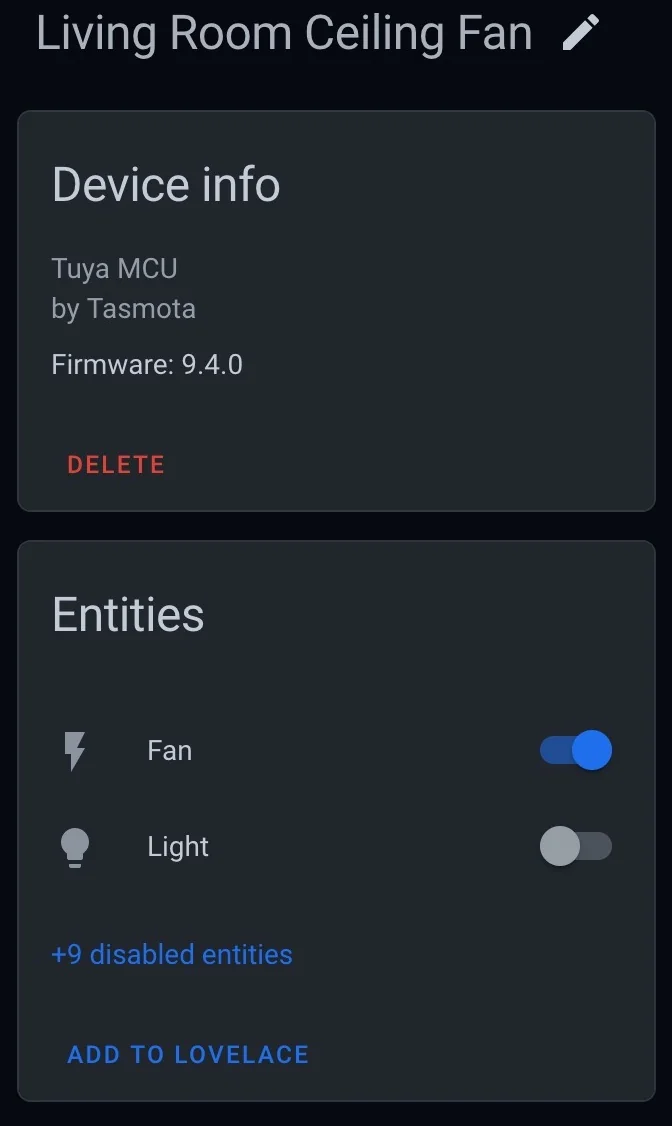
The default auto-configuration leads Home Assistant to believe the fan can only be switched on/off.
The existing guides on how to flash the device with Tasmota and integrate it with Home Assistant all work around this limitation by manually configuring Home Assistant to see the device as a multi-speed fan 🤦.
I’m not a huge fan of doing things manually, especially when there’s a well documented and robust protocol designed to make manual configuration unnecessary! Why ignore the almost completely working auto-configuration in favor of manual configuration? Why not just fix the auto-config payload so Home Assistant exposes the full functionality of the device?
Both of the above guides were written long before Home Assistant gained support for fans with more than 3 speeds so even if I were to configure Home Assistant with a copy their example YAML, I’d still be missing the ability to control the 4th speed!
How
In short, Tasmota supports some basic scripting, called rules. They work exactly as you’re thinking: On $someEvent do $someAction. One of the actions allows the Tasmota device to publish a message to a MQTT topic. I’m going to have the DS03 broadcast a proper auto-configuration message to Home Assistant.
The technique is basically the same one outlined in this article, but I’m posting this to document a few of the subtle differences in my approach.
I’ll assume that you’ve successfully flashed your DS03 with Tasmota and have already configured the module and issued the necessary ledtable commands. You will also need the native Tasmota integration installed.
If you’re following either the blakadder or digiblur guides linked above, stop at the step where you’re meant to configure rule1.
Issue a slightly modified rule:
Rule1 on TuyaReceived#Data=55AA03070005030400010016 do publish2 stat/%topic%/speed 25 endon
    on TuyaReceived#Data=55AA03070005030400010117 do publish2 stat/%topic%/speed 50 endon
    on TuyaReceived#Data=55AA03070005030400010218 do publish2 stat/%topic%/speed 75 endon
    on TuyaReceived#Data=55AA03070005030400010319 do publish2 stat/%topic%/speed 100 endon
This tells Tasmota to publish an integer speed (25,50,75,100) when it receives a specific packet from the dedicated MCU over th UART.
Then, issue a second rule to actually publish the configuration data:
rule2 on SetOption19#Data=OFF do publish2 homeassistant/fan/%macaddr%/config {"uniq_id":"AABBCC","~":"%topic%/POWER1","cmd_t":"cmnd/~","pl_off":"OFF","pl_on":"ON","stat_t":"stat/~","avty_t":"tele/%topic%/LWT","pl_avail":"Online","pl_not_avail":"Offline","pct_cmd_t":"cmnd/%topic%/tuyasend4","pct_cmd_tpl":"{%set v=value|int%}{%if v<=25%}3,0{%elif v<=50%}3,1{%elif v<=75%}3,2{%elif v<=100%}3,3{%endif%}","pct_stat_t":"stat/%topic%/speed","dev":{"cns":[["mac","%macaddr%"]]}} endonNote: You’ll probably want to modify the above payload so the occurrences of the placeholder string AABBCC are replaced with the last 6 characters of your own device’s MAC address!
For readability, here’s the unminified JSON:
{
  "uniq_id": "AABBCC",
  "~":"%topic%/POWER1",
  "cmd_t": "cmnd/~",
  "pl_off": "OFF",
  "pl_on": "ON",
  "stat_t": "stat/~",
  "avty_t": "tele/%topic%/LWT",
  "pl_avail": "Online",
  "pl_not_avail": "Offline",
  "pct_cmd_t": "cmnd/%topic%/tuyasend4",
  "pct_cmd_tpl": "{%set v=value|int%}{%if v<=25%}3,0{%elif v<=50%}3,1{%elif v<=75%}3,2{%elif v<=100%}3,3{%endif%}",
  "pct_stat_t": "stat/%topic%/speed",
  "dev": {
    "cns": [
      [
        "mac",
        "%macaddr%"
      ]
    ]
  }
}
Note: The dev portion of the payload is the magic that convinces Home Assistant to combine the multiple entities under once device. Without that portion of the document, you will still have a properly configured DS03, but it will exist as an ‘orphaned’ entity that belongs to no device!
All that’s left is to enable rule2 and then trigger it:
rule2 1
so19 0
Altogether, It’ll look something like this:
18:23:54.140 CMD: Rule1 on TuyaReceived#Data=55AA03070005030400010016 do publish2 stat/%topic%/speed 25 endon on TuyaReceived#Data=55AA03070005030400010117 do publish2 stat/%topic%/speed 50 endon on TuyaReceived#Data=55AA03070005030400010218 do publish2 stat/%topic%/speed 75 endon on TuyaReceived#Data=55AA03070005030400010319 do publish2 stat/%topic%/speed 100 endon
18:23:54.149 RUL: Stored uncompressed, would compress from 344 to 98 (-72%)
18:23:54.155 MQT: stat/living_room_ceiling_fan/RESULT = {"Rule1":{"State":"ON","Once":"OFF","StopOnError":"OFF","Length":344,"Free":167,"Rules":"on TuyaReceived#Data=55AA03070005030400010016 do publish2 stat/%topic%/speed 25 endon on TuyaReceived#Data=55AA03070005030400010117 do publish2 stat/%topic%/speed 50 endon on TuyaReceived#Data=55AA03070005030400010218 do publish2 stat/%topic%/speed 75 endon on TuyaReceived#Data=55AA03070005030400010319 do publish2 stat/%topic%/speed 100 endon"}}

18:24:05.061 CMD: rule2 on SetOption19#Data=OFF do publish2 homeassistant/fan/%macaddr%/config {"uniq_id":"AABBCC","~":"%topic%/POWER1","cmd_t":"cmnd/~","pl_off":"OFF","pl_on":"ON","stat_t":"stat/~","avty_t":"tele/%topic%/LWT","pl_avail":"Online","pl_not_avail":"Offline","pct_cmd_t":"cmnd/%topic%/tuyasend4","pct_cmd_tpl":"{%set v=value|int%}{%if v<=25%}3,0{%elif v<=50%}3,1{%elif v<=75%}3,2{%elif v<=100%}3,3{%endif%}","pct_stat_t":"stat/%topic%/speed","dev":{"cns":[["mac","%macaddr%"]]}} endon
18:24:05.093 RUL: Stored uncompressed, would compress from 473 to 351 (-26%)
18:24:05.100 MQT: stat/living_room_ceiling_fan/RESULT = {"Rule2":{"State":"OFF","Once":"OFF","StopOnError":"OFF","Length":473,"Free":38,"Rules":"on SetOption19#Data=OFF do publish2 homeassistant/fan/%macaddr%/config {\"uniq_id\":\"AABBCC\",\"~\":\"%topic%/POWER1\",\"cmd_t\":\"cmnd/~\",\"pl_off\":\"OFF\",\"pl_on\":\"ON\",\"stat_t\":\"stat/~\",\"avty_t\":\"tele/%topic%/LWT\",\"pl_avail\":\"Online\",\"pl_not_avail\":\"Offline\",\"pct_cmd_t\":\"cmnd/%topic%/tuyasend4\",\"pct_cmd_tpl\":\"{%set v=value|int%}{%if v<=25%}3,0{%elif v<=50%}3,1{%elif v<=75%}3,2{%elif v<=100%}3,3{%endif%}\",\"pct_stat_t\":\"stat/%topic%/speed\",\"dev\":{\"cns\":[[\"mac\",\"%macaddr%\"]]}} endon"}}
18:24:07.494 CMD: rule2 1
18:24:07.503 MQT: stat/living_room_ceiling_fan/RESULT = {"Rule2":{"State":"ON","Once":"OFF","StopOnError":"OFF","Length":473,"Free":38,"Rules":"on SetOption19#Data=OFF do publish2 homeassistant/fan/%macaddr%/config {\"uniq_id\":\"AABBCC\",\"~\":\"%topic%/POWER1\",\"cmd_t\":\"cmnd/~\",\"pl_off\":\"OFF\",\"pl_on\":\"ON\",\"stat_t\":\"stat/~\",\"avty_t\":\"tele/%topic%/LWT\",\"pl_avail\":\"Online\",\"pl_not_avail\":\"Offline\",\"pct_cmd_t\":\"cmnd/%topic%/tuyasend4\",\"pct_cmd_tpl\":\"{%set v=value|int%}{%if v<=25%}3,0{%elif v<=50%}3,1{%elif v<=75%}3,2{%elif v<=100%}3,3{%endif%}\",\"pct_stat_t\":\"stat/%topic%/speed\",\"dev\":{\"cns\":[[\"mac\",\"%macaddr%\"]]}} endon"}}

18:24:10.362 CMD: so19 0
18:24:10.369 MQT: stat/living_room_ceiling_fan/RESULT = {"SetOption19":"OFF"}
18:24:10.414 RUL: SETOPTION19#DATA=OFF performs "publish2 homeassistant/fan/DDEEFFAABBCC/config {"uniq_id":"AABBCC","~":"living_room_ceiling_...
18:24:10.421 MQT: home Assistant/fan/DDEEFFAABBCC/config = {"uniq_id":"AABBCC","~":"living_room_ceiling_fan/POWER1","cmd_t":"cmnd/~","pl_off":"OFF","pl_on":"ON","stat_t":"stat/~","avty_t":"tele/living_room_ceiling_fan/LWT","pl_avail":"Online","pl_not_avail":"Offline","pct_cmd_t":"cmnd/living_room_ceiling_fan/tuyasend4","pct_cmd_tpl":"{%set v=value|int%}{%if v<=25%}3,0{%elif v<=50%}3,1{%elif v<=75%}3,2{%elif v<=100%}3,3{%endif%}","pct_stat_t":"stat/living_room_ceiling_fan/speed","dev":{"cns":[["mac","DDEEFFAABBCC"]]}} (retained)
18:24:10.509 LOG: Home Assistant MQTT Discovery disabled.
If everything worked correctly, Home Assistant should now show a single device in the device registry with a dimmable light entity and a variable-speed fan entity!
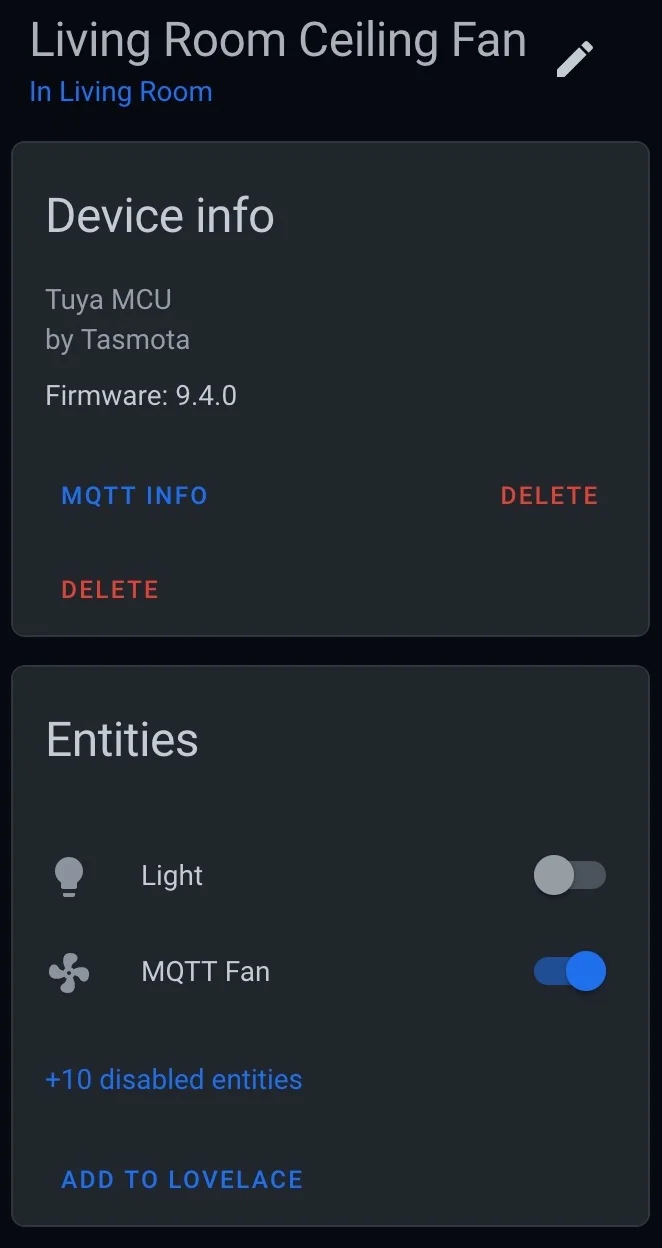
The DS03 device entity after the variable speed configuration document is received by Home Assistant.
Note: Depending on weather or not Home Assistant has previously ‘seen’ your DS03 via the native native Tasmota integration, you may see three entities on the device page; the light/dimmer, the switch/fan and the variable speed fan. Just disable the ‘basic’ fan switch entity that Tasmota publishes as discussed below.
Updating a DS03 that’s already integrated with Home Assistant
If you’ve already got a DS03 that’s integrated with Home Assistant, you can still get the device to properly auto-configure. Just remove the YAML configuration for both the light and fan entities.
You will likely need to restart HA to make sure all traces of the manual configurations are removed from the entity registry.
Once Home Assistant has forgotten all about the manual entities and the native Tasmota integration in installed, all of the MQTT-connected Tasmota devices should get picked up and configured in Home Assistant. At this point, you should have the single device with two entities; dimmable light and binary-switch fan as shown in the first picture on this post.
If your DS03 was already configured with Home Assistant via the Tasmota integration, just disable the simple switch entity that Tasmota configures Home Assistant with:
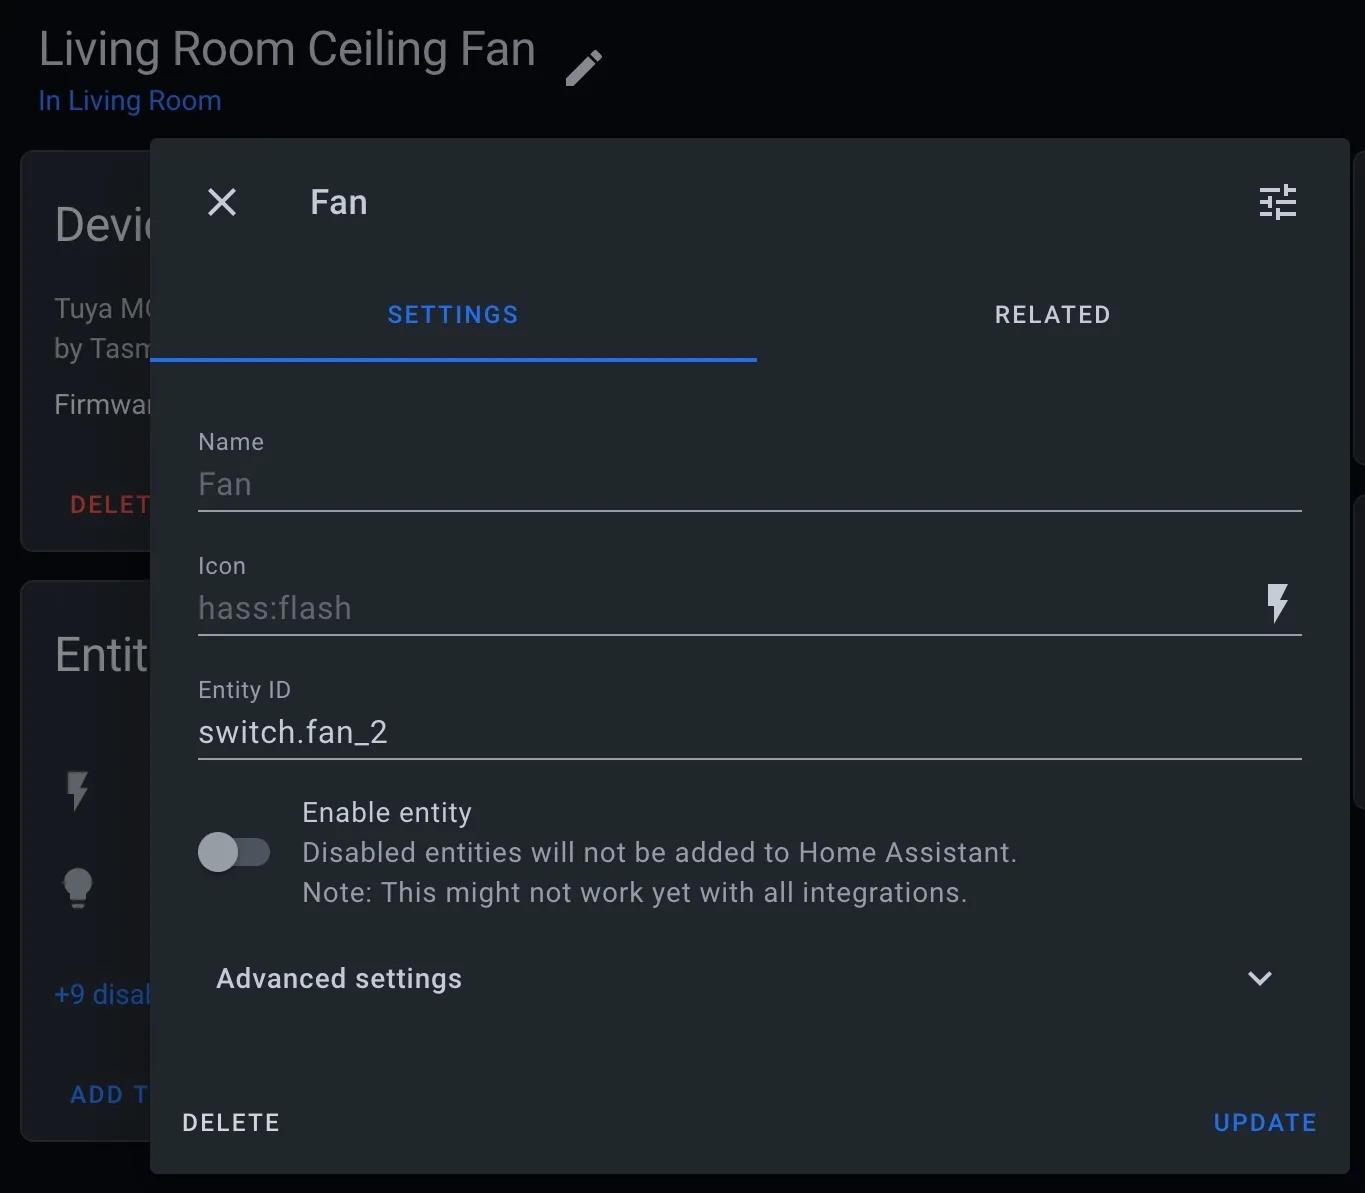
Toggle 'Enable entity' off to hide the basic binary switch that Tasmota configured Home Assistant with.
After disabling the switch/fan entity, trigger rule2 again and refresh the device entity page in Home Assistant to confirm that the device now has a MQTT Fan entity if it wasn’t there already.
Enjoy :)
Why use SetOption19:OFF as the trigger?
I run my MQTT broker on Kubernetes and do not have any persistance configured for that pod. This means that regardless of what retention settings a message was published with, every message on every topic is wiped out whenever the MQTT broker pod is rescheduled. As a result almost every device that Home Assistant monitors or controls via MQTT drifts into an Unavailable state whenever I do any maintenance on my K8s cluster.
I’m not the only one with this issue, even if the cause is different.
To get around this, I have a small automation that pokes the Tasmota devices every hour and when Home Assistant starts up. Since the Home Assistant pod takes longer than the MQTT pod to initialize, having HA poke the devices on startup minimizes the time a given entity is Unavailable in HA.
alias: Tasmotas Announce
description: 'Prevents devices from going Unavailable'
trigger:
  - platform: home Assistant
    event: start
  - platform: time_pattern
    hours: /1
condition: []
action:
  # For reasons that I don't understand, different tasmota devices seem to
  #     subscribe to a different group topic. cmnd/tas vs tas/cmnd
  ##
  - service: mqtt.publish
    data:
      topic: cmnd/tasmotas/SetOption19
      payload: '0'
  - service: mqtt.publish
    data:
      topic: tasmotas/cmnd/SetOption19
      payload: '0'
mode: single
You could probably work around this whole thing by changing the trigger for rule2 to something like on Mqtt#Connected publish2. Or storing the configuration payload as a variable so you could write multiple triggers for the same publish2 %mem1% action 🤔.
Side note: Rules Crash
While developing the configuration payload, I was able to reliably crash the ESP8266 module causing Tasmota to reboot. The crash / reboot symptoms are pretty similar to those outlined here so I assume that even though the rules “fit”, something about how the rule was parsed or the actions the rule drove caused the ESP to run out of RAM.
When I say “fit” I mean that I’d see lines like this in the console after configuring a test payload for rule2:
MQT: stat/living_room_ceiling_fan/RESULT = {"Rule2":{"State":"ON",..."Free":9,"Rules":"on ... endon"}}I could technically make the rule 9 characters longer and it’d still fit… right?
Not quite. Looking at the result from issuing the Rule1 command, it was clear that while rule2 would have an absolute maximum length of 511 characters ("Length":344,"Free":167; 344+167=511) there was also a less well defined soft limit on rule length.
For some versions of my rule2 payload, I was able to solve the crashing just by switching to the ’lite’ version of Tasmota. While the ’lite’ version of Tasmota does work with Tuya MCU (USE_TUYA_MCU), it does not support Home Assistant configuration (USE_HOME_ASSISTANT)!
After flashing back to the ‘regular’ Tasmota build, I set out trying to compress the rule2 payload as much as possible so that it would still work and not reliably crash the ESP8266 on the DS03.
After testing several things, I managed to get a working rule2 that didn’t reliably crash when triggered.