ESPHome for Sonoff T5 family of Switches
ESPHome for Sonoff T5 family of Switches
It’s hard to beat Sonoff switches when it comes to well-made, affordable, Home Assistant compatible switches. Ever since they announced the T5 series, I’ve been patiently waiting for the US variant to become available so I could replace my M5 switches with T5 switches.
Don’t get me wrong, the M5 switches are great… but not perfect.
The T5 switches improve on the M5 limitations with some new and novel hardware features. Taking advantage of these unique features requires a considerably more complex ESPHome configuration than the M5 series switches.
But before diving into the configuration, let’s briefly take a closer look at the hardware.
Brief hardware overview
Everything I’m going to cover below is for the US version.
Presumably the international version has a different layout and total number of LEDs.
The T5 series follows the “two part” design of the M5 switches; there’s a “base” that gets mounted in the wall and then the “face plate” that snaps on to the base. All high-voltage electronics stay in the base and the face plate is just a PCB with a touch sensor and LEDs. As far as I can tell, the face plates are interchangeable between the 1, 2, 3 and 4 relay variants but only within the same family; the physical features that mate the face plate to the base differ between M and T series switches.
The one bit of information that doesn’t seem to be readily available online is the location of the LEDs on the PCB, specifically the US version.
LED locations
For the US version, there are 32 LEDs around the perimeter of the switch; 6 on the top, 6 on the bottom, and 10 on each side.
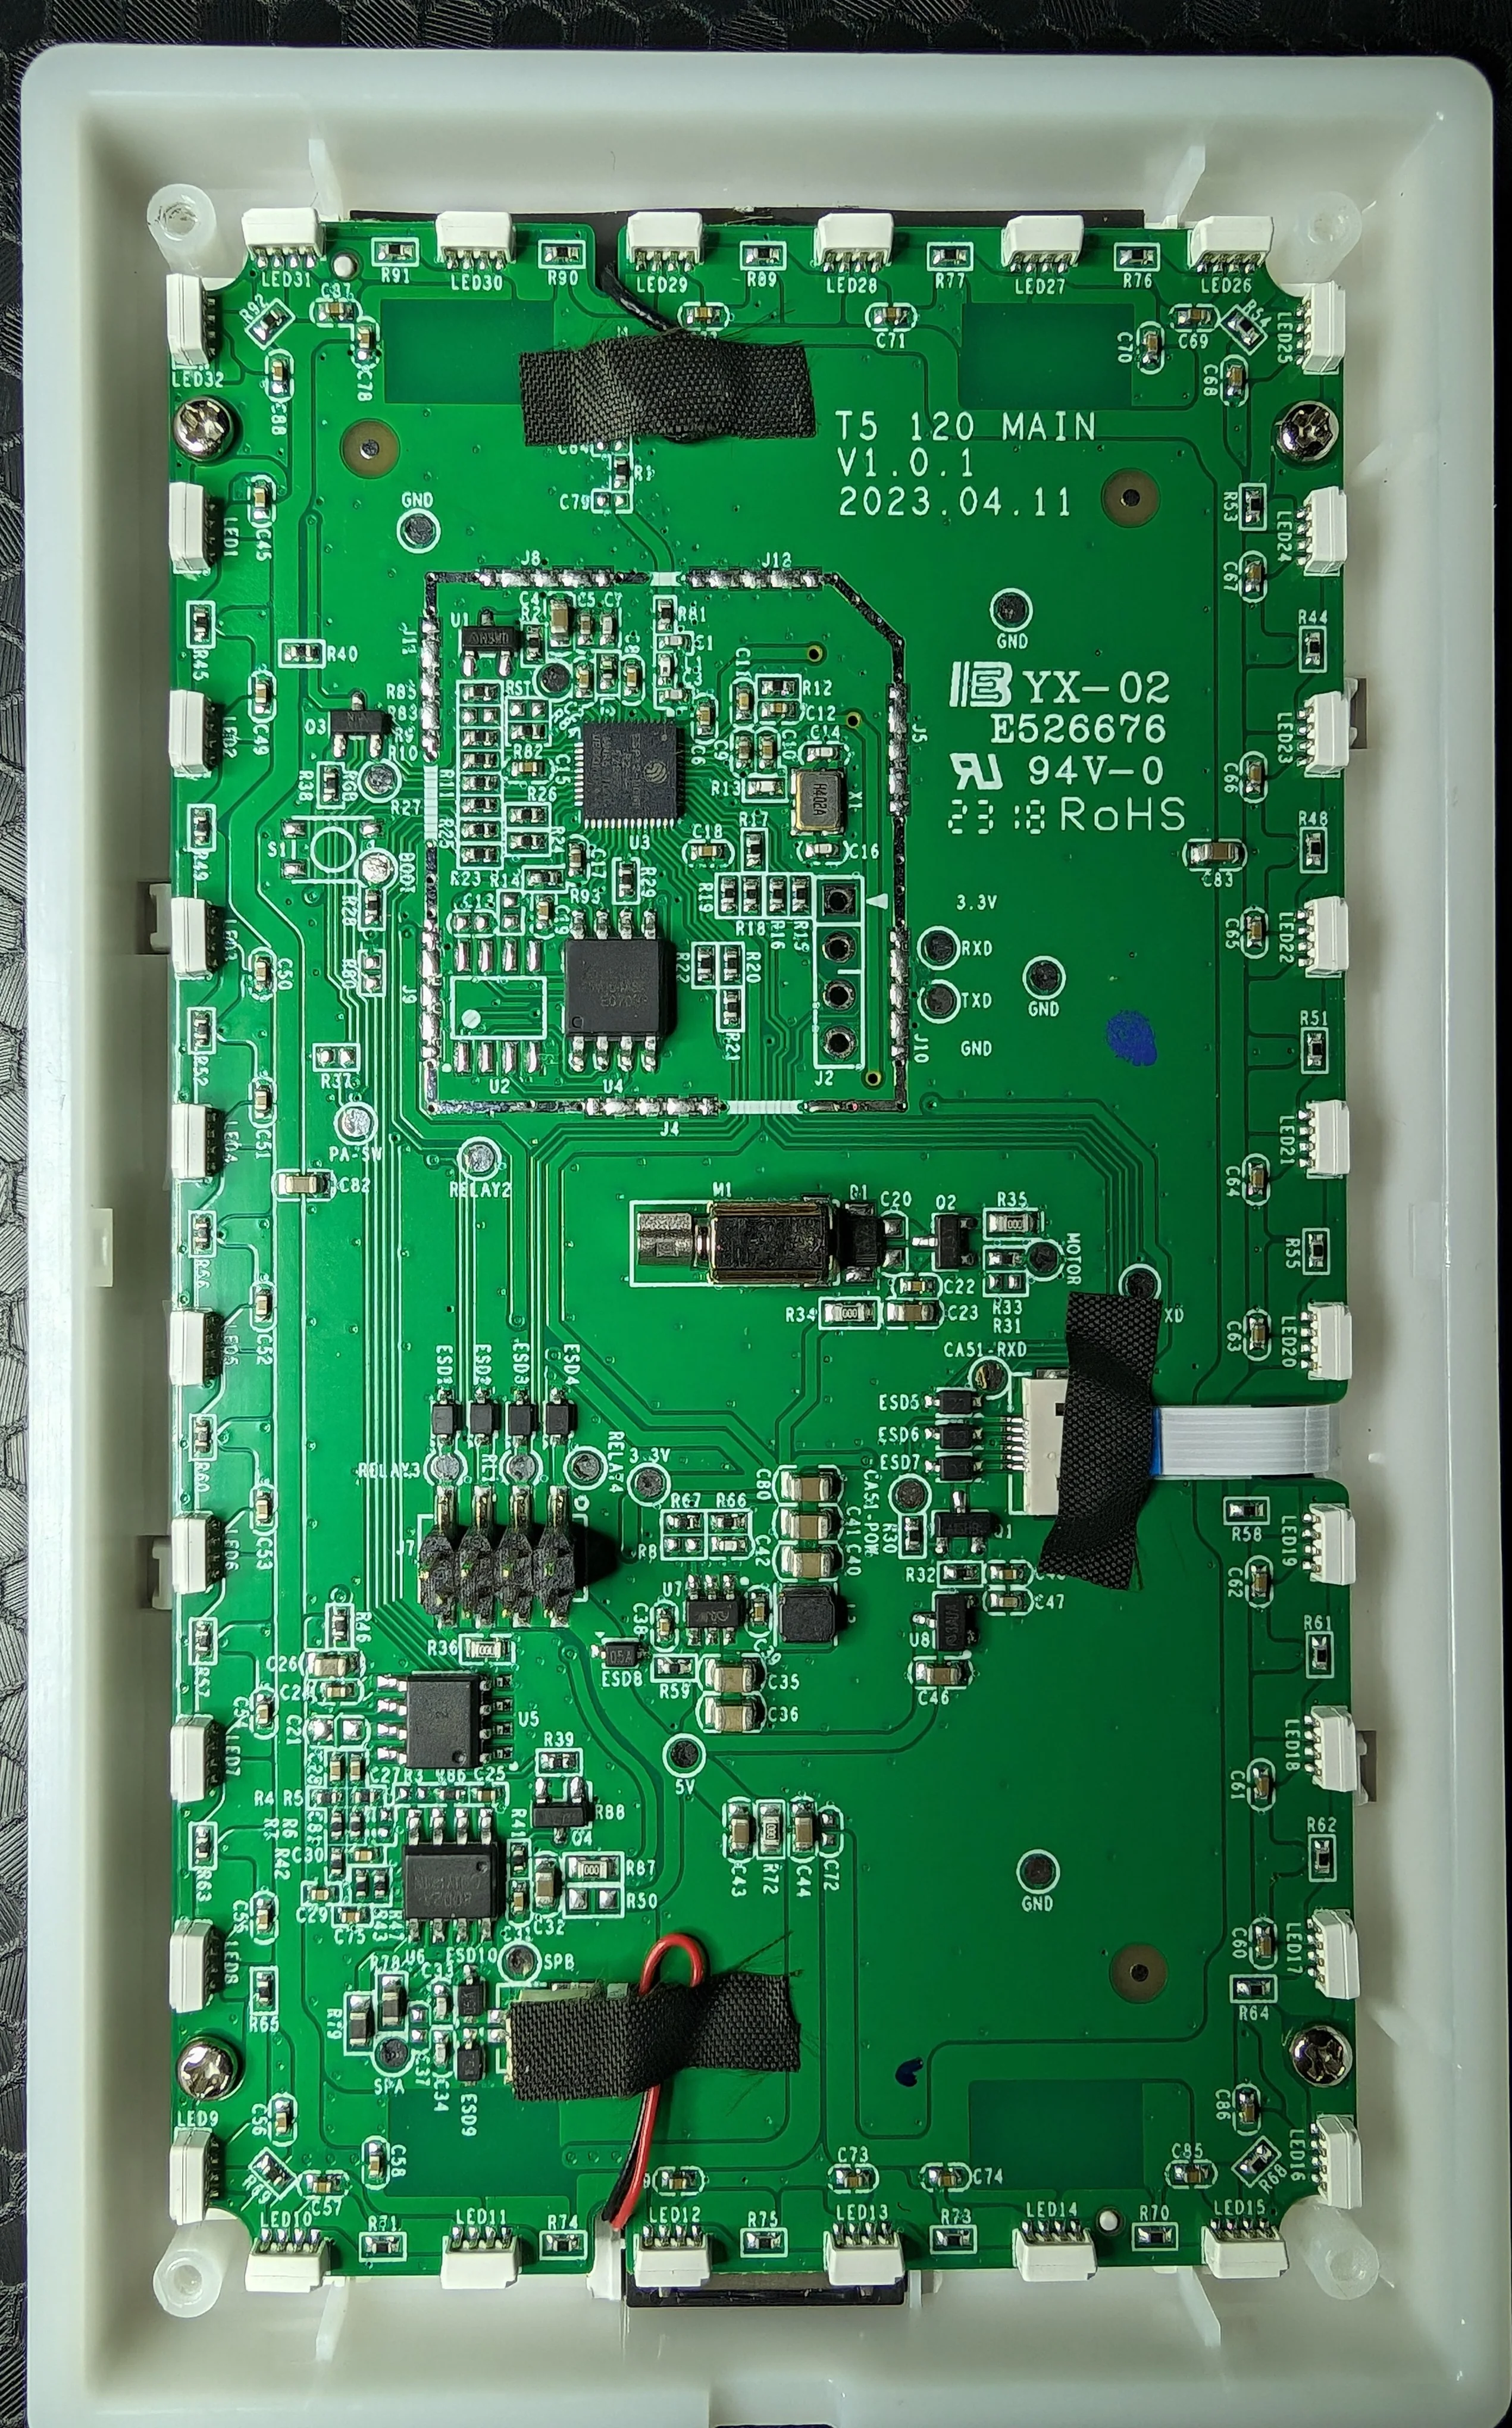
Clear shot of the PCB showing location of each LED. This is from the rear so the numbers on the right will be on the left when looking at the front of the switch.
From the front of the switch, mounted in traditional “tall” orientation:
- Top right corner going down the right side LED 32, 1-9
- Bottom right corner going across the bottom to the left LED 10-15
- Bottom left corner going up the left side LED 16-25
- Top left corner going across the top to the right LED 26-31
T5 improvements over M5
My issues with the M5 switches can be broadly summarized as:
- The physical touch targets are TINY relative to the size of the switch face.
- There’s only a TINY single-color LED that indicates the state of the switch and where the user should touch to trigger the relay.
Small Touch Area
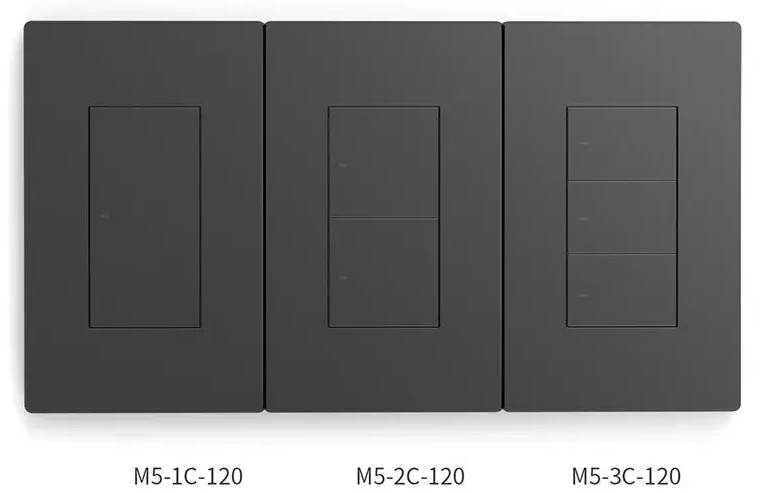
The 1C variant has the largest touch area but it’s still only about 50% of the switch face.
As you increase the number of relays, the area dedicated to each physical touch zone decreases which makes it harder to press.
If you’re coming into a room with arms full of groceries and you try to hit one of the buttons on the 3C variant with your elbow, you’re going to have a bad time.
There’s no reason why the physical touch zones couldn’t use the entire surface of the switch.
Unlike the International version of the M5 series, the US version doesn't use the full surface of the switch for touch input.
The T5 series fixes this by making the entire surface of the switch touch sensitive!

Instead of a single touch zone, the entire surface is touch sensitive.
This introduces a new problem, though, how do you know where to touch to toggle a given output? Look at these two styles of face plates for the T5 series and see if you can identify which belongs to the 1, 2, 3 and 4 relay variants:

Which face plate belongs to which variant? You can't tell just by looking at them!
You can’t.
If you look really close, you can see very faint delineation lines between the touch zones but it’s not obvious at a glance and it certainly will not be obvious to guests looking at the switch from across the room. Trying to figure out where to touch in a dark room is even harder.
We can solve this with the LEDs around the perimeter of the switch, though!
Indicating touch zone and relay state
The M5 switches have a single red LED for each physical button that is fully illuminated when the relay is on. As a group, these indicator LEDs can be dimmed to indicate where to touch to trigger the relay.
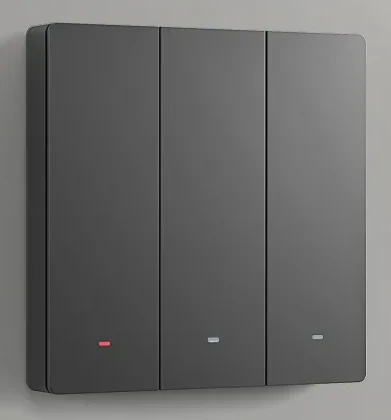
You can _clearly_ tell that this is a 3 relay variant and the left most relay is ON.
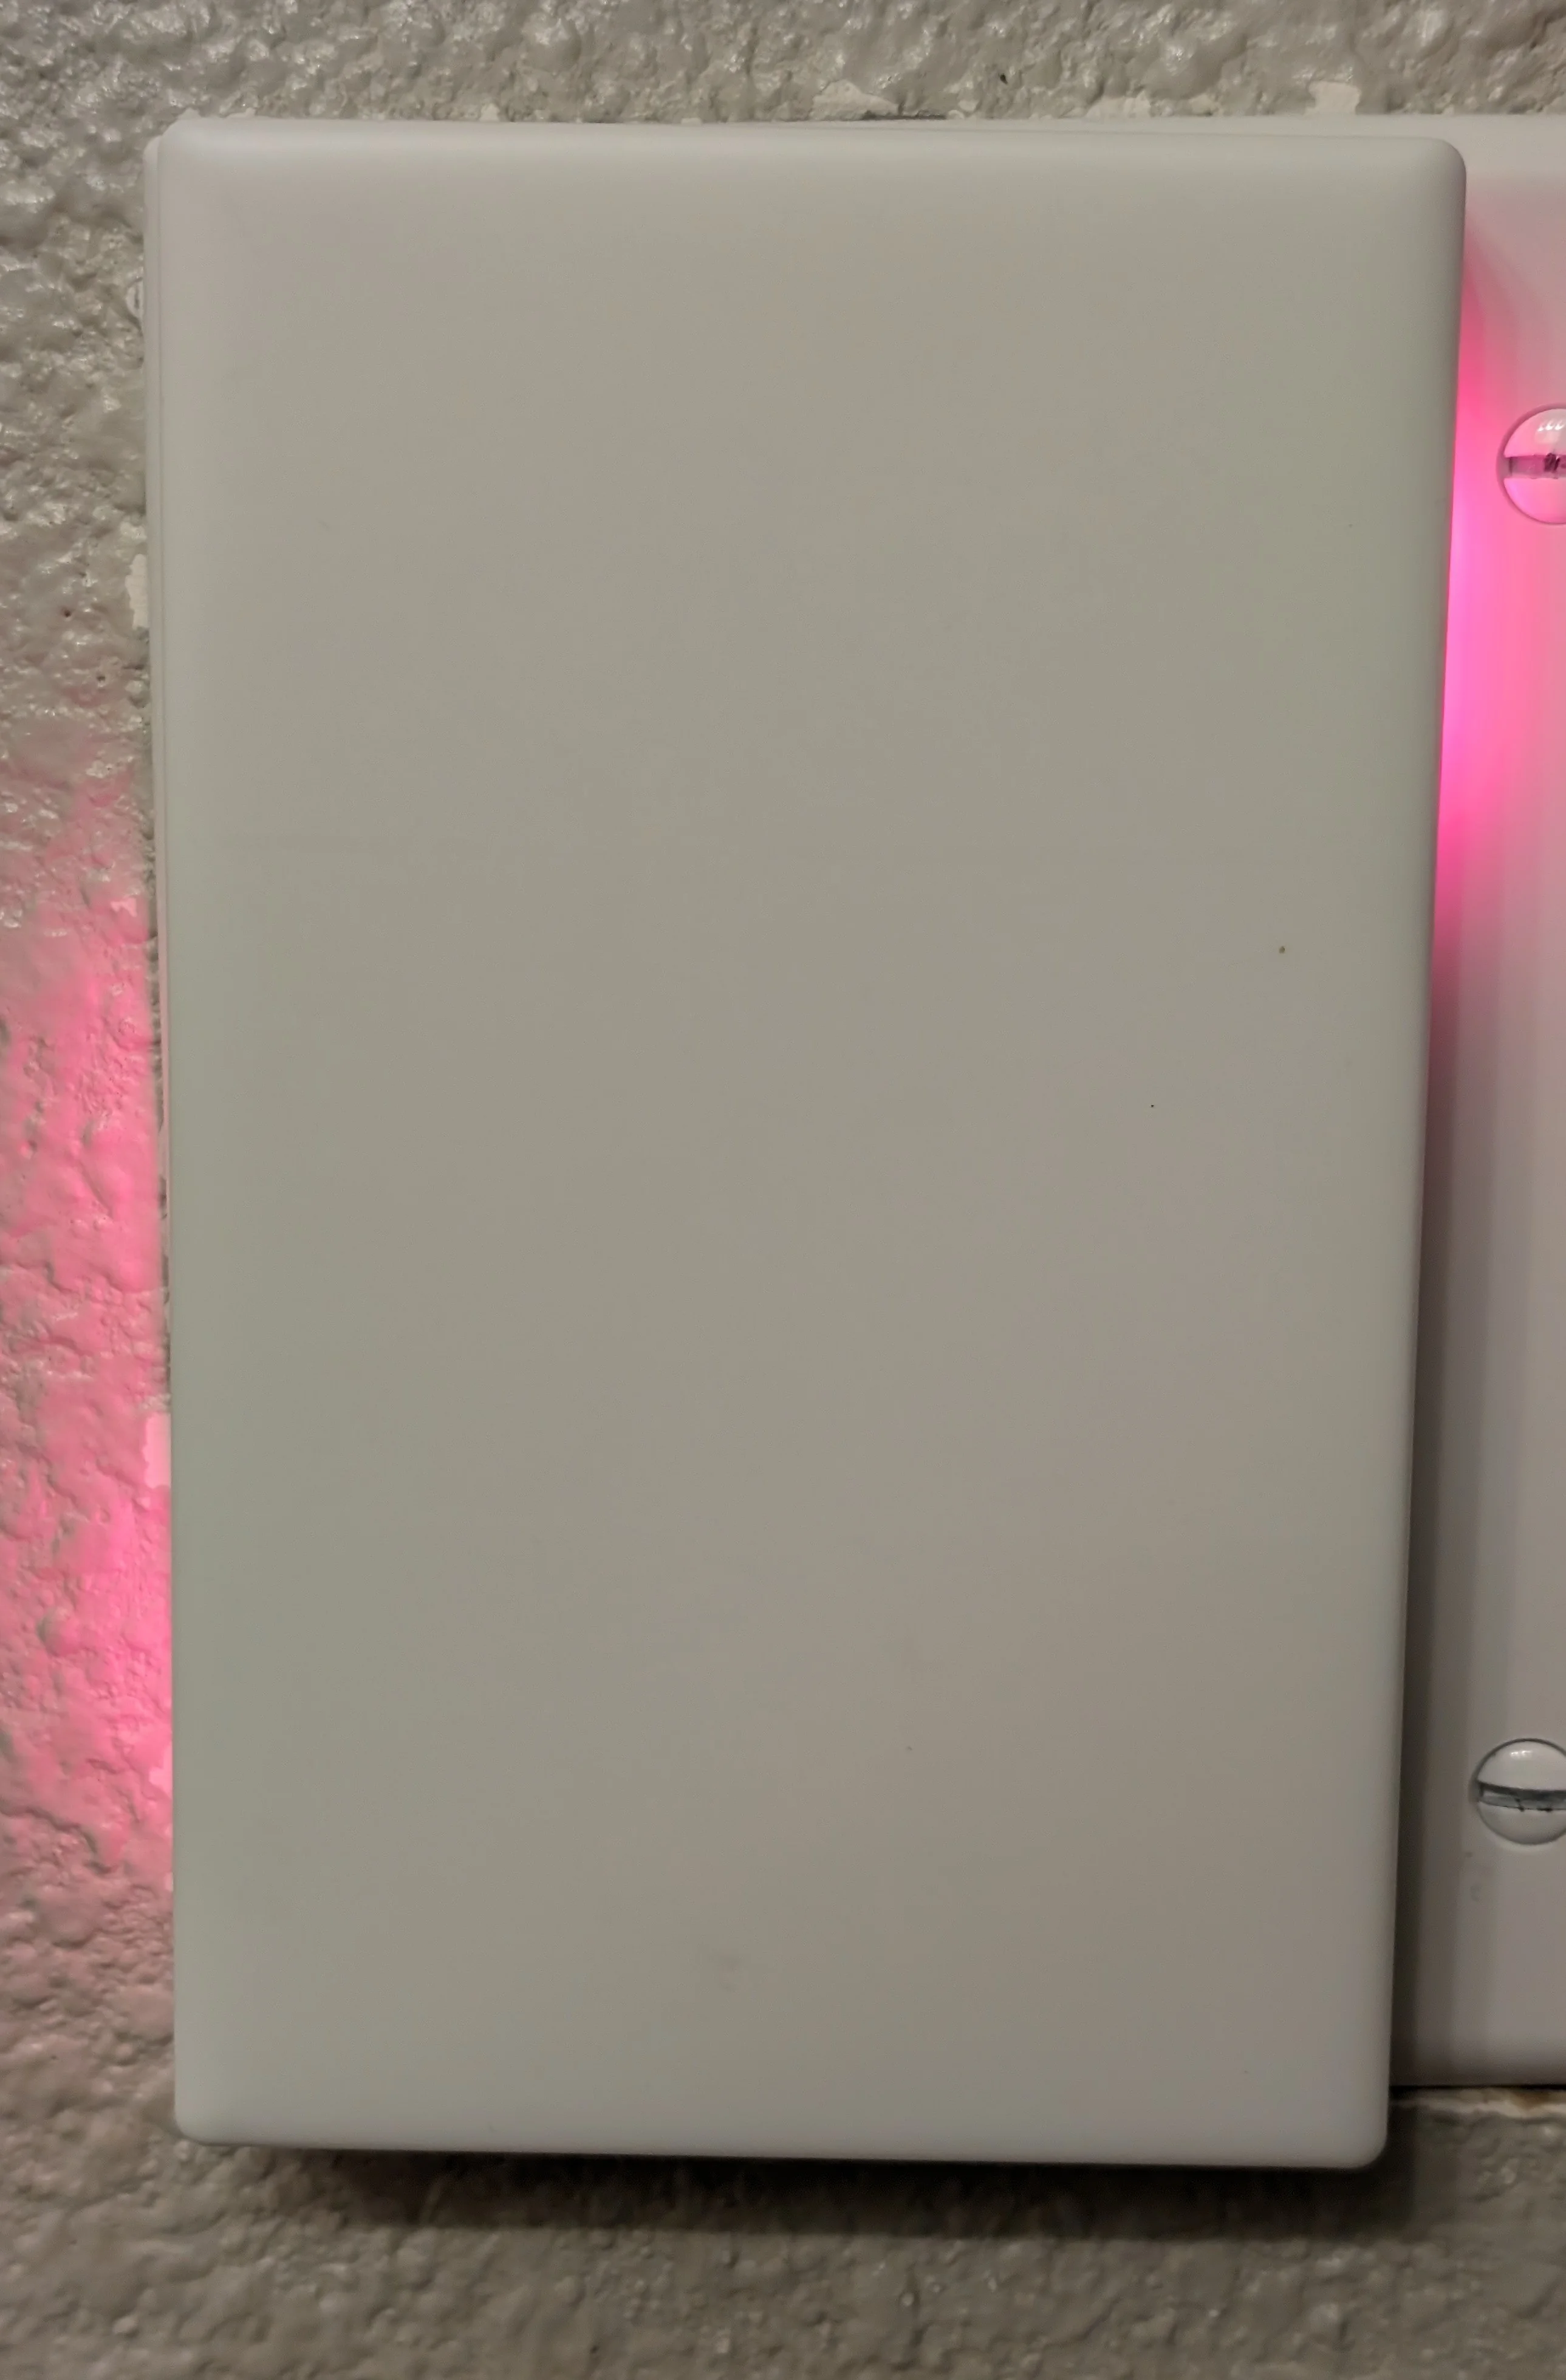
To get a comparable visual indicator, we can use the LEDs around the perimeter of the touch panel; split the LEDs on the sides into groups; one group per relay/touch-area.
Instead of using LEDs on both the right and left side together, alternate which side is lit up to indicate the state of the relay; if the LEDs on the left are lit up, the relay is on and if the LEDs on the right are lit up, the relay is off.
Given this picture, you can clearly tell that this T5 switch supports two touch areas and both relays are currently off:
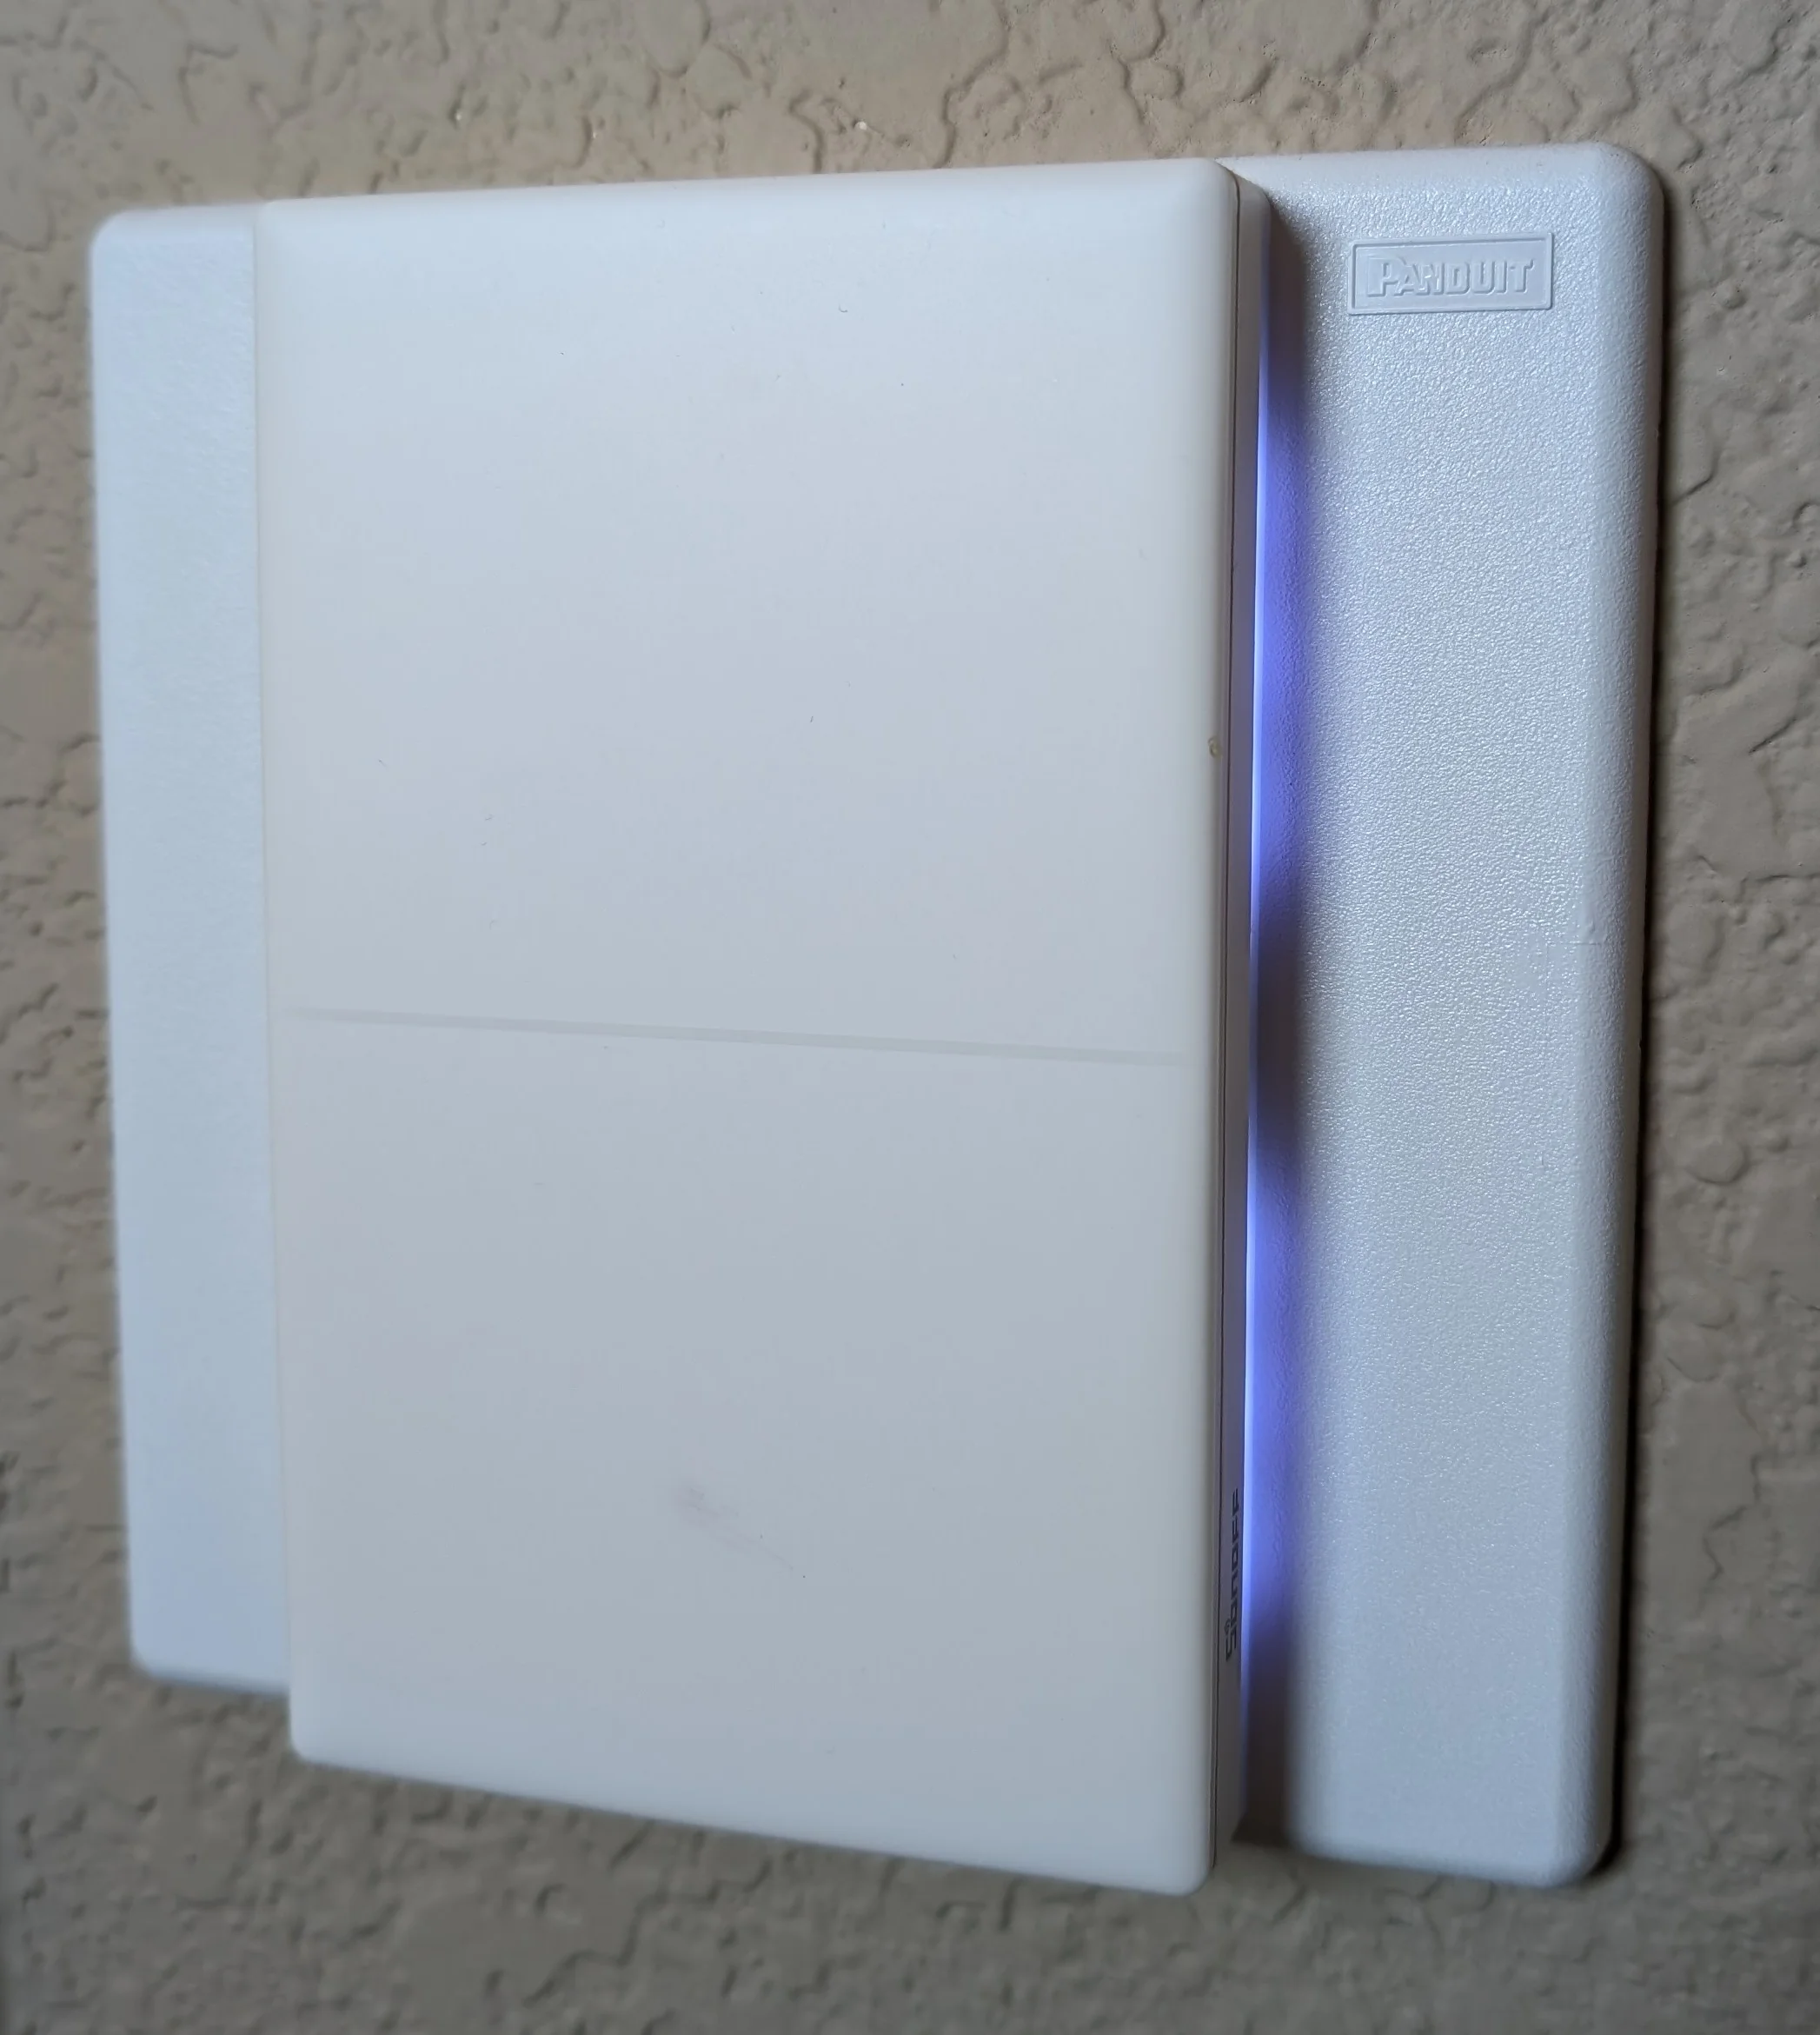
Please ignore the smudge on the bottom half of the switch that I didn't notice until after I took the picture.
This is a huge improvement over the M5 series switches but it comes with a cost: complexity. The T5 comes in 1, 2, 3 and 4 relay variants. Each relay means a set of lights that need to be controlled. Excluding the RGB LEDs on the top/bottom of the switch, this gives us up to 8 partition lights that we need to create in the ESPHome configuration.
ESPHome Configuration
Here’s what the UI looks like for the 1 relay variant.
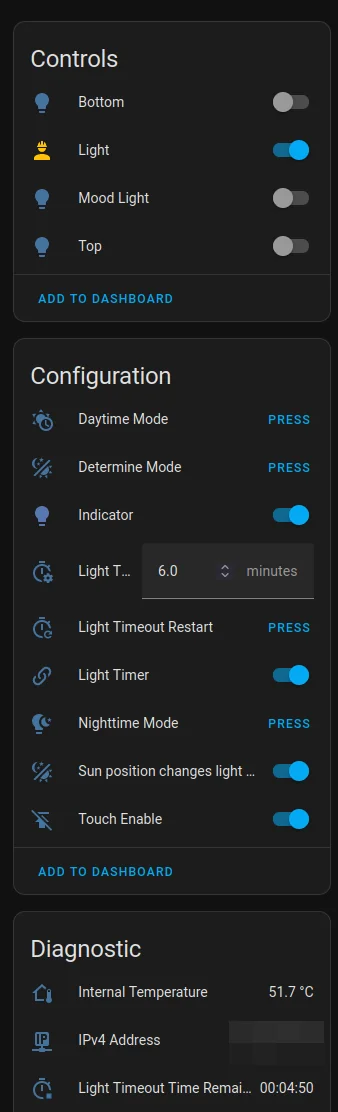
1 Relay variant with timer for light counting down.
For a single switch that has just a single relay, there’s an awful lot going on here as the copious amount of yaml below will demonstrate.
Normally I’d just show the yaml with comments in the relevant sections but there’s a few “features” that I want to detail first before diving into how they are implemented.
Features
Controls:
light.{Bottom,Top}: These are the bottom/top partitions of the RGB LEDs around the perimeter of the switch. I don’t use them for anything in the ESPHome configuration but they are exposed to Home Assistant so that I can use them for other automations and notifications. Think “pulse the top LEDs on the front-door switch when the garage door is open” …light.Mood Light: This is the entire ring of RGB LEDs around the perimeter of the switch. Like the Top/Bottom lights, I don’t use this for anything explicitly in the ESPHome configuration but it is exposed to Home Assistant so that I can use it for other automations and notifications.light.Light: This is the actual light entity that is controlled by the relay.
Configuration:
button.{Daytime,Nighttime} Mode: These act as simple “one touch” buttons that set thelight.Indicatorto a hardcoded color/brightness for a given regime.button.Determine Mode: This is a manual trigger for an otherwise automatic script that determines which regime to use.light.Indicator: This is a “template” light that wraps the set of lights that indicate the state of the relay and touch zone.number.Light Timer: This is a dynamic timer that is used to turn off the light after a given amount of time. A sane default value is chosen but it can be overridden from the Home Assistant UI if needed. Example: normally, keep the bathroom fan on for 30 minutes unless taking a long and luxurious bath, then adjust the timer for 90 minutes.button.Light Timer Restart: Restarts the dynamic timer for the light. Useful for extending the amount of time the light is on if, for example, Home Assistant detects that the room is still occupied.switch.Light Timer: Toggle to control if the dynamic timer should be armed or not.switch.Sun position changes light regime: Toggle to control if the sun position should trigger a change in the regime.switch.Touch Enable: Toggle to control if the touch sensor inputs should be processed or ignored.
Diagnostic:
text.Light Timeout Time Remaining: This is a template text that displays the remaining time on the dynamic timer. Useful for triggering other automations when the timer is about to expire.
Indicator / “Template” Light
Remember that the solution to the “where do I touch to toggle / what’s the current state of the” relay problem is to use the LEDs around the perimeter of the switch. Specifically, cut the LEDs on left and right side into groups and then associate each left/right pair with a relay/touch zone.
This will result in two “lights” for each relay; one for the “on” state and one for the “off” state. I want to hide these lights from Home Assistant as they are just an implementation detail and should not be controlled directly. For each relay, I want only a single “template” light that I can assign color/brightness to and have that automatically propagate to the “on” or “off” partition light as appropriate for the relay’s current state.
This single light is the light.Indicator entity.
ESPHome doesn’t technically have a “template” light but it does have a custom light component that can be used to create a “template” light.
For convenience, the button.{Daytime,Nighttime} Mode entities set the color/brightness of the light.Indicator to a hardcoded value for the given regime.
This is useful for quickly getting each indicator light into a consistent state after some other automation has changed the color/brightness for a subset of indicator lights.
Regimes
I use the word regime and mode interchangeably to refer to a set of color/brightness values for the indicator lights. This is a byproduct of an earlier version of the configuration where I had stricter control over weather or not the partition lights or moodlight should be “in control” of what the RGB LEDs are doing. I’ve since relaxed this requirement and settled on a general “the partition lights are in control until the Moodlight is turned on” policy.
This ultimately stems from how ESPHome tries to make a single string of addressable LEDs behave like multiple independent strings of LEDs. The last “light” to be updated is the one that “wins”, and gets to control the LEDs. If you set an effect like Rainbow on the moodlight and then turn on the partition lights, the partition lights will “win” until the moodlight moves to a new color; then the moodlight will “win” until the partition lights are updated again.
However, when the moodlight is turned off, the partition lights will resume their default regime.
Since each “indicator” light is exposed to Home Assistant, it’s possible to set a unique color for each relay if desired. But without explicitly changing the color/brightness of the indicator lights, two “baked-in” modes are present: daytime, and nighttime.
The color/brightness values for these two modes are declared once in the yaml, so they’re easy to change if your particular deployment calls for different colors.
It just so happened that given the various locations that each switch is deployed a soft blue and red happened to work best for me.
Here’s two pictures of the same switch under the “no-moodlight” regime in both daytime and nighttime mode.
In the first photo, relays 1 and 3 are on, relay 2 is off. In the second photo, relay 1 is off but 2 and 3 are on.

Lightish blue is easy to see / spot in the daytime.
The dark red color looks a lot better at night.
Dynamic Timer
I’ve already covered the basics of how to do this with ESPHome in my “dynamic timers in ESPHome” post. The same technique is used again here but it’s been refined a bit and turned into a proper package which is easier to re-use.
YAML
There are some similarities to the examples provided by SmartHome-yourself in their sonoff-tx-ultimate-for-esphome custom component but I ultimately decided to go in a different direction for most things.
I still use his custom component for the touch sensor but the rest of the configuration is my own.
Below I have provided a complete and working example of the configuration for a 3 relay variant. I specifically chose the 3 relay variant because it’s the most complex; creating a 1 or 2 relay variant is a subset of the 3 relay variant; take what’s below and delete the parts you don’t need.
For this example, I’ve provided a sample garage.yaml file which is a lightly modified version of the configuration I have deployed.
Specifically, I have a combination of lights and a fan wired to the switch so the example demonstrates how to use multiple relays to control multiple different types of devices.
I’ve left comments throughout the files to explain what’s going on and why. Those comments - in addition to the “features” described above - should be enough to get you started with your own configuration.
File structure
For readability and composability, I like to break up my ESPHome configuration into multiple files using the packages pattern.
Here is how I have this example laid out:
❯ tree .
.
├── garage.yaml
└── packages
    ├── base.esphome.yaml
    ├── base.yaml
    ├── buzzer.yaml
    ├── countdown-timer.yaml
    ├── light-automations.yaml
    ├── status_led.yaml
    ├── template_light.h
    ├── touch_disable.yaml
    └── variant.c3.yaml

2 directories, 10 files
Assuming you reproduce this structure, you can compile and flash the example with:
❯ esphome -s version_hash $(git rev-parse --short HEAD) run garage.yamlIf you don’t want to embed the git hash into the build, remove the -s version_hash $(git rev-parse --short HEAD) part and remove the version_hash substitution from packages/base.esphome.yaml.
garage.yaml
# A lightly modified version of a deployed sonoff T5 switch.
# This example demonstrates how to use multiple relays to control multiple different types of devices.
# In this case, two lights and a fan.
# Also demonstrates how to use the timer package to create a countdown timer for the fan.
##
# Build / flash with:
# ❯ esphome -s version_hash $(git rev-parse --short HEAD) run garage.yaml
#
# This build results in a pretty full flash so be careful about adding more features!
#     RAM:   [=         ]  13.0% (used 42704 bytes from 327680 bytes)
#     Flash: [======    ]  61.3% (used 1124229 bytes from 1835008 bytes)
##

substitutions:
  # Upper case used for human facing labels
  variant: "Garage"
  # Lower case is for hostname and machine facing labels
  variant_lc: "garage"

  # For 2023.11
  esphome_area: Garage

  # Each instance of the timer needs a unique id
  # This suffix will be appended to the id of each component to make it unique.
  timer_one_instance_uid: fan

packages:
  common: !include packages/base.yaml

  # 3 relay version
  output: !include
    file: packages/variant.c3.yaml
    vars:
      # Relay 1,3 are wired up to lights
      out_1_state_exp: "current_values.is_on()"
      out_3_state_exp: "current_values.is_on()"
      out_2_state_exp: "state"

  # Want the fan to have an auto-off timer function.
  fan_relay_timeout_automation: !include
    file: packages/countdown-timer.yaml
    vars:
      # Prefix for the UI components
      entity_name: "Fan"
      # Suffix to create unique ids for each component
      # We need substitution to work in THIS file as well not just the included
      instance_uid: "${timer_one_instance_uid}"

      timer_duration_seconds: 3600

      # Pass in which entity / how to control it
      timer_control_entity_id: "out_2"
      # Will get plugged into this expression:
      # call->${timer_control_action_exp}.perform();
      # So values are "turn_on()" or "turn_off()" or "toggle()" depending on
      #  what the the value of id(${timer_control_entity_id}) supports.
      ##
      timer_control_action_exp: "turn_off()"
      # Will get plugged into this expression:
      # if ( ${timer_control_entity_state_exp} )
      # so needs to return a bool. Exact value will depend on the type of entity
      # being controlled. E.G.: ".current_values.is_on()" or ".state"
      timer_control_entity_state_exp: "id(out_2).state"

# Customize what each of the three relays do
light:
  # Relay 1 and 2 are the fan/light combo
  - name: Fan Light
    id: out_1
    platform: binary
    output: relay_1
    icon: "mdi:ceiling-fan-light"
    restore_mode: RESTORE_DEFAULT_OFF

    # When changing between states, we need to update the partition light(s)
    on_turn_on:
      - script.execute:
          id: figure_out_which_partition_to_light
          output_num: 1

    on_turn_off:
      - script.execute:
          id: figure_out_which_partition_to_light
          output_num: 1

  # Main overhead light
  - name: Main Light
    id: out_3
    platform: binary
    output: relay_3
    restore_mode: RESTORE_DEFAULT_OFF

    on_turn_on:
      - script.execute:
          id: figure_out_which_partition_to_light
          output_num: 3

    on_turn_off:
      - script.execute:
          id: figure_out_which_partition_to_light
          output_num: 3

# See: https://esphome.io/components/fan/binary.html
fan:
  - name: Fan
    id: out_2
    platform: binary
    output: relay_2
    icon: "mdi:fan"

    # On boot, fan should be off
    restore_mode: ALWAYS_OFF

    # Wire in the count down timer automation if enabled
    on_turn_on:
      then:
        - script.execute:
            id: figure_out_which_partition_to_light
            output_num: 2
        - if:
            condition:
              # If the countdown timer is enabled
              lambda: "return id(glbl_timeout_armed_${timer_one_instance_uid});"
            then:
              # The light is already on, start counting the seconds.
              # When timer ends, light will be turned off
              - script.execute: _timer_tick_${timer_one_instance_uid}

            else:
              - logger.log:
                  level: DEBUG
                  format: "${timer_one_instance_uid} turned on, countdown timer not armed"

    # This can be called by the natural end of the timer OR manually through any other source.
    on_turn_off:
      then:
        - script.execute:
            id: figure_out_which_partition_to_light
            output_num: 2
        - if:
            condition:
              # If the timer is still running
              lambda: "return id(_timer_tick_${timer_one_instance_uid}).is_running();"
            then:
              - script.execute: on_timer_stop_${timer_one_instance_uid}
              # Don't wait for ESPHome to schedule updating the text sensor to re-draw the HA UI.
              # As soon as the entity is off cancel the timer and update the text sensor
              - lambda: "id(s_txt_timeout_remaining_${timer_one_instance_uid}).update();"

            else:
              - logger.log:
                  level: DEBUG
                  format: "${timer_one_instance_uid} turned off, countdown timer not armed"

##
# Don't abstract the touch handling away behind a variant specific file.
# Allow for customizing what happens for a given touch event/location on a per-device basis.
##
tx_ultimate_touch:
  id: tx_touch
  uart: uart_touch

  on_press:
    # Let the user know we've registered the touch
    - script.execute: buzz_default
    # Like "traditional" switches, we act as soon as pressed and do not wait for "release"
    # Unless user has disabled touch input processing
    - lambda: >
        ESP_LOGD("tx_ultimate_touch.on_press", "Touch Position: %d / State: %d", touch.x, touch.state);

        if (!id(glbl_sw_touch_enable)) {
          ESP_LOGD("tx_ultimate_touch.on_press", "Touch is disabled, ignoring");
          return;
        }

        // 3 ch version means we split the touch surface into 3 equal size zones
        // 0-3, 4-7, 8-11
        // There's nothing stopping you from creating unequal sized zones if desired!
        /////////////////////////////////
        // The if/else pattern is extended or shortened depending on the number of relays
        // In addition to modifying the if/else pattern, you'll need to update the code that
        //    checks the state of each output.
        // Below, out_1 and out_3 are lights so current_values.is_on() is used instead of just .state
        //    which works for binary fan / out_2.
        // I wish ESPHome would have a more homogenous API for this since there IS a homogenous
        //  API for calling the turn_on/turn_off methods!
        /////////////////////////////////

        if (touch.x <= 3) {
          ESP_LOGD("tx_ultimate_touch.on_press", "Toggle 1");
          if(id(out_1).current_values.is_on() ) {
            id(out_1).turn_off().perform();
          } else {
            id(out_1).turn_on().perform();
          }
        } else if (touch.x <= 7) {
          ESP_LOGD("tx_ultimate_touch.on_press", "Toggle 2");
          if(id(out_2).state ) {
            id(out_2).turn_off().perform();
          } else {
            id(out_2).turn_on().perform();
          }
        } else {
          ESP_LOGD("tx_ultimate_touch.on_press", "Toggle 3");
          if(id(out_3).current_values.is_on() ) {
            id(out_3).turn_off().perform();
          } else {
            id(out_3).turn_on().perform();
          }
        }
packages/base.esphome.yaml
esphome:
  name: ${hostname}
  friendly_name: ${friendly_name}
  comment: "Controls ${friendly_name}"
  area: ${esphome_area}

  build_path: ../../build-root/${hostname}

  # The device name / hostname is unique enough
  name_add_mac_suffix: false

  project:
    name: "t5.${variant_lc}"
    version: "1.0.${version_hash}"

  includes:
    - packages/template_light.h

  # Shortly after booting up, refresh the partition lights to make sure the right
  # colors are used.
  # Might be useful in day-to-day use, but is _very_ useful when testing late at night and
  #   after flashing new build and the lights come on full blast/white!
  on_boot:
    # The higher the number, the earlier in the boot process it runs
    # We do need to wait for NTP to get a fix, though.
    # With that, we can properly figure out which light mode to use
    priority: -200
    then:
      - button.press: button_determine_mode

# Throttle writing parameters to the internal flash memory to reduce ESP memory wear / degradation
preferences:
  flash_write_interval: 15min

esp32:
  # There is no platform.io board preset so we go with a generic one
  board: esp32dev

# Enable logging
logger:
  #  hardware_uart: UART2
  level: INFO
  logs:
    binary_sensor: INFO
    script: INFO

    # I don't need to see wifi strength, internal temp and other sensor updates spamming logs
    text_sensor: INFO
    sensor: INFO

    # Also don't need to get log span every time I toggle main relays
    switch: INFO
    mqtt.fan: INFO
    fan: INFO
    light: INFO

    # DEBUG is very helpful for mapping position to numbers but it's a lot of spam otherwise
    tx_ultimate_touch: INFO
    uart_debug: INFO
    ledc.output: INFO

# Note: the content of these includes is not shown in this example as the values are unique to my setup
# The name of the package matches the name of the component set up in the package so you can substitute
#   your own values as needed. E.G.: you'd set up your own MQTT connection and remove the one I have here.
packages:
  time: !include ../../../packages/ntp/home.yaml
  mqtt: !include ../../../packages/mqtt/home.yaml
  ota: !include ../../../packages/ota/home.yaml
  web_server: !include ../../../packages/web_server.yaml
  wifi: !include ../../../packages/wifi/home.yaml
  friendly_uptime: !include ../../../packages/sensor/friendly_uptime.yaml

  # Enable IPv6 support
  # Note, seems like dual-stack isn't well supported w/ the IP address text sensor
  # See: https://github.com/esphome/issues/issues/5126
  ##
  ipv6: !include ../../../packages/network/ipv6.yaml

text_sensor:
  # See above GH issue
  - <<: !include ../../../packages/sensor/ip_addr.wifi.yaml

button:
  # Allow restarting via HA UI
  - !include ../../../packages/button/restart.external.config.yaml
  - !include ../../../packages/button/safemode.external.config.yaml

sensor:
  # Misc diagnostic sensors
  - <<: !include ../../../packages/sensor/esp32_internal_temp.yaml
  - <<: !include ../../../packages/sensor/wifi_signal_strength.config.yaml

binary_sensor:
  - <<: !include ../../../packages/binary_sensor/connection_status.config.yaml
packages/base.yaml
##
# Base configuration for the Sonoff T5 switches
# See: https://templates.blakadder.com/sonoff_T5-1C-86
# See: https://github.com/SmartHome-yourself/sonoff-tx-ultimate-for-esphome
##
substitutions:
  # Displayed in HA frontend
  friendly_name: "${variant} Switch"
  friendly_name_short: "${variant}"
  hostname: "${variant_lc}-switch"
  version_hash: "not_set"

external_components:
  - source:
      type: git
      url: https://github.com/SmartHome-yourself/sonoff-tx-ultimate-for-esphome
      ref: main
    components:
      - tx_ultimate_touch

# See: https://esphome.io/guides/configuration-types.html#packages
packages:
  # Common configuration used in virtually every device on my network
  esphome: !include base.esphome.yaml

  # Device specific
  status_led: !include status_led.yaml

  # Automatic day/night regime for partitioned LEDs
  day_night_mode: !include light-automations.yaml

  # Buzzer motor
  buzzer: !include buzzer.yaml

  # Global "ignore touch" switch
  touch_disable: !include touch_disable.yaml

# regardless of which variant, we have some common configurations for LED lights
light:
  # Expose all LEDs as a single lamp
  - name: "Mood Light"
    platform: neopixelbus
    id: leds_all
    type: GRB
    variant: WS2811
    pin: GPIO13
    num_leds: 32
    # Gently fade between states
    default_transition_length: 1.5s
    # The mood light is meant for subtle indications so we don't really overdo it here
    effects:
      - addressable_rainbow:
          name: "Rainbow"
          speed: 30
          width: 8
      - pulse:
          name: "Pulse"
          transition_length: 1.4s
          update_interval: 1s

    # When the mood light is turned off, will need to restore the last state to the side/indicator leds
    on_turn_off:
      then:
        - script.execute:
            id: resume_normal_regime_for_leds

  # Leave the lights on the side for relay/switch state indication.
  # Use the top/bottom of the switch for general indication purposes.
  # Note that ALL the leds are on the same bus so ESPHome is doing
  #   a lot of internal processing / merging to generate the "final" stream
  #   of data to send to the LEDs. Complicated / quick moving effects don't
  #   look awesome here so we keep it simple, subtle and slow.
  ##
  - name: "Top"
    platform: partition
    id: leds_sw_top
    segments:
      - id: leds_all
        from: 25
        to: 30

    effects:
      - addressable_scan:
          name: "Scan"
      - addressable_rainbow:
          name: "Rainbow"
          speed: 10
          width: 20

  - name: "Bottom"
    platform: partition
    id: leds_sw_bottom
    segments:
      - id: leds_all
        from: 9
        to: 14

    effects:
      - addressable_scan:
          name: "Scan"
      - addressable_rainbow:
          name: "Rainbow"
          speed: 10
          width: 20

# Interact with the touch panel
uart:
  tx_pin: GPIO19
  rx_pin: GPIO22
  id: uart_touch
  baud_rate: 115200
  data_bits: 8
  stop_bits: 1
  parity: NONE
  debug:
    direction: RX
    dummy_receiver: false
    after:
      timeout: 2s
      bytes: 2048

    # Debug raw packets from the touch panel
    sequence:
      - lambda: UARTDebug::log_hex(direction, bytes, ' ');

switch:
  # I tried to make this a switch that I could toggle from HA.
  # The hope was that It would function as a quick way to disable all touch inputs.
  # I was able to reliably trigger a crash when the switch was toggled.
  # Leaving this as an internal switch that can't be controlled from HA to avoid the crash and using
  #   a template switch to disable touch inputs instead.
  ##
  # TODO: if I can't really control this, just make it a GPIO output?
  # See: https://esphome.io/components/output/gpio.html
  ##
  - name: "touch panel power"
    platform: gpio
    pin:
      number: GPIO5
      inverted: true
    id: touch_power
    internal: true
    restore_mode: RESTORE_DEFAULT_ON
packages/buzzer.yaml
# There is a very small motor w/ an offset weight that vibrates the switch.
# Rather than basic binary control we can use PWM for more interesting patterns.
##
output:
  - platform: ledc
    pin: GPIO21
    id: out_buzzer

script:
  # Standard "click"
  - id: buzz_default
    mode: single
    then:
      # Enable output
      - output.turn_on: out_buzzer
      - output.ledc.set_frequency:
          id: out_buzzer
          frequency: "1000Hz"
      - output.set_level:
          id: out_buzzer
          level: "30%"
      - delay: 20ms
      - output.set_level:
          id: out_buzzer
          level: "90%"
      - delay: 30ms
      - output.turn_off: out_buzzer
packages/countdown-timer.yaml
# Common bits for GPIO based timer

globals:
  # For the auto-off automation
  - id: glbl_timeout_armed_${instance_uid}
    type: bool
    restore_value: yes
    initial_value: "true"

  - id: glbl_timeout_length_ticks_${instance_uid}
    type: int
    restore_value: yes
    initial_value: "${timer_duration_seconds}"

  # We ALSO need to keep track of the number of 'ticks' that have passed
  - id: _glbl_timeout_ticks_${instance_uid}
    type: int
    restore_value: no
    initial_value: "0"

# This particular implementation intentionally does not restart the timer when the time is running
#   and changed. If the timer is running but the user changes the duration, the timer will keep
#   counting ticks until it expires. Restarting the timer via HA is possible by either toggling the enabled
#   switch or setting the time to 0, waiting 1 second for ESPHome to figure out that the timer has expires
#   and then setting the time back / turning on the $thing.
# Not elegant so we provide this helper button to clear out the elapsed time and start the timer over.
# This can be more useful than the above method if the timer is running and the user wants to "add" more time.
# E.G.: Home Assistant can detect that $room is still occupied but that the timer is about to expire and can just
#   press the button so the light does not go off while the room is still occupied instead of having to guess
#   about what the user wants and just extending the timer by some arbitrary amount.
##
button:
  - name: "${entity_name} Timeout Restart"
    id: btn_restart_timer_${instance_uid}
    platform: template
    icon: "mdi:timer-refresh-outline"
    entity_category: "config"
    on_press:
      # Just set the elapsed ticks to 0 and start the _tick script
      - globals.set:
          id: _glbl_timeout_ticks_${instance_uid}
          value: "0"
      - script.execute: _timer_tick_${instance_uid}

# And a way to disable the timer
switch:
  # Another arm/disarm toggle for the "auto off" timer
  - name: "${entity_name} Timer"
    platform: template
    id: sw_timeout_arm_${instance_uid}
    device_class: "switch"
    icon: "mdi:link-variant"
    entity_category: "config"

    # Default to on unless user says no.
    restore_mode: RESTORE_DEFAULT_ON

    # Lambda to figure out the current state/value
    lambda: |-
      if (id(glbl_timeout_armed_${instance_uid})) {
        return true;
      } else {
        return false;
      }

    turn_on_action:
      then:
        # If the $thing is already on, start counting down
        - lambda: |-
            // Indicate that the timer _should_ be set, though
            id(glbl_timeout_armed_${instance_uid}) = true;

            auto TAG = "template.Timeout Automation.turn_on_action";
            if ( ${timer_control_entity_state_exp} ) {
              ESP_LOGD(TAG, "Timeout Automation ARMED with '${timer_control_entity_id}'' already on... starting timer!");
              id(_timer_tick_${instance_uid}).execute();
            } else {
              ESP_LOGD(TAG, "Timeout Automation ARMED with '${timer_control_entity_id}'' NOT on... nothing to do!");
            }
            // Don't wait for ESPHome to schedule updating the text sensor to re-draw the HA ui
            id(s_txt_timeout_remaining_${instance_uid}).update();

    turn_off_action:
      then:
        # If the light is still on when the timeout timer is engaged then we stop the timer and clean up.
        # The light will just stay on until something else turns it off
        ##
        - lambda: |-
            // Set the global to OFF, it will be checked next time the _tick fires
            id(glbl_timeout_armed_${instance_uid}) = false;
            id(on_timer_stop_${instance_uid}).execute();
            // Don't wait for ESPHome to schedule updating the text sensor to re-draw the HA ui
            id(s_txt_timeout_remaining_${instance_uid}).update();

# Expose a control to HA so we can adjust timer length
# See: https://esphome.io/components/number/template.html
##
number:
  - name: "${entity_name} Timeout Length"
    id: num_timeout_length_${instance_uid}
    platform: template
    icon: "mdi:timer-cog-outline"
    entity_category: "config"
    unit_of_measurement: minutes
    # Internally, we do everything in seconds but I can't really see the value in
    #   allowing the user to set precise values in seconds. Do you really need a
    #   timer for 170 seconds or can we just do 3 minutes and call it good?
    # To Home Assistant, we'll expose a number input that allows the user to set
    #   the number of whole minutes. A slider _can_ work but when the MAX value
    #   is quite a ways from the min and typical, the slider is not very useful and
    #   direct numeric input becomes a bit more appropriate even if the UX is bad
    #   on mobile.
    ##
    mode: box
    # At least one minute and no more than 6 hours
    min_value: 1
    max_value: 360
    step: 1

    lambda: |-
      // HA expects value in minutes, we do everything in seconds so convert
      return (int) id(glbl_timeout_length_ticks_${instance_uid})/60;

    set_action:
      then:
        # Store the val
        - globals.set:
            id: glbl_timeout_length_ticks_${instance_uid}
            value: !lambda |-
              return (int) x*60;
        # And update the text sensor so HA displays the new value
        - lambda: "id(s_txt_timeout_remaining_${instance_uid}).update();"

# And while counting down, show the time remaining to HA
text_sensor:
  - name: "${entity_name} Timeout Time Remaining"
    id: s_txt_timeout_remaining_${instance_uid}
    platform: template
    icon: "mdi:timer-stop-outline"
    entity_category: "diagnostic"
    # If i set this to 10s, then every 10s we need to get on WiFi and talk to MQTT... even if the value hasn't changed
    # If i set this to the esphome default of 60s, the timer does not update often in the UI which leads to ... poor experience.
    # The solution is to manually update it when appropriate.
    ##
    update_interval: never
    lambda: |
      auto TAG="textSensor.lambda.${instance_uid}";
      //Assuming 3 digits for hours, min, seconds _and_ three colons + 2 char extra
      char buff[15];
      int hr, min, sec;
      hr = min = sec = 0;

      int _remaining_sec = id(glbl_timeout_length_ticks_${instance_uid}) - id(_glbl_timeout_ticks_${instance_uid});

      // Sanity checks
      if(_remaining_sec < 0) {
        ESP_LOGE(TAG, "negative time remaining error! _remaining_sec: %d", _remaining_sec);
        return {"negative time remaining error"};
      }
      if(! id(glbl_timeout_armed_${instance_uid})) {
        return {"Disarmed"};
      }

      ESP_LOGD(TAG, "_remaining_sec: %d", _remaining_sec);

      hr = _remaining_sec/3600;
      min = (_remaining_sec % 3600) / 60;
      sec = _remaining_sec % 60;

      ESP_LOGD(TAG, "hr: %d, min: %d, sec: %d", hr, min, sec);

      snprintf(buff, 15, "%02d:%02d:%02d", hr, min, sec);
      ESP_LOGD(TAG, "buff: %s", buff);
      return to_string(buff);

script:
  # End meaning the natural conclusion of the timer. Do whatever we're supposed to do when the timer fires off
  - id: on_timer_end_${instance_uid}
    mode: single
    then:
      - lambda: |-
          auto call = id(${timer_control_entity_id});
          call->${timer_control_action_exp}.perform();
          ESP_LOGI("script.on_timer_end_${instance_uid}", "output should be ${timer_control_action_exp}!");

    # Stop meaning the pre-mature ending of the timer
  - id: on_timer_stop_${instance_uid}
    # Do not start a new run. Issue a warning.
    mode: single
    then:
      - lambda: |-
          auto TAG = "lambda.on_timer_stop_${instance_uid}";

          // For now, we just clean up the _timer_tick_${instance_uid} stuff.
          // I could use this opportunity to do other things like turn the light off when the timer is stopped...

          id(_timer_tick_${instance_uid}).stop();
          id(_glbl_timeout_ticks_${instance_uid}) = 0;
          ESP_LOGD(TAG, "_timer_tick_${instance_uid} now stopped and _glbl_timeout_ticks_${instance_uid} is %d", id(_glbl_timeout_ticks_${instance_uid}));

  - id: _timer_tick_${instance_uid}
    # Start a new run after previous runs completes. This will happen until timer.stop() is called on us
    ##
    mode: queued
    then:
      # A single 'tick' is 1 second long
      - delay: 1s
      - lambda: |-
          auto TAG = "timer_tick.${instance_uid}";

          // First, update the number of ticks
          id(_glbl_timeout_ticks_${instance_uid}) += 1;

          // Then update the text sensor showing the time remaining; do this every 10 ticks
          // We also update on the FIRST tick so the user has immediate confirmation that we're counting down
          if( id(_glbl_timeout_ticks_${instance_uid}) % 10 == 0 || id(_glbl_timeout_ticks_${instance_uid}) == 1) {
            id(s_txt_timeout_remaining_${instance_uid}).update();
          }

          // Then check if we have timed out
          if (id(_glbl_timeout_ticks_${instance_uid}) >= id(glbl_timeout_length_ticks_${instance_uid}) ) {

            // If we have timed out, run the script to handle the timer expiration
            // It's cleaner to call out to a script rather than put all the "what no?" code in here!
            id(on_timer_end_${instance_uid}).execute();

            ESP_LOGD(TAG, "_glbl_timeout_ticks_${instance_uid} is >= glbl_timeout_length_ticks  %d >= %d ", id(_glbl_timeout_ticks_${instance_uid}), id(glbl_timeout_length_ticks_${instance_uid}) );

            // And then re-set the internal counter
            id(_glbl_timeout_ticks_${instance_uid}) = 0;

            // And finally, stop the ticking timer
            id(_timer_tick_${instance_uid}).stop();
            ESP_LOGD(TAG, "_timer_tick_${instance_uid} now stopped!");

          } else {

            ESP_LOGD(TAG, "_glbl_timeout_ticks_${instance_uid} is < glbl_timeout_length_ticks  %d < %d ", id(_glbl_timeout_ticks_${instance_uid}), id(glbl_timeout_length_ticks_${instance_uid}) );

            // make sure we run again.. unless we're not supposed to
            if( id(glbl_timeout_armed_${instance_uid}) ) {
              id(_timer_tick_${instance_uid}).execute();
            }

          }
packages/light-automations.yaml
---
# Create two buttons to trigger night/day mode immediately and expose them to HA for easy automation.
# Also offer up a template switch + global to control weather or not the sun triggers transition between modes.
##

substitutions:
  # Found after some trial/error.
  # In dark room, make light.turn_on calls in HA dev tools, dialing the brightness down as much as possible
  # until lights no longer turned on and the general color/brightness was what I wanted for the room.
  ##
  # nt = night time
  nt_exp_red: 255/255.0;
  nt_exp_green: 110/255.0;
  nt_exp_blue: 84/255.0;
  nt_exp_bright: 28/255.0;
  # dt = day time
  dt_exp_red: 127/255.0;
  dt_exp_green: 172/255.0;
  dt_exp_blue: 255/255.0;
  dt_exp_bright: 100/255.0;

globals:
  - id: glbl_automation_sun_position_triggers_light_modes
    type: bool
    # Store to flash on change; not expected to change often
    restore_value: yes
    initial_value: "true"

  - id: glbl_normal_regime_mode_is_nighttime
    type: bool
    # On boot, assume it is not night time
    restore_value: yes
    initial_value: "false"

script:
  # Note that this only figures out WHICH mode we should be in, it does not actually change any light colors.
  - id: figure_out_normal_regime_mode
    mode: single
    # So simple we don't need a lambda :D
    then:
      - if:
          condition:
            - sun.is_above_horizon:
          then:
            - logger.log: Sun is above horizon!
            - globals.set:
                id: glbl_normal_regime_mode_is_nighttime
                value: "false"
          else:
            - logger.log: Sun is below horizon!
            - globals.set:
                id: glbl_normal_regime_mode_is_nighttime
                value: "true"

button:
  - name: "Daytime Mode"
    platform: template
    id: button_daytime_mode
    icon: "mdi:sun-clock"
    entity_category: "config"
    on_press:
      - script.execute: do_daytime_mode_active
      - globals.set:
          id: glbl_normal_regime_mode_is_nighttime
          value: "false"

  - name: "Nighttime Mode"
    platform: template
    id: button_nighttime_mode
    icon: "mdi:lightbulb-night"
    entity_category: "config"
    on_press:
      - script.execute: do_nighttime_mode_active
      - globals.set:
          id: glbl_normal_regime_mode_is_nighttime
          value: "true"

  # A helper button to trigger the "reset lights to normal regime/color" script
  - name: "Determine Mode"
    platform: template
    id: button_determine_mode
    icon: "mdi:theme-light-dark"
    entity_category: "config"
    on_press:
      # Consult the sun position to figure out which mode we should be in
      # Day/Night will be stored in `glbl_normal_regime_mode_is_nighttime`
      - script.execute: figure_out_normal_regime_mode

      # Based on what's stored in the global, set the template lights to the correct colors
      # And then refresh the partition lights
      - lambda: |-
          if ( id(glbl_normal_regime_mode_is_nighttime) ) {
            id(do_nighttime_mode_active).execute();
          } else {
            id(do_daytime_mode_active).execute();
          }
          id(resume_normal_regime_for_leds).execute();

# Switch to control different bits of functionality
switch:
  - name: "Sun position changes light modes"
    platform: template
    id: sw_sun_position_triggers_light_modes
    icon: "mdi:theme-light-dark"
    # By default, we want the automation enabled.
    restore_mode: RESTORE_DEFAULT_ON

    entity_category: config
    device_class: switch

    lambda: |-
      if (id(glbl_automation_sun_position_triggers_light_modes)) {
        return true;
      } else {
        return false;
      }
    turn_on_action:
      then:
        - lambda: |-
            id(glbl_automation_sun_position_triggers_light_modes) = true;

    turn_off_action:
      then:
        - lambda: |-
            id(glbl_automation_sun_position_triggers_light_modes) = false;

# See: https://esphome.io/components/sun.html
sun:
  id: sun_position
  latitude: !secret home_latitude_deg
  longitude: !secret home_longitude_deg

  # When the sun is up, we assume ambient brightness is sufficient to show the user where the buttons are
  on_sunrise:
    # Delays us a bit after true sun rise.
    - elevation: 5°
      then:
        - if:
            condition:
              lambda: "return id(glbl_automation_sun_position_triggers_light_modes);"
            then:
              - button.press: button_daytime_mode
            else:
              - logger.log: "Sunrise, but automation disabled."

  # When the sun sets, though, we want the LEDS to come on at about 50% brightness. They can then be seen in a dim
  #   room. When the relay is activated, the led will be on FULL which is distinct from the background 50% brightness
  ##
  on_sunset:
    # Trigger a bit before the sun actually sets
    - elevation: 5°
      then:
        - if:
            condition:
              lambda: "return id(glbl_automation_sun_position_triggers_light_modes);"
            then:
              - button.press: button_nighttime_mode
            else:
              - logger.log: "Sunset, but automation disabled."
packages/status_led.yaml
# I can't find a ton of evidence that there actually IS a status LED on the T5... but it costs nothing to include this.
# See: https://github.com/SmartHome-yourself/sonoff-tx-ultimate-for-esphome/blob/main/tx_ultimate_local.yaml#L53
##
status_led:
  pin:
    number: GPIO33
    inverted: True
packages/template_light.h
#include "esphome.h"

/*
  ESPHome does not have a template light component but it does have "custom" light component.
  As it turns out, the backbones example that they provide for setting up a custom light component
    is exactly what I need to do. Love it when stuff works out that way :D!

  Essentially, I have two partition lights that I want to present to Home Assistant as a single light.
  Which partition light is active depends on the state of relay / switched output.
  This "template" entity just needs to "store" the color/brightness assigned by the user / HA.
  When appropriate, we'll consult the stored values and forward them to the appropriate partition light.

*/
class TemplateLight : public Component, public LightOutput
{
public:
  void setup() override
  {
    ESP_LOGCONFIG("TemplateLight", "Nothing to do for setup...");
  }
  LightTraits get_traits() override
  {
    auto traits = LightTraits();
    traits.set_supported_color_modes({ColorMode::RGB});
    return traits;
  }

  // Called when there's a new state to write out to hardware.
  // The whole point of this Light is that there IS no hardware to drive so we do nothing
  void write_state(LightState *state) override
  {
    // TODO: I might need to implement the minimum brightness here
    // Implementation here might be useful: https://esphome.io/api/float__output_8cpp_source#l00016
    // See: https://github.com/esphome/feature-requests/issues/920
    // float red, green, blue;
    // state->current_values_as_rgb(&red, &green, &blue);
    // ESP_LOGD("TemplateLight", "Color is. R: %f, G: %f, B: %f.", red, green, blue);
  }
};
packages/touch_disable.yaml
# For reasons that I don't understand, toggling the GPIO that powers the touch panel causes a crash.
# I would have preferred using that to lock out touch inputs but this plan-B works well enough.
# This is useful for "guest" or "cleaning" mode when you don't want the touch panel to do anything.
##
globals:
  - id: glbl_sw_touch_enable
    type: bool

    restore_value: no
    initial_value: "true"

switch:
  - name: "Touch Enable"
    platform: template
    id: sw_sw_touch_disable
    icon: "mdi:publish-off"
    entity_category: config
    device_class: switch
    # If something goes wrong, a reboot should re-enable touch
    restore_mode: ALWAYS_ON
    lambda: |-
      if (id(glbl_sw_touch_enable)) {
        return true;
      } else {
        return false;
      }
    turn_on_action:
      then:
        - lambda: |-
            id(glbl_sw_touch_enable) = true;
    turn_off_action:
      then:
        - lambda: |-
            id(glbl_sw_touch_enable) = false;
packages/variant.c3.yaml
# Each variant has a slightly different set of template lights to turn on/off for day/night mode.
# The c2 and c1 versions of this file are mostly identical except for:
#     - the number of the template lights; the C1 variant only has a left/right partition light instead of 2 or three
#         left/right partition lights as would be present on the C2 or C3 variants.
#     - the specific led numbers used in each partition are different; all variants have 10 LEDs on each side but
#         those 10 total must be broken up into 1,2,3 partitions based on the variant.
#     - the number of outputs; the C1 variant only has 1 outputs instead of 2 or 3
#
# Each variant file must define/implement the same scripts though.
# WHAT each script does is slightly different per variant. The C1 variant of `do_nighttime_mode_active` only
#   adjusts `template_light_1` since there is no template_light_2 or template_light_3 on the C1 variant.
#
# Likewise, the C2 variant of `figure_out_which_partition_to_light` only has case 1 and case 2 defined since
#   there is no `leds_button_3_right` or `leds_button_3_left` on the C2 variant.
##
script:
  - id: do_nighttime_mode_active
    then:
      - lambda: |-
          ESP_LOGD("script.do_nighttime_mode_active", "Nighttime mode activated...");

          float red = ${nt_exp_red};
          float green = ${nt_exp_green};
          float blue = ${nt_exp_blue};
          float bright = ${nt_exp_bright};

          ESP_LOGD("script.do_nighttime_mode_active", "Setting TEMPLATE(s) => R: %f G: %f B: %f BR: %f", red, green, blue, bright);
          id(template_light_1).turn_on().set_rgb( red, green, blue ).set_brightness(bright).set_transition_length(0).perform();
          id(template_light_2).turn_on().set_rgb( red, green, blue ).set_brightness(bright).set_transition_length(0).perform();
          id(template_light_3).turn_on().set_rgb( red, green, blue ).set_brightness(bright).set_transition_length(0).perform();

  - id: do_daytime_mode_active
    then:
      - lambda: |-
          ESP_LOGD("script.do_daytime_mode_active", "Daytime mode activated...");

          float red = ${dt_exp_red};
          float green = ${dt_exp_green};
          float blue = ${dt_exp_blue};
          float bright = ${dt_exp_bright};

          ESP_LOGD("script.do_daytime_mode_active", "Setting TEMPLATE(s) => R: %f G: %f B: %f BR: %f", red, green, blue, bright);
          id(template_light_1).turn_on().set_rgb( red, green, blue ).set_brightness(bright).set_transition_length(0).perform();
          id(template_light_2).turn_on().set_rgb( red, green, blue ).set_brightness(bright).set_transition_length(0).perform();
          id(template_light_3).turn_on().set_rgb( red, green, blue ).set_brightness(bright).set_transition_length(0).perform();

  - id: figure_out_which_partition_to_light
    mode: single
    parameters:
      output_num: int
    then:
      - lambda: |-
          auto TAG = "script.figure_out_which_partition_to_light";
          // We don't know WHICH partition light to pull RGB/BR from, but regardless we do need place to store....
          float red, green, blue, br;

          ESP_LOGD(TAG, "Trigger was output %d", output_num);
          switch (output_num) {
            case 1:
                // Output 1 is top button, so we want to light the top partition
                id(template_light_1).current_values_as_rgb(&red, &green, &blue);
                id(template_light_1).current_values_as_brightness(&br);
                ESP_LOGD(TAG, "Light State => R: %f, G: %f, B: %f BR: %f", red, green, blue, br);

                // Will be either just .state for entities that have bool on/off properties or something like
                //  .current_values.is_on() for entities that don't.
                if(id(out_1).${out_1_state_exp}) {
                  ESP_LOGD(TAG, "out_1: ON, setting left side ON");
                  id(leds_button_1_left).turn_on().set_rgb( red, green, blue ).set_brightness(br).set_transition_length(0).perform();
                  id(leds_button_1_right).turn_off().set_rgb( red, green, blue ).set_brightness(br).set_transition_length(0).perform();
                } else {
                  ESP_LOGD(TAG, "out_1: OFF, setting right side ON");
                  id(leds_button_1_left).turn_off().set_rgb( red, green, blue ).set_brightness(br).set_transition_length(0).perform();
                  id(leds_button_1_right).turn_on().set_rgb( red, green, blue ).set_brightness(br).set_transition_length(0).perform();
                }
                break;
            case 2:
                // Output 2 is middle button, so we want to light the second partition
                id(template_light_2).current_values_as_rgb(&red, &green, &blue);
                id(template_light_2).current_values_as_brightness(&br);
                ESP_LOGD(TAG, "Light State => R: %f, G: %f, B: %f BR: %f", red, green, blue, br);

                // The C++ code we call changes based on which type of output out_2 is
                if(id(out_2).${out_2_state_exp}) {
                  ESP_LOGD(TAG, "out_2: ON, setting left side ON");
                  id(leds_button_2_left).turn_on().set_rgb( red, green, blue ).set_brightness(br).set_transition_length(0).perform();
                  id(leds_button_2_right).turn_off().set_rgb( red, green, blue ).set_brightness(br).set_transition_length(0).perform();
                } else {
                  ESP_LOGD(TAG, "out_2: OFF, setting right side ON");
                  id(leds_button_2_left).turn_off().set_rgb( red, green, blue ).set_brightness(br).set_transition_length(0).perform();
                  id(leds_button_2_right).turn_on().set_rgb( red, green, blue ).set_brightness(br).set_transition_length(0).perform();
                }
                break;
            case 3:
                // Output 3 is bottom button, so we want to light the third partition
                id(template_light_3).current_values_as_rgb(&red, &green, &blue);
                id(template_light_3).current_values_as_brightness(&br);
                ESP_LOGD(TAG, "Light State => R: %f, G: %f, B: %f BR: %f", red, green, blue, br);

                if(id(out_3).${out_3_state_exp}) {
                  ESP_LOGD(TAG, "out_3: ON, setting left side ON");
                  id(leds_button_3_left).turn_on().set_rgb( red, green, blue ).set_brightness(br).set_transition_length(0).perform();
                  id(leds_button_3_right).turn_off().set_rgb( red, green, blue ).set_brightness(br).set_transition_length(0).perform();
                } else {
                  ESP_LOGD(TAG, "out_3: OFF, setting right side ON");
                  id(leds_button_3_left).turn_off().set_rgb( red, green, blue ).set_brightness(br).set_transition_length(0).perform();
                  id(leds_button_3_right).turn_on().set_rgb( red, green, blue ).set_brightness(br).set_transition_length(0).perform();
                }
                break;
              default:
                ESP_LOGE(TAG, "Unknown output number: %d", output_num);
                return;
            }

  # Called on boot or any time we're transitioning from mood-light to a "normal" mode
  - id: resume_normal_regime_for_leds
    mode: single
    # When resuming normal regime, figure out which color scheme we should be using and then run the "figure out which partition to light" script for each output
    then:
      - script.execute:
          id: figure_out_normal_regime_mode
      - script.execute:
          id: figure_out_which_partition_to_light
          output_num: 1
      - script.execute:
          id: figure_out_which_partition_to_light
          output_num: 2
      - script.execute:
          id: figure_out_which_partition_to_light
          output_num: 3

##
# See the LEDs section of readme.md
# There are 10 LEDs on each side, we have 3 groups which means we'll need 4 "buffers"
# 10 - 4 = 6 and 6/3 is 2 so we'll use 2 leds per partition
##
light:
  - name: "Button TOP Left (internal)"
    platform: partition
    id: leds_button_1_left
    internal: true
    segments:
      - id: leds_all
        from: 22
        to: 23

  - name: "Button TOP Right (internal)"
    platform: partition
    id: leds_button_1_right
    internal: true
    segments:
      - id: leds_all
        from: 0
        to: 1

  - name: "Button MIDDLE Left (internal)"
    platform: partition
    id: leds_button_2_left
    internal: true
    segments:
      - id: leds_all
        from: 19
        to: 20

  - name: "Button MIDDLE Right (internal)"
    platform: partition
    id: leds_button_2_right
    internal: true
    segments:
      - id: leds_all
        from: 3
        to: 4

  - name: "Button BOTTOM Left (internal)"
    platform: partition
    id: leds_button_3_left
    internal: true
    segments:
      - id: leds_all
        from: 16
        to: 17

  - name: "Button BOTTOM Right (internal)"
    platform: partition
    id: leds_button_3_right
    internal: true
    segments:
      - id: leds_all
        from: 6
        to: 7

  # Expose a "template" light entity to HA.
  # Use this to "wrap" the partition lights and pass through values to them.
  # See readme.md for more info
  - platform: custom
    lambda: |-
      // Sign of life
      ESP_LOGD("light.template_light", "Alive!");

      auto template_light_1 = new TemplateLight();
      App.register_component(template_light_1);

      auto template_light_2 = new TemplateLight();
      App.register_component(template_light_2);

      auto template_light_3 = new TemplateLight();
      App.register_component(template_light_3);

      return {template_light_1, template_light_2, template_light_3};

    lights:
      - name: "Indicator 1"
        id: template_light_1
        # Expose to HA, under config section
        internal: false
        entity_category: config

        # Template light should restore to last state / ON at boot
        restore_mode: RESTORE_AND_ON
        # We do not bother with gamma correction here, we want to keep the values as unadulterated as possible as this is JUST a pass through
        # The actual light(s) that we pass values to will handle gamma correction (if configured)
        gamma_correct: 0.0
        # Likewise, we do not want to do any smoothing here, we want to pass the values through as quickly as possible
        default_transition_length: 0s

        # In testing, I can't get the (gamma corrected...) partition light(s) to turn on at all below ~20%.
        # Not clear _why_ this is (too dim to see?) but it's a problem because there's nothing preventing you from setting a brightness of < 20% in HA.
        # HA thinks that the light is on, but it's not actually on.
        # Ideally i'd be able to set min_brightness here like I can with other types of light in ESPHome, but I can't.
        # More than likely i'll need to implement this myself in the template_light.h file.
        ##
        # We need to link our state to the actual partition lights... which is not as straightforward as expected.
        # After a lot of trial/error, this is the least janky method I could come up with.
        ##
        # Because we have a transition length of 0, the on_state hook really shouldn't be called more than 2x
        # Once as soon as any command is received; it'll print the state we're about to move away from
        # Once as soon as we've reached the  commanded state that was just received; it'll print the state we're at / should match what HA commanded.
        # However, the on_state call is STILL needed because a light that is on full red and then given a command to go to full purple will not pass through
        #   on/off state.
        ##
        on_turn_on:
          - lambda: |-
              // Get user requested RGB values and pass them through to the partition lights
              float red, green, blue, br;
              id(template_light_1).current_values_as_rgb(&red, &green, &blue);
              id(template_light_1).current_values_as_brightness(&br);

              // Pass through should happen ONLY in the on_state and on_turn_off hooks so just log here
              // Since we have ZERO gamma correction, the values here should _match_ the ones set in HA
              // They'll just be normalized though. So HA sends red: 255, here, we get 1.0
              ESP_LOGD("template_light_1.on_turn_on", "ON_TURN_ON => R: %f, G: %f, B: %f BR: %f", red, green, blue, br);

        on_turn_off:
          - lambda: |-
              // Get template RGB values
              float red, green, blue, br;
              id(template_light_1).current_values_as_rgb(&red, &green, &blue);
              id(template_light_1).current_values_as_brightness(&br);
              // OFF means OFF so both partitions should be off
              ESP_LOGD("template_light_1.on_turn_off", "TURN OFF");
              id(leds_button_1_left).turn_off().set_rgb( red, green, blue ).set_brightness(br).set_transition_length(0).perform();
              id(leds_button_1_right).turn_off().set_rgb( red, green, blue ).set_brightness(br).set_transition_length(0).perform();

        on_state:
          - lambda: |-
              // Get template RGB values
              float red, green, blue, br;
              id(template_light_1).current_values_as_rgb(&red, &green, &blue);
              id(template_light_1).current_values_as_brightness(&br);
              ESP_LOGD("template_light_1.on_state", "State => R: %f, G: %f, B: %f BR: %f", red, green, blue, br);

          # Figure out which partition light to light up now that we have an updated state
          - script.execute:
              id: figure_out_which_partition_to_light
              # Output 1 = top
              output_num: 1

      - name: "Indicator 2"
        id: template_light_2
        internal: false
        entity_category: config
        restore_mode: RESTORE_AND_ON
        gamma_correct: 0.0
        default_transition_length: 0s

        on_turn_on:
          - lambda: |-
              // Get user requested RGB values and pass them through to the partition lights
              float red, green, blue, br;
              id(template_light_2).current_values_as_rgb(&red, &green, &blue);
              id(template_light_2).current_values_as_brightness(&br);

              // Pass through should happen ONLY in the on_state and on_turn_off hooks so just log here
              // Since we have ZERO gamma correction, the values here should _match_ the ones set in HA
              // They'll just be normalized though. So HA sends red: 255, here, we get 1.0
              ESP_LOGD("template_light_2.on_turn_on", "ON_TURN_ON => R: %f, G: %f, B: %f BR: %f", red, green, blue, br);

        on_turn_off:
          - lambda: |-
              // Get template RGB values
              float red, green, blue, br;
              id(template_light_2).current_values_as_rgb(&red, &green, &blue);
              id(template_light_2).current_values_as_brightness(&br);
              // OFF means OFF so both partitions should be off
              ESP_LOGD("template_light_2.on_turn_off", "TURN OFF");
              id(leds_button_2_left).turn_off().set_rgb( red, green, blue ).set_brightness(br).set_transition_length(0).perform();
              id(leds_button_2_right).turn_off().set_rgb( red, green, blue ).set_brightness(br).set_transition_length(0).perform();

        on_state:
          - lambda: |-
              // Get template RGB values
              float red, green, blue, br;
              id(template_light_2).current_values_as_rgb(&red, &green, &blue);
              id(template_light_2).current_values_as_brightness(&br);
              ESP_LOGD("template_light_2.on_state", "State => R: %f, G: %f, B: %f BR: %f", red, green, blue, br);

          - script.execute:
              id: figure_out_which_partition_to_light
              # Output 2 = middle on 3c version
              output_num: 2

      - name: "Indicator 3"
        id: template_light_3
        internal: false
        entity_category: config
        restore_mode: RESTORE_AND_ON
        gamma_correct: 0.0
        default_transition_length: 0s

        on_turn_on:
          - lambda: |-
              // Get user requested RGB values and pass them through to the partition lights
              float red, green, blue, br;
              id(template_light_3).current_values_as_rgb(&red, &green, &blue);
              id(template_light_3).current_values_as_brightness(&br);

              // Pass through should happen ONLY in the on_state and on_turn_off hooks so just log here
              // Since we have ZERO gamma correction, the values here should _match_ the ones set in HA
              // They'll just be normalized though. So HA sends red: 255, here, we get 1.0
              ESP_LOGD("template_light_3.on_turn_on", "ON_TURN_ON => R: %f, G: %f, B: %f BR: %f", red, green, blue, br);

        on_turn_off:
          - lambda: |-
              // Get template RGB values
              float red, green, blue, br;
              id(template_light_3).current_values_as_rgb(&red, &green, &blue);
              id(template_light_3).current_values_as_brightness(&br);
              // OFF means OFF so both partitions should be off
              ESP_LOGD("template_light_3.on_turn_off", "TURN OFF");
              id(leds_button_3_left).turn_off().set_rgb( red, green, blue ).set_brightness(br).set_transition_length(0).perform();
              id(leds_button_3_right).turn_off().set_rgb( red, green, blue ).set_brightness(br).set_transition_length(0).perform();

        on_state:
          - lambda: |-
              // Get template RGB values
              float red, green, blue, br;
              id(template_light_3).current_values_as_rgb(&red, &green, &blue);
              id(template_light_3).current_values_as_brightness(&br);
              ESP_LOGD("template_light_3.on_state", "State => R: %f, G: %f, B: %f BR: %f", red, green, blue, br);

          - script.execute:
              id: figure_out_which_partition_to_light
              output_num: 3

# Set up the gpio outputs for the relays
output:
  - id: relay_1
    platform: gpio
    pin: GPIO18

  - id: relay_2
    platform: gpio
    pin: GPIO17

  - id: relay_3
    platform: gpio
    pin: GPIO27