Multi-Material Printing Hack for Prusa XL
In the same spirit as an earlier post, here is a quick hack I used to get my dual-headed Prusa XL printer to print with three materials at once.
While the technique worked, it may not be the best method, so proceed with caution.
The problem
I am trying to print a part that requires two different materials at the same time: ABS and TPU.
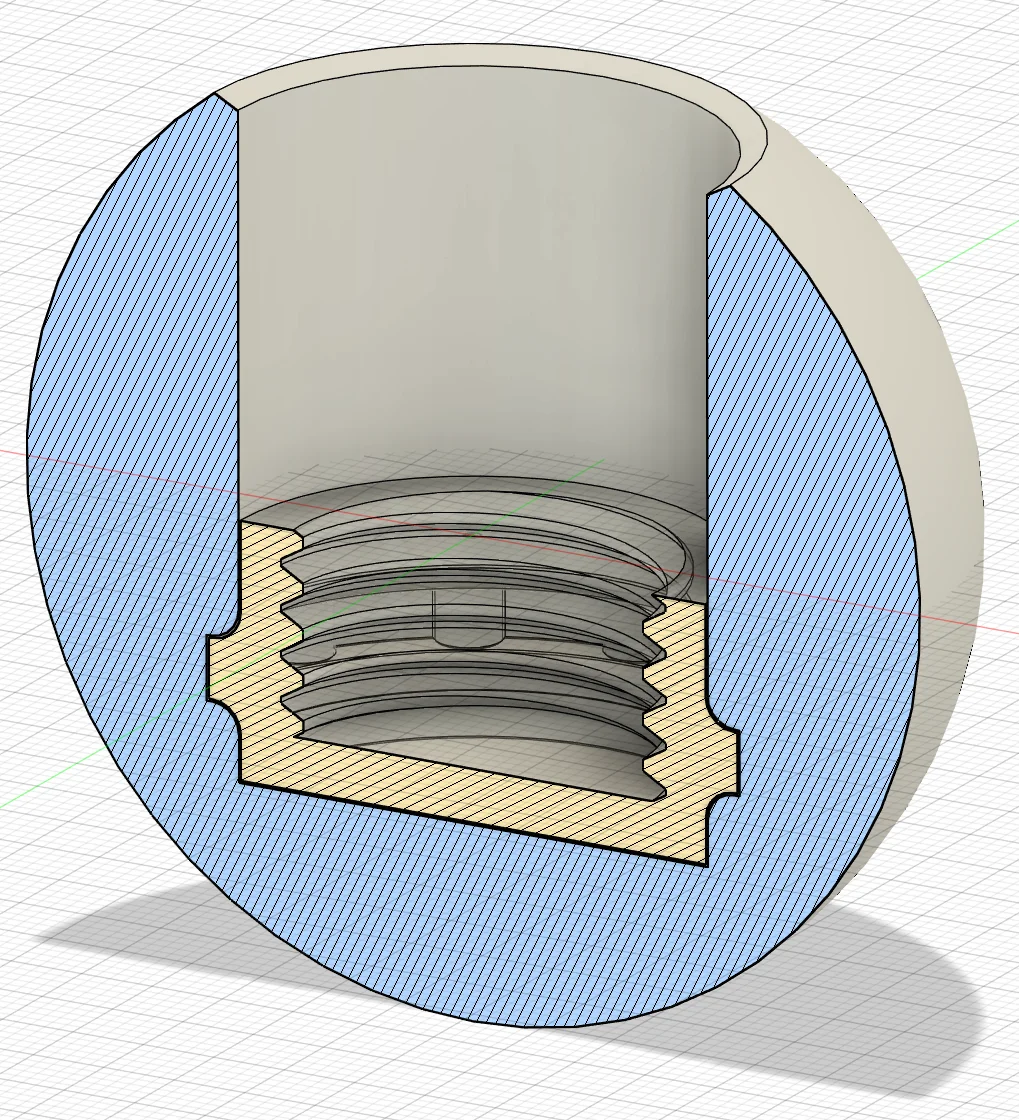
The shaded blue area is meant to be TPU/FLEX material. The shaded yellow area is meant to be ABS material.
The first complication comes from the “unfriendly” shape; the part is spherical and has no ideal orientation for printing without any supports.
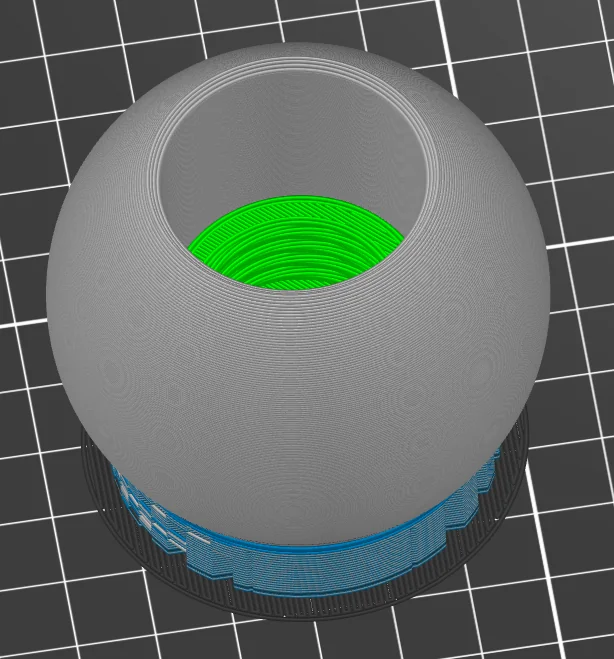
Grey is TPU, Green is ABS, and the Blue/Grey mix is the support material composed of interleaved PLA and TPU layers.
To make matters slightly more complicated, TPU is one of those filaments that likes to stick to pretty much everything; I have few good options for support material. The least sticky material is PLA.
So now I have a single job that requires three materials: ABS, TPU, and PLA…. but still only two print heads to work with.
What to do?
Usually when faced with the “more materials than heads” problem, the solution is to use the M600 gCode command to have the printer pause, eject the current material and wait for the user to load the new material.
This technique is not new; it’s widely supported and works perfectly if the materials are similar enough that the extrusion settings can be shared between them.
For my part, the tool head will have to transition from PLA to ABS which means virtually every instruction in the gCode will have to change as well.
The loophole
Fortunately, the geometry for this part has a “gap” between the initial section where supports are needed and the internal section where the ABS material is needed.
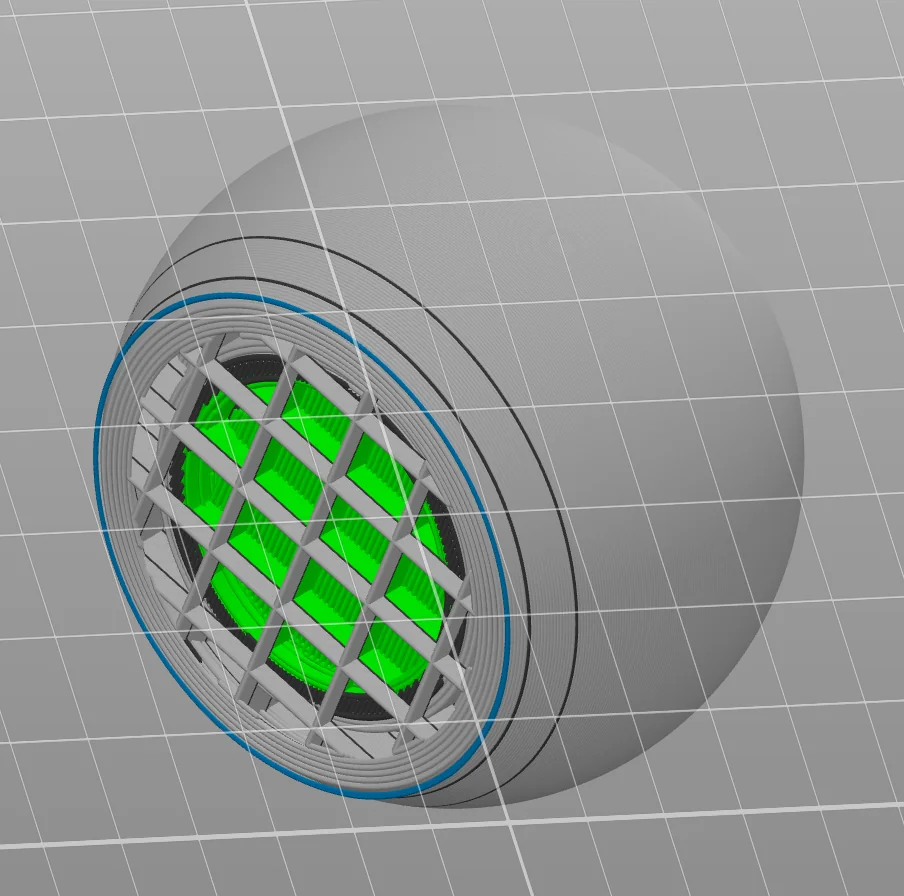
This is the 'per-layer' view from the slicer with a 'bottom-up' perspective. As before, Grey is TPU, Green is ABS, and the thin blue circle represents the topmost layer of the support material.
Notice that the last support layer (blue circle) is still a few layers away from the first ABS layer (the green section).
Essentially, I do need three materials, but only two at a time. What a coincidence that I have a printer with two heads!
The solution hack
This is a hack and may not work for all printers or all slicers. Think of this more as a “proof of concept” than a reliable technique. You can likely adapt this technique to other printers but you will need to understand the gCode generated by your slicer and the firmware running on your printer.
Ideally, this serves as a demonstration and inspires the development of a more robust solution; conceivably, the prusa slicer/firmware could be modified to support this use case directly with not much effort.
The solution is to lie to the slicer and tell it that I have three tool heads. This way, I can use correct profiles for each material and the slicer will generate the correct gCode for each material.
All I have to do is post-process the gCode to pause for a manual material swap at the correct time and then replace all references to the third tool head with the second tool head after the swap.
Simple, right?
(yes, but not as simple as I thought)
This particular part has a little over 400K lines of gCode so I’m not going to do this by hand! Here’s a quick and dirty Python script that rewrote the gCode for me:
| |
I ran that script, loaded the modified gCode into the printer, and…was not able to fool the printer.
Prusa XL refusing to start the print because it knows I'm trying to cheat.
The printer was - somehow - aware that the gCode wanted three heads with three distinct materials and refused to start the print until I added a third head.
As it turns out, that python script isn’t quite enough to fool the printer. I’ll spare you from the many iterative attempts to get this working and say that the following additional optimizations/deletions were necessary:
Manual fix 1: Remove all routines for the third tool head
Somewhere early on in the gCode is a section that looks like this
| |
This can be removed from the gCode as there is no physical 3rd head to purge or park, heat up, probe…etc.
If the python script naïvely replaced all instances of T2 with T1, this section would be left in the gCode and would waste time running the second print head through the same routine twice.
Manual fix 2: Remove all metadata
This one took quite a few trial/error attempts to figure out. At the tail end of the unmodified gCode there are some “shutdown” commands and then a ton of metadata:
| |
As best as I can tell, there’s a few hundred lines that encode some basic metadata about the part(s) and the filament(s) used / print times and the slicer specific configuration information. If you look closely, you can see that a fair number of properties have three values: one for each tool head:
| |
I spent a few iterations trying to identify what each property did and if it was safe to drop the third value but wasn’t making a ton of progress. Eventually I just decided to drop all of the metadata… and that worked!
Initially I didn’t think that the printer firmware would be reading ANY of the commented out sections of the file but I guess this makes sense for metadata and anything else that’s not a gCode instruction.
As best as I can tell, nothing contained in the metadata sections changes how the actual print is executed. All of the values are for the slicer UI and - in some cases - for the printer firmware to sanity check the gCode before starting the print.
I could be wrong about this but I don’t have the time/patience/resources to properly test this. The gCode works well enough for my needs without the metadata so I’m content to move on to the next steps on this project.
If I am wrong about what the metadata sections do and it turns out that they do help refine/improve how the printer firmware processes instructions…please do let me know!
TL;DR
If you have a need to print with more materials than you have tool heads, you might be able to trick the slicer/printer into re-configuring a print head mid-print.
To do this, get the slicer to generate valid and correct gCode for each material/tool head combination as if you had an appropriately configured printer. After the gCode has been generated, map every “virtual” too head to a real tool head and remove any additional references to the virtual tool heads.