Using Home Assistant to dynamically layout openHasp widgets
Background
This is one of those posts that sat in the Drafts folder for way too long.
Just before release, I’d discover something new that would warrant substantial rewrites.
After several delays, false starts and re-writes, I finally have something that is mostly new and worth sharing with the world.
Like with the past few teardown posts, this one also started off as a ‘cart-stuffer’ item so I could unlock a more generous discount on the total purchase. The listing that caught my eye had the generic title:
EU US Wifi LCD Smart Wall Light Touch Switch Tuya Smart Life App Remote Control ON OFF Timer Voice Control For Google Home Alexa
Naturally, a cursory check for existing writeups / teardowns didn’t yield much.
I did have some hope that the Tuya compatibility meant an easily hacked ESP module running the show and not a proprietary module.
It was unlikely that the device would be Android powered at that price-point and an ESP8266 series would be woefully under powered for direct LCD control so … fingers crossed for an ESP32 module!
Or, at the very least there might be a way to retrofit in an ESP module like with the recent Mi-Boxer LED controller that I helped to integrate with Tasmota.
The plan was to do a teardown and dump as much technical data as I could possibly gather in an evening or two and conclude with a feasibility assessment of hacking the device for use with Home Assistant.
Generic becomes Lanbon
Immediately after opening the shipping box and getting eyes on the actual product packaging, it was clear that this was a Lanbon L8 series module.
A quick google later and it turns out that the venerable blakadder.com has already covered this device… and documented it’s Tasmota compatibility!
So much for publishing a teardown and trying to figure out if Home Assistant integration was feasible 😕.
Funny how once you have the ‘magic query string’, google starts to yield a ton of relevant results! Just after finding the aforementioned blakadder.com posts on the L8 device, I found two very helpful sources of more information:
- Somebody by the name of Jan Newmarch has published a comprehensive dive into the protocol(s) used by the stock firmware / other devices in the Lanbon family.
- This page dedicated to the Lanbon L8 from a project called openHasp.
I thought that second link seemed familiar…🤔.
Turns out, the openHASP project is a substantial rewrite of the initial software that powered my Enhanced HomeAssistant Switch Plate (eHasp) project.
openHasp
As opposed to the old HASP project, openHasp leverages more powerful processors that can drive the LCD directly; graphical assets no longer need to be compiled down to a LCD-specific firmware before use and the content of the entire display can be arbitrarily manipulated at runtime!
openHasp uses json like files to store the UI/widgets layout and configuration.
On boot, the content of the jsonl is parsed and turned into the actual UI widgets that are displayed on screen.
For example, here is the example jsonl that renders two buttons:
{"page":1,"id":2,"obj":"btn","x":10,"y":40,"w":105,"h":90,"toggle":false,"text":"Button","mode":"break","align":"center"}

{"page":1,"id":3,"obj":"btn","x":125,"y":40,"w":105,"h":90,"toggle":true,"text":"#FFD700 Toggle# Button","mode":"break","align":"center"}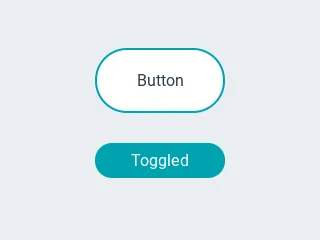
Image credit/source: openHasp Docs
Notice how the absolute coordinates on screen (x and y) and and absolute width (w) and height (w) properties are explicitly declared.
The only reason the buttons look appropriately sized/positioned in the above screenshot is because someone took the time to calculate the appropriate values for the particular screen resolution and orientation.
The above jsonl example would look different on any openHasp device with a different screen orientation or resolution!
Manually calculating the exact size and position of every widget for each class of device isn’t so bad if you’re planning on deploying the same file to several instances of the same device… but it starts be become a real headache if you want to deploy the same layout to 2+ different types of device.
The L8 devices are designed to be installed into a wall electrical box; they don’t sit well on my desk so prototyping various interface files on a L8 device isn’t the easiest.
Instead, I am using a device with a higher resolution and bigger screen that does work well on a desk to prototype the various jsonl files.
If you’re thinking that calculating the appropriate location for various UI widgets on one device and then having to re-do the math for the intended deploy targets sounds like a task better suited to a computer… you’re right!
Dynamic Layouts with Home Assistant
Fortunately, the properties of every UI widget can be modified over the network even after the jsonl file has been parsed and the initial display has been painted!
My C++ skills are pretty weak so contributing new code to enable dynamic layouts directly to the openHasp codebase is not immediately practical. There is, however, a robust Home Assistant integration published in the form of a custom component. Home Assistant means Python and some Python code to calculate the appropriate position/size for a given element is immediately within my means.
0.7 should work.
As of 2022-01, there is no release of the custom component that works with 0.7 out of the box so if installing through HACS, you will need to patch the custom component so devices running .0.7 can be controlled via Home Assistant.Please see the openHasp <-> Home Assistant docs for background information, examples and a lot more detail on how Home Assistant and openHasp work together or if any of the jsonl and yaml below does not make sense.
Two devices, one pages.jsonl
The pages.jsonl file used for this post and the screenshots below is a (lightly) modified versions of the clock and temperature example and the
simple page navigation examples with a room specific set of ui widgets.
That singular pages.jsonl file was uploaded it to two devices:
- Lanbon L8 with a 240x320 resolution
- WT32-SC01 module with a 320x480 resolution
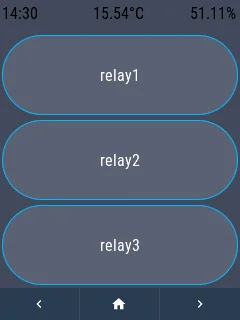
Each screenshot was taken with the device display configured to 0º and 90º of rotation.
A reboot was required for the configuration change to take effect but I made zero changes to the pages.jsonl file on the device between changing the screen orientation.
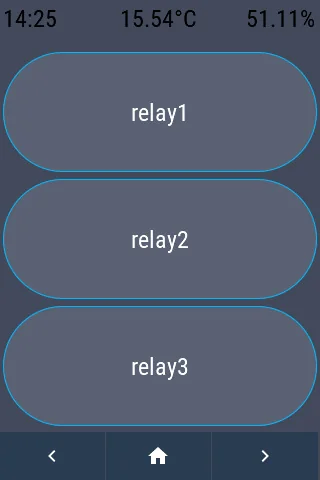
Lanbon L8 in it's rotated 'landscape' orientation Lanbon L8 in it's default 'portrait' orientation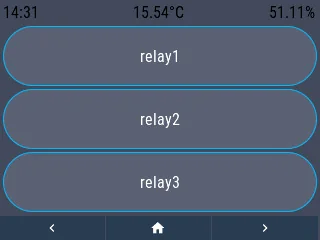
wt32-sc01 in 'landscape' orientation. wt32-sc01 in 'portrait' orientation.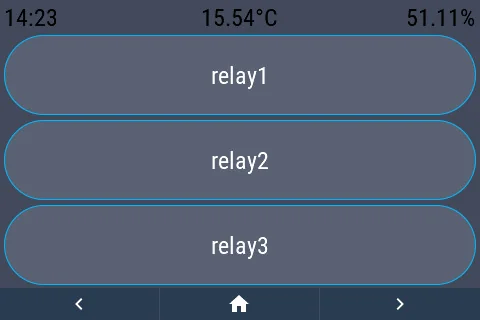
building a pages.jsonl
You don’t need to use this exact technique to build the pages.jsonl file; it works well for my needs / development flow.
All that matters is that you get every UI element for every page into a single pages.jsonl file and then get that file uploaded to the device(s) in question.
The page/id values declared in your jsonl file must match the object IDs that you will use to configure the Home Assistant integration.
❯ cat header.frag.jsonl footer.frag.jsonl room.frag.jsonl > pages.jsonl
❯ curl http://roomPlateIpv4Here/edit --form name=data --form data=@pages.jsonlI store the combined files in pages.jsonl because this is the default page that an openHasp device will render.
You can change this setting via the web UI: http://roomPlateIpv4Here/config/hasp or via telnet:
❯ telnet roomPlateIpv4Here
<...>
prompt> config/hasp {"pages":"/foo.jsonl"}
header.frag.jsonl
This contains the three text labels that I wish to have at the top of every openHasp device I deploy.
{
    "page": 0,
    "comment": "Default to page0 as the header and page/layout"
}
{
    "id": 1,
    "comment": "Time in the top left",
    "obj": "label",
    "text": "00:00",
    "align": "center",
    "bg_color": "#2C3E50"
}
{
    "id": 2,
    "comment": "Temp in the middle",
    "obj": "label",
    "text": "00.0°C",
    "align": "center",
    "bg_color": "#2C3E50"
}
{
    "id": 3,
    "comment": "Humidity in the top right",
    "obj": "label",
    "text": "00.0%",
    "align": "right",
    "bg_color": "#2C3E50"
}
footer.frag.jsonl
This contains the three page navigation buttons that I wish to have at the bottom of every openHasp device that I deploy.
{
    "id": 6,
    "comment": "tab nav on the bottom, prev",
    "obj": "btn",
    "action": "prev",
    "bg_color": "#2C3E50",
    "text": "\uE141",
    "text_color": "#FFFFFF",
    "radius": 0,
    "border_side": 0,
    "text_font": 28
}
{
    "id": 7,
    "obj": "btn",
    "action": "back",
    "bg_color": "#2C3E50",
    "text": "\uE2DC",
    "text_color": "#FFFFFF",
    "radius": 0,
    "border_side": 0,
    "text_font": 22
}
{
    "id": 8,
    "obj": "btn",
    "action": "next",
    "bg_color": "#2C3E50",
    "text": "\uE142",
    "text_color": "#FFFFFF",
    "radius": 0,
    "border_side": 0,
    "text_font": 28
}
room.frag.json
This file should contain all the page(s) and UI widgets that are unique to the openHasp device deployed into the room that I will call room for the purposes of this post.
As a demonstration, I have set up three buttons that control each of the three relays on a L8 device; you will almost certainly want to add multiple pages / other UI widgets as needed.
{
    "page": 1,
    "comment": "primary controls for the 3 relays"
}
{
    "id": 101,
    "comment": "relay1",
    "obj": "btn",
    "toggle": true,
    "text": "relay1",
    "mode": "break",
    "align": "center",
    "groupid": 1
}
{
    "id": 102,
    "comment": "relay2",
    "obj": "btn",
    "toggle": true,
    "text": "relay2",
    "mode": "break",
    "align": "center",
    "groupid": 2
}
{
    "id": 103,
    "comment": "relay3",
    "obj": "btn",
    "toggle": true,
    "text": "relay3",
    "mode": "break",
    "align": "center",
    "groupid": 3
}
Configure Home Assistant
After the pages.jsonl is deployed to each of the openHasp devices, you will need to create a configuration file for Home Assistant.
For the above screenshots, I created two identical ⃰ copies of the yaml below
⃰ Other than the device name; in one file, the name was changed from plate00 to plate01.
# plate00 is a test L8 module
# Has a resolution of 240x320
# The top left corner is 0,0, X grows positive to the right and Y grows positive down
##
plate00:
  ## TODO: is there a way to fix this? Maybe a HA feature request or openHasp/CC change...
  # Would be really nice if HA had some way to save templates and load them
  #   that way I don't have to declare the same variables over and over...
  objects:
    ###
    # COMMON
    ###
    # Header: Time
    - obj: "p0b1"
      properties:
        # Align left most, If we do go over our permitted length, loop
        "align": "left"
        "text": "{{ states('sensor.time') }}"
        "mode": "loop"
        ##
        # Draw the labels with a 1% margin from the top and sides
        "x": >-
          {% set scnWd = state_attr('openhasp.plate00', 'tftWidth') | int %}
          {% set hdrHorMargin = (scnWd*0.01) | int %}
          {{hdrHorMargin}}

        "y": >-
          {% set scnHt = state_attr('openhasp.plate00', 'tftHeight') | int %}
          {% set hdrVrtMargin = (scnHt*0.01) | int %}
          {{hdrVrtMargin}}

        # Width is 1/3 of the screen width after subtracting margins
        ##
        "w": >-
          {% set numObj = 3 %}
          {% set scnWd = state_attr('openhasp.plate00', 'tftWidth') | int %}
          {% set hdrHorMargin = (scnWd*0.01) | int %}
          {% set usableHdrWd = scnWd-(2*hdrHorMargin) %}
          {% set hdrLblWd = (usableHdrWd/numObj) | int %}
          {{hdrLblWd}}

        # Height is 10% of the screen, after margin
        ##
        "h": >-
          {% set scnHt = state_attr('openhasp.plate00', 'tftHeight') | int %}
          {% set hdrVrtMargin = (scnHt*0.01) | int %}
          {% set hdrHt = (scnHt*0.1) | int %}
          {% set hdrLblHt = hdrHt-hdrVrtMargin %}
          {{hdrLblHt}}

    # Header: Temp
    - obj: "p0b2"
      properties:
        # Align center, If we do go over our permitted length, loop
        "align": "center"
        "text": "{{ states('sensor.room_temperature') }}°C"
        "mode": "loop"
        ##
        # Draw the labels with a 1% margin from the top and sides
        "x": >-
          {% set numObj = 3 %}
          {% set scnWd = state_attr('openhasp.plate00', 'tftWidth') | int %}
          {% set hdrHorMargin = (scnWd*0.01) | int %}
          {% set usableHdrWd = scnWd-(2*hdrHorMargin) %}
          {% set hdrLblWd = (usableHdrWd/numObj) | int %}
          {% set hdrHorMargin = (scnWd*0.01) | int %}
          {{hdrHorMargin+hdrLblWd}}

        "y": >-
          {% set scnHt = state_attr('openhasp.plate00', 'tftHeight') | int %}
          {% set hdrVrtMargin = (scnHt*0.01) | int %}
          {{hdrVrtMargin}}

        # Width is 1/3 of the screen width after subtracting margins
        ##
        "w": >-
          {% set numObj = 3 %}
          {% set scnWd = state_attr('openhasp.plate00', 'tftWidth') | int %}
          {% set hdrHorMargin = (scnWd*0.01) | int %}
          {% set usableHdrWd = scnWd-(2*hdrHorMargin) %}
          {% set hdrLblWd = (usableHdrWd/numObj) | int %}
          {{hdrLblWd}}

        # Height is 10% of the screen, after margin
        ##
        "h": >-
          {% set scnHt = state_attr('openhasp.plate00', 'tftHeight') | int %}
          {% set hdrVrtMargin = (scnHt*0.01) | int %}
          {% set hdrHt = (scnHt*0.1) | int %}
          {% set hdrLblHt = hdrHt-hdrVrtMargin %}
          {{hdrLblHt}}

    # Header: Humidity
    - obj: "p0b3"
      properties:
        # Align right most, If we do go over our permitted length, loop
        "align": "right"
        "text": "{{ states('sensor.room_humidity') }}%"
        "mode": "loop"
        ##
        # Draw the labels with a 1% margin from the top and sides
        "x": >-
          {% set numObj = 3 %}
          {% set scnWd = state_attr('openhasp.plate00', 'tftWidth') | int %}
          {% set hdrHorMargin = (scnWd*0.01) | int %}
          {% set usableHdrWd = scnWd-(2*hdrHorMargin) %}
          {% set hdrLblWd = (usableHdrWd/numObj) | int %}
          {% set hdrHorMargin = (scnWd*0.01) | int %}
          {{hdrHorMargin+(2*hdrLblWd)}}

        "y": >-
          {% set scnHt = state_attr('openhasp.plate00', 'tftHeight') | int %}
          {% set hdrVrtMargin = (scnHt*0.01) | int %}
          {{hdrVrtMargin}}

        # Width is 1/3 of the screen width after subtracting margins
        ##
        "w": >-
          {% set numObj = 3 %}
          {% set scnWd = state_attr('openhasp.plate00', 'tftWidth') | int %}
          {% set hdrHorMargin = (scnWd*0.01) | int %}
          {% set usableHdrWd = scnWd-(2*hdrHorMargin) %}
          {% set hdrLblWd = (usableHdrWd/numObj) | int %}
          {{hdrLblWd}}

        # Height is 10% of the screen, after margin
        ##
        "h": >-
          {% set scnHt = state_attr('openhasp.plate00', 'tftHeight') | int %}
          {% set hdrVrtMargin = (scnHt*0.01) | int %}
          {% set hdrHt = (scnHt*0.1) | int %}
          {% set hdrLblHt = hdrHt-hdrVrtMargin %}
          {{hdrLblHt}}

    # bottom nav: previous
    - obj: "p0b6"
      properties:
        # Left most button sits all the way up against the left side of the screen
        "x": 0
        # Start drawing the button from the bottom most pixel
        "y": >-
          {% set scnHt = state_attr('openhasp.plate00', 'tftHeight') | int %}
          {% set hdrHt = (scnHt*0.1) | int %}
          {{scnHt-hdrHt}}
        # And since we have 3 buttons, 1/3 of the width
        "w": >-
          {% set numObj = 3 %}
          {% set scnWd = state_attr('openhasp.plate00', 'tftWidth') | int %}
          {% set ftrBtnWd = (scnWd/numObj) | int %}
          {{ftrBtnWd-1}}
        # We want the bottom nav buttons to consume the bottom 10% of the screen
        "h": >-
          {% set scnHt = state_attr('openhasp.plate00', 'tftHeight') | int %}
          {% set ftrHt = (scnHt*0.1) | int %}
          {{ftrHt}}

    # bottom nav: home
    - obj: "p0b7"
      properties:
        # Start drawing exactly the next pixel over from where the first button stopped
        "x": >-
          {% set numObj = 3 %}
          {% set scnWd = state_attr('openhasp.plate00', 'tftWidth') | int %}
          {% set ftrBtnWd = (scnWd/numObj) | int %}
          {{ftrBtnWd}}
        # Start drawing the button from the bottom most pixel
        "y": >-
          {% set scnHt = state_attr('openhasp.plate00', 'tftHeight') | int %}
          {% set hdrHt = (scnHt*0.1) | int %}
          {{scnHt-hdrHt}}
        # And since we have 3 buttons, 1/3 of the width
        "w": >-
          {% set numObj = 3 %}
          {% set scnWd = state_attr('openhasp.plate00', 'tftWidth') | int %}
          {% set ftrBtnWd = (scnWd/numObj) | int %}
          {{ftrBtnWd-1}}
        # We want the bottom nav buttons to consume the bottom 10% of the screen
        "h": >-
          {% set scnHt = state_attr('openhasp.plate00', 'tftHeight') | int %}
          {% set ftrHt = (scnHt*0.1) | int %}
          {{ftrHt}}

    # bottom nav: next
    - obj: "p0b8"
      properties:
        # Start drawing exactly the next pixel over from where the first button stopped
        "x": >-
          {% set numObj = 3 %}
          {% set scnWd = state_attr('openhasp.plate00', 'tftWidth') | int %}
          {% set ftrBtnWd = (scnWd/numObj) | int %}
          {{ftrBtnWd*2}}
        # Start drawing the button from the bottom most pixel
        "y": >-
          {% set scnHt = state_attr('openhasp.plate00', 'tftHeight') | int %}
          {% set hdrHt = (scnHt*0.1) | int %}
          {{scnHt-hdrHt}}
        # And since we have 3 buttons, 1/3 of the width
        "w": >-
          {% set numObj = 3 %}
          {% set scnWd = state_attr('openhasp.plate00', 'tftWidth') | int %}
          {% set ftrBtnWd = (scnWd/numObj) | int %}
          {{ftrBtnWd}}
        # We want the bottom nav buttons to consume the bottom 10% of the screen
        "h": >-
          {% set scnHt = state_attr('openhasp.plate00', 'tftHeight') | int %}
          {% set ftrHt = (scnHt*0.1) | int %}
          {{ftrHt}}

    # ###
    # # Room Specific
    # ###
    # relay toggle 1
    - obj: "p1b101"
      properties:
        "x": >-
          {% set scnWd = state_attr('openhasp.plate00', 'tftWidth') | int %}
          {% set hdrHorMargin = (scnWd*0.01) | int %}
          {{hdrHorMargin}}
        # Figure out how tall the display is, subtract out the height of the header/footer and that's the usable
        #   space. Within that usable space, we will want small margins.
        ##
        "y": >-
          {% set scnHt = state_attr('openhasp.plate00', 'tftHeight') | int %}
          {% set hdrVrtMargin = (scnHt*0.01) | int %}
          {% set hdrHt = (scnHt*0.1) | int %}
          {{hdrHt+hdrVrtMargin}}

        "w": >-
          {% set scnWd = state_attr('openhasp.plate00', 'tftWidth') | int %}
          {% set hdrHorMargin = (scnWd*0.01) | int %}
          {% set usableHdrWd = scnWd-(2*hdrHorMargin) %}
          {% set bdyWd = usableHdrWd %}
          {{bdyWd}}

        # We want the bottom nav buttons to consume the bottom 10% of the screen
        "h": >-
          {% set numObj = 3 %}
          {% set scnHt = state_attr('openhasp.plate00', 'tftHeight') | int %}
          {% set hdrHt = (scnHt*0.1) | int %}
          {% set ftrHt = (scnHt*0.1) | int %}
          {% set hdrVrtMargin = (scnHt*0.01) | int %}
          {% set bdyHt = (scnHt - (hdrHt+ftrHt) - (2*hdrVrtMargin)) | int %}
          {% set bdyBtnVrtMargin = (bdyHt * 0.02) | int %}
          {% set bdyBtnHt = ((bdyHt-((numObj-1)*bdyBtnVrtMargin))/numObj) | int %}
          {{bdyBtnHt}}

    # relay toggle 2
    - obj: "p1b102"
      properties:
        "x": >-
          {% set scnWd = state_attr('openhasp.plate00', 'tftWidth') | int %}
          {% set hdrHorMargin = (scnWd*0.01) | int %}
          {{hdrHorMargin}}

        # Figure out how tall the display is, subtract out the height of the header/footer and that's the usable
        #   space. Within that usable space, we will want small margins.
        ##
        "y": >-
          {% set numObj = 3 %}
          {% set scnHt = state_attr('openhasp.plate00', 'tftHeight') | int %}
          {% set hdrVrtMargin = (scnHt*0.01) | int %}
          {% set hdrHt = (scnHt*0.1) | int %}
          {% set ftrHt = (scnHt*0.1) | int %}
          {% set bdyHt = (scnHt - (hdrHt+ftrHt) - (2*hdrVrtMargin)) | int %}
          {% set bdyBtnVrtMargin = (bdyHt * 0.02) | int %}
          {% set bdyBtnHt = ((bdyHt-((numObj-1)*bdyBtnVrtMargin))/numObj) | int %}
          {{hdrHt+hdrVrtMargin+(1*bdyBtnHt+bdyBtnVrtMargin)}}

        "w": >-
          {% set scnWd = state_attr('openhasp.plate00', 'tftWidth') | int %}
          {% set hdrHorMargin = (scnWd*0.01) | int %}
          {% set usableHdrWd = scnWd-(2*hdrHorMargin) %}
          {% set bdyWd = usableHdrWd %}
          {{bdyWd}}

        # We want the bottom nav buttons to consume the bottom 10% of the screen
        "h": >-
          {% set numObj = 3 %}
          {% set scnHt = state_attr('openhasp.plate00', 'tftHeight') | int %}
          {% set hdrHt = (scnHt*0.1) | int %}
          {% set ftrHt = (scnHt*0.1) | int %}
          {% set hdrVrtMargin = (scnHt*0.01) | int %}
          {% set bdyHt = (scnHt - (hdrHt+ftrHt) - (2*hdrVrtMargin)) | int %}
          {% set bdyBtnVrtMargin = (bdyHt * 0.02) | int %}
          {% set bdyBtnHt = ((bdyHt-((numObj-1)*bdyBtnVrtMargin))/numObj) | int %}
          {{bdyBtnHt}}

    # relay toggle 3
    - obj: "p1b103"
      properties:
        "x": >-
          {% set scnWd = state_attr('openhasp.plate00', 'tftWidth') | int %}
          {% set hdrHorMargin = (scnWd*0.01) | int %}
          {{hdrHorMargin}}

        # Figure out how tall the display is, subtract out the height of the header/footer and that's the usable
        #   space. Within that usable space, we will want small margins.
        ##
        "y": >-
          {% set numObj = 3 %}
          {% set scnHt = state_attr('openhasp.plate00', 'tftHeight') | int %}
          {% set hdrVrtMargin = (scnHt*0.01) | int %}
          {% set hdrHt = (scnHt*0.1) | int %}
          {% set ftrHt = (scnHt*0.1) | int %}
          {% set bdyHt = (scnHt - (hdrHt+ftrHt) - (2*hdrVrtMargin)) | int %}
          {% set bdyBtnVrtMargin = (bdyHt * 0.02) | int %}
          {% set bdyBtnHt = ((bdyHt-((numObj-1)*bdyBtnVrtMargin))/numObj) | int %}
          {{hdrHt+hdrVrtMargin+(2*(bdyBtnHt+bdyBtnVrtMargin))}}

        "w": >-
          {% set scnWd = state_attr('openhasp.plate00', 'tftWidth') | int %}
          {% set hdrHorMargin = (scnWd*0.01) | int %}
          {% set usableHdrWd = scnWd-(2*hdrHorMargin) %}
          {% set bdyWd = usableHdrWd %}
          {{bdyWd}}

        # We want the bottom nav buttons to consume the bottom 10% of the screen
        "h": >-
          {% set numObj = 3 %}
          {% set scnHt = state_attr('openhasp.plate00', 'tftHeight') | int %}
          {% set hdrHt = (scnHt*0.1) | int %}
          {% set ftrHt = (scnHt*0.1) | int %}
          {% set hdrVrtMargin = (scnHt*0.01) | int %}
          {% set bdyHt = (scnHt - (hdrHt+ftrHt) - (2*hdrVrtMargin)) | int %}
          {% set bdyBtnVrtMargin = (bdyHt * 0.02) | int %}
          {% set bdyBtnHt = ((bdyHt-((numObj-1)*bdyBtnVrtMargin))/numObj) | int %}
{{bdyBtnHt}}This technique could be considered overkill. Each template incurs some additional memory/cpu overhead on the Home Assistant instance.
While this technique is pretty helpful during rapid prototyping, at some point the additional resource usage is hard to justify for layouts that do not change often.
A reasonable compromise would be to leverage the template evaluation functionality via the Home Assistant Developer tools to calculate the positions and locations for each UI elements while building out your interface(s) and then copy the computed values into your pages.jsonl file once the layout has been more or less finalized.
And you’re done! You might need to restart Home Assistant or reload the openHasp component/configuration so your update YAML is picked up. Assuming everything works, you should see a flurry of activity on your MQTT broker or the plate telnet console as the openHasp component renders each template and commands the plate to re-draw each UI element.
You can then re-configure your device with a new display orientation and then reboot it. As it connects back to your MQTT broker, Home Assistant will re-evaluate the templates with the inverted screen height/width and each UI widget should get re-painted.
If I had a way to reliably capture the content of the framebuffer as a video rather than a screenshot, I’d include it here. You’ll just have to trust me when I say that It’s kinda neat to watch this happen in real time.
Teardown
Product packaging
Since it’s all but impossible to find any photos of the product packaging online, here’s a few of those:
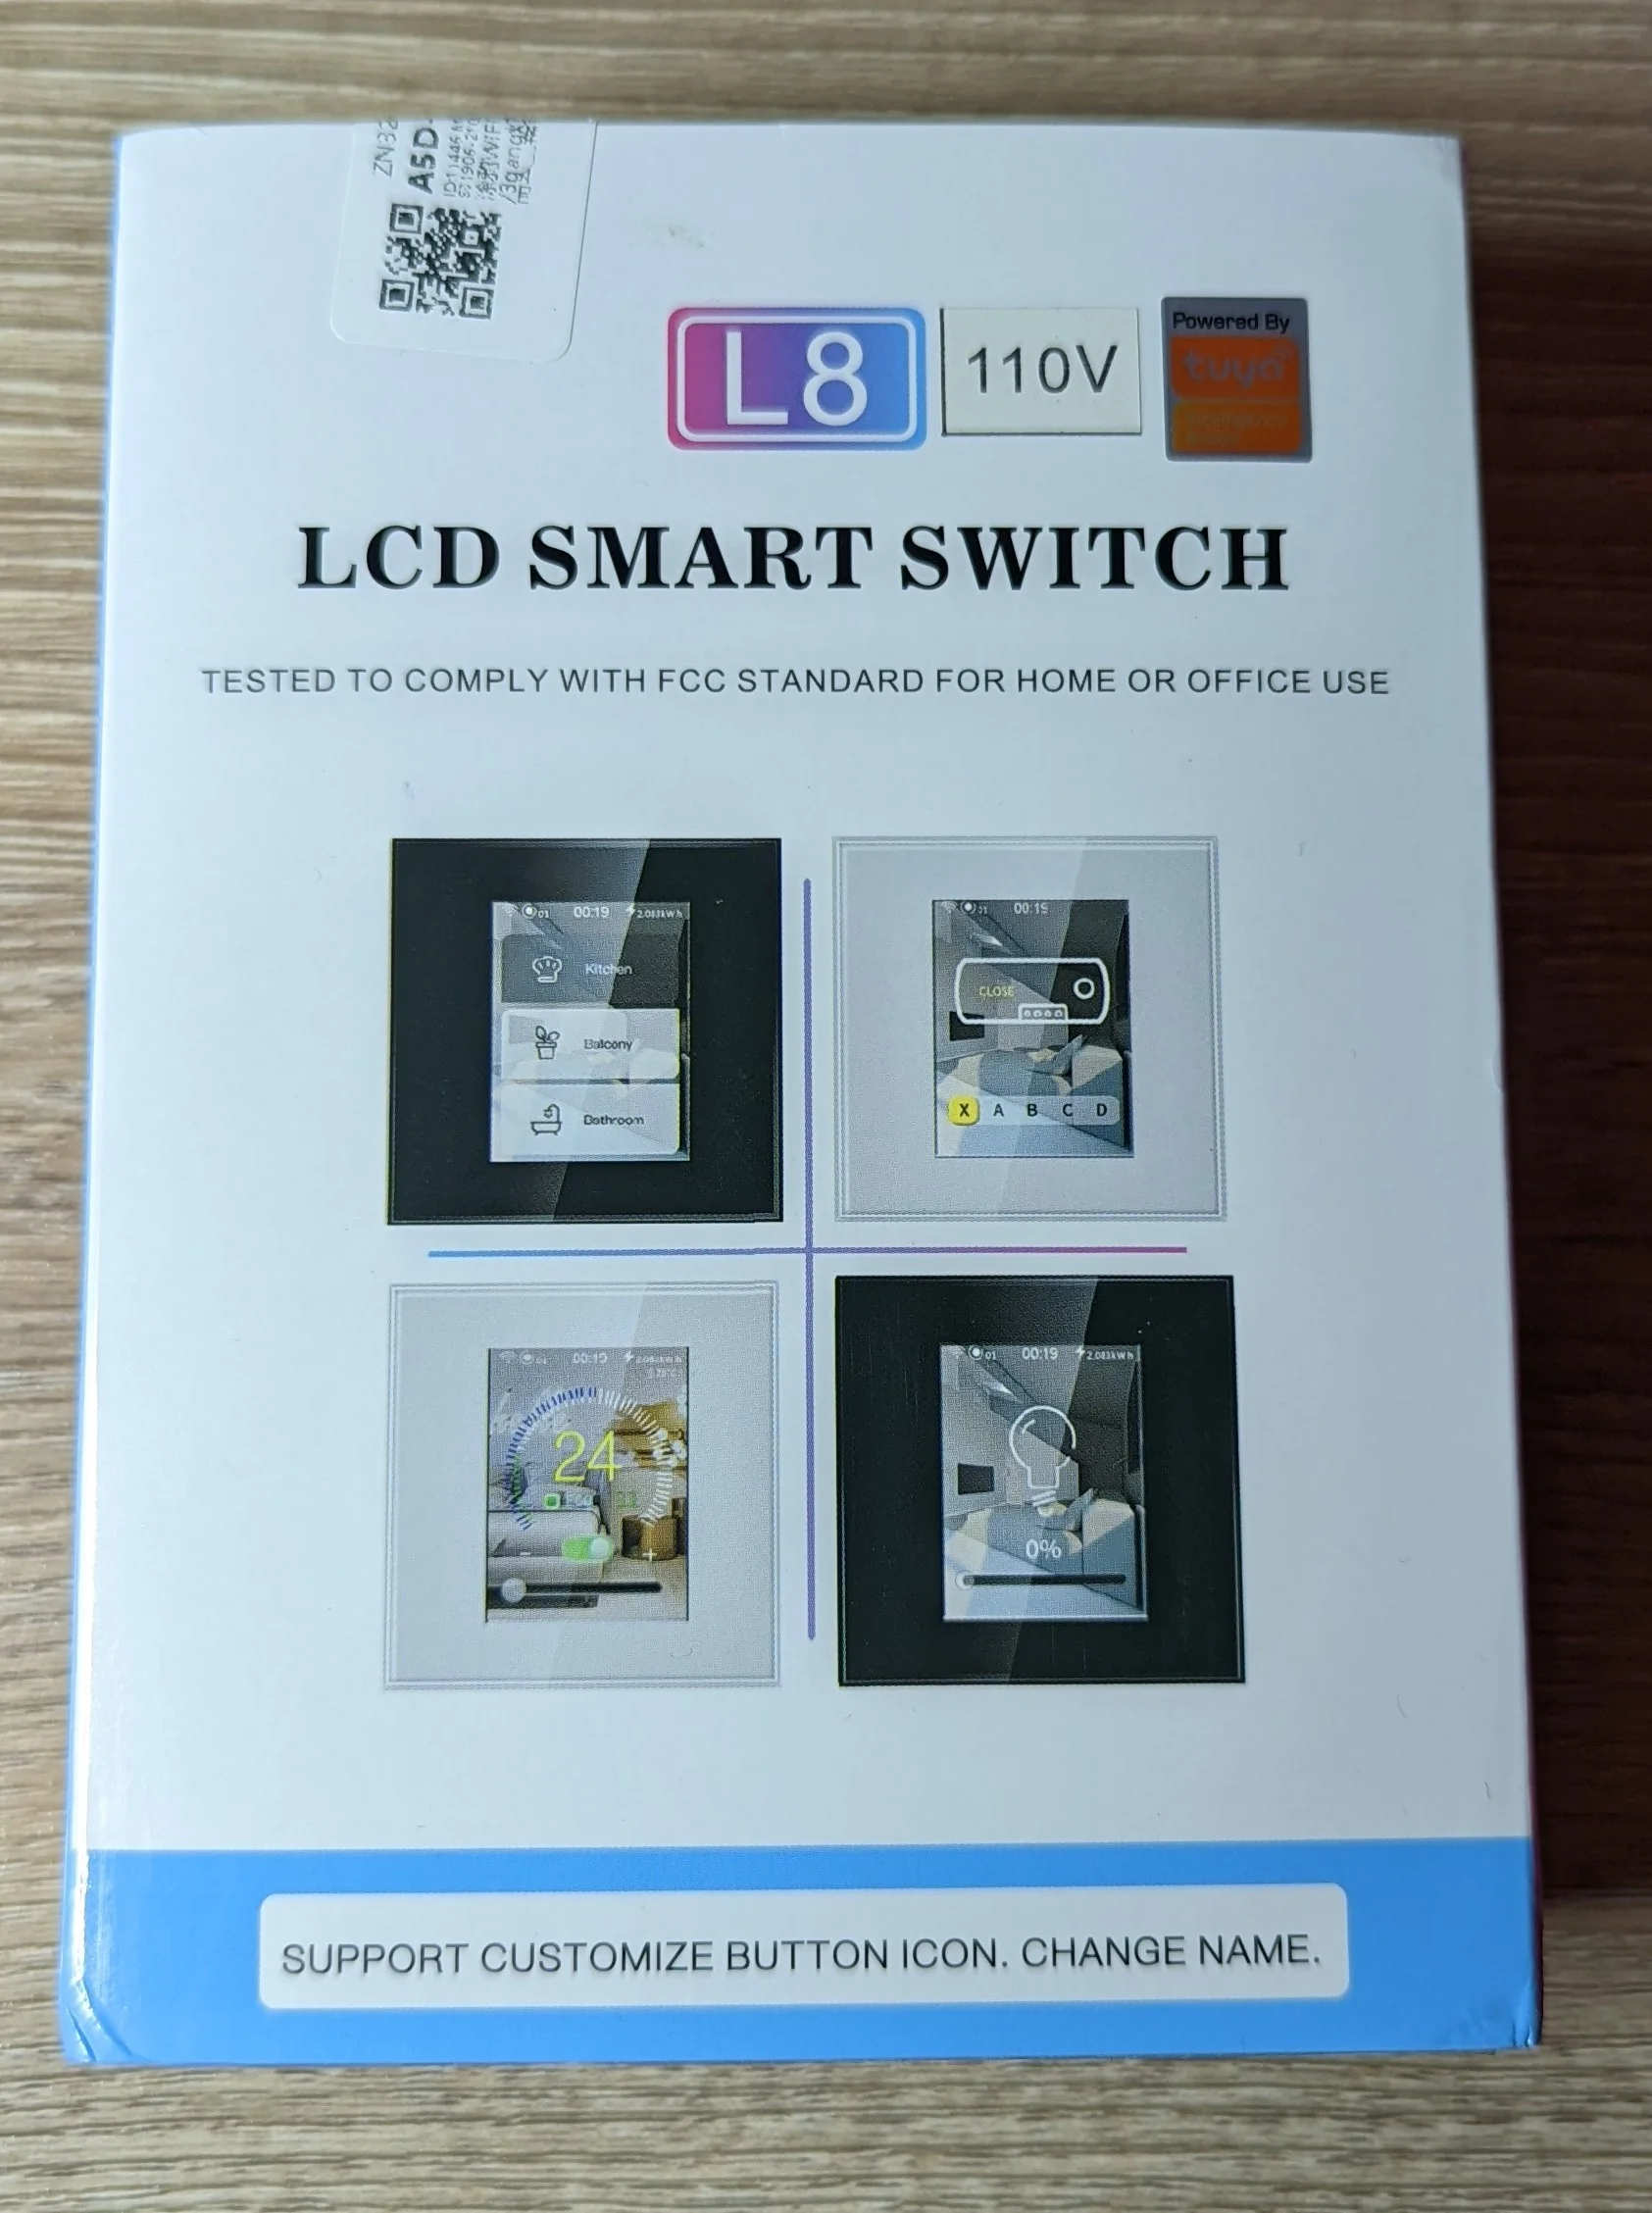

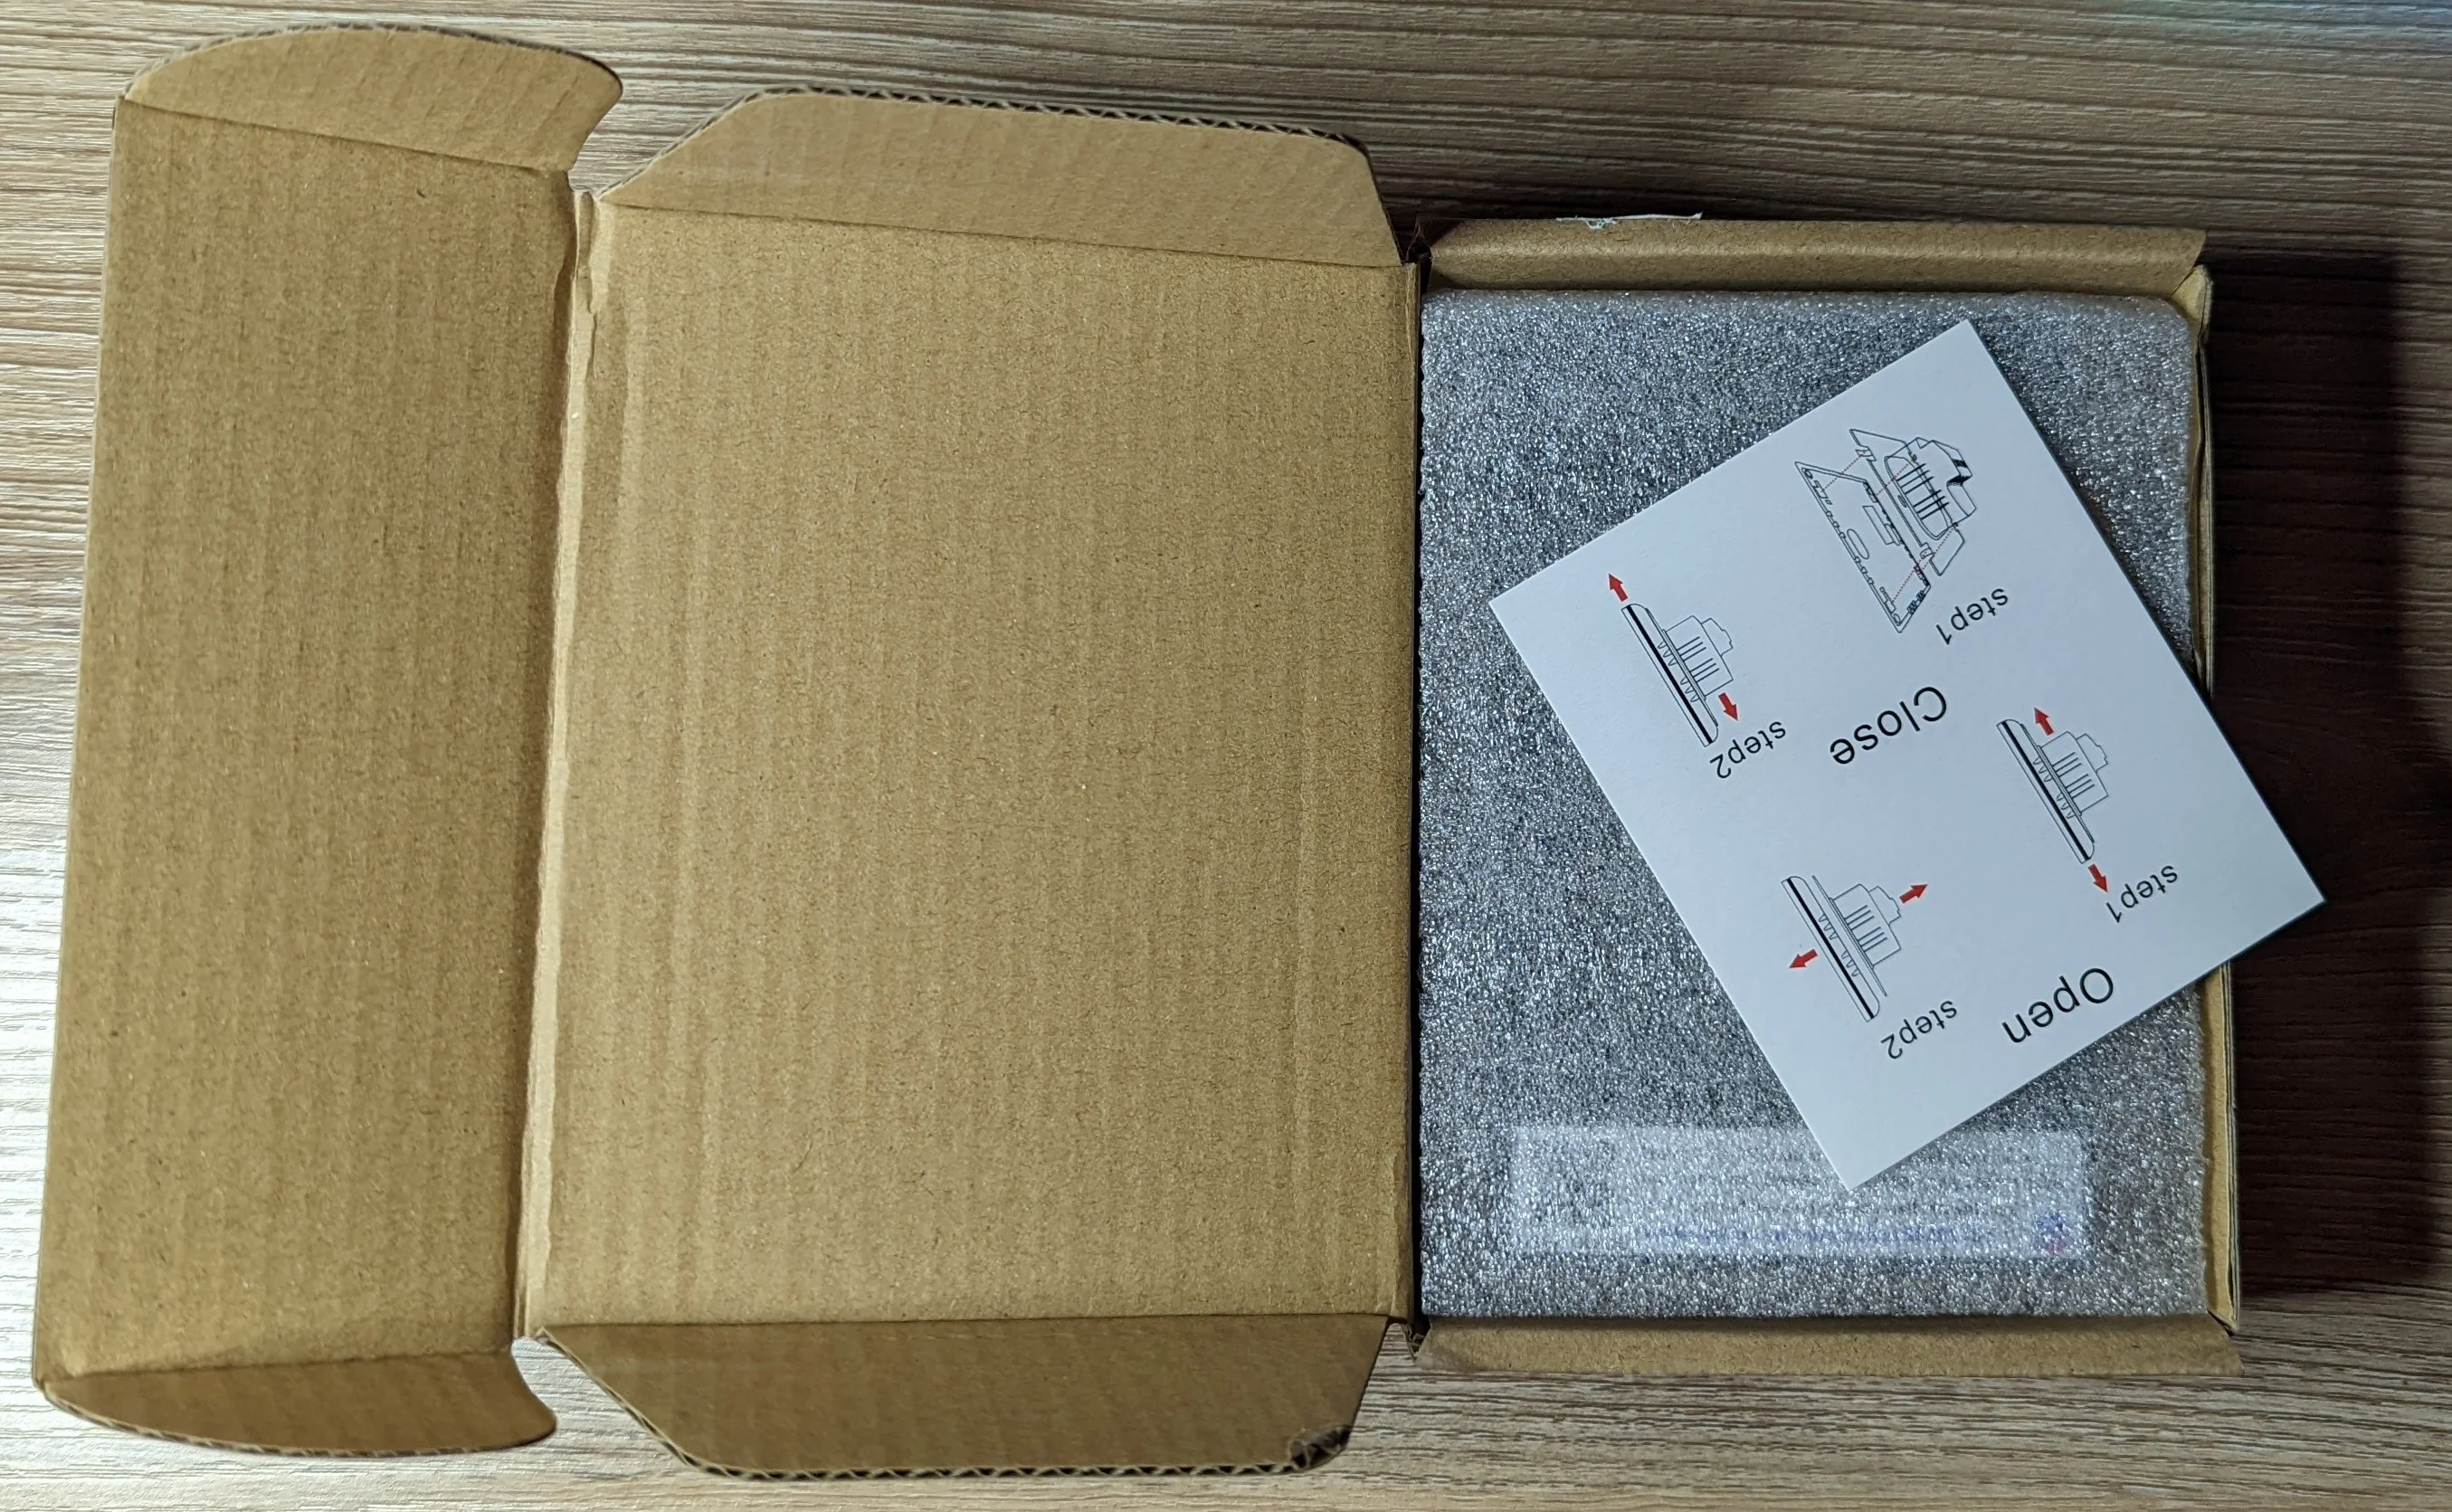
Minimal instructions and wasteful packaging. Other than the small foam insert, this entire package can be recycled!
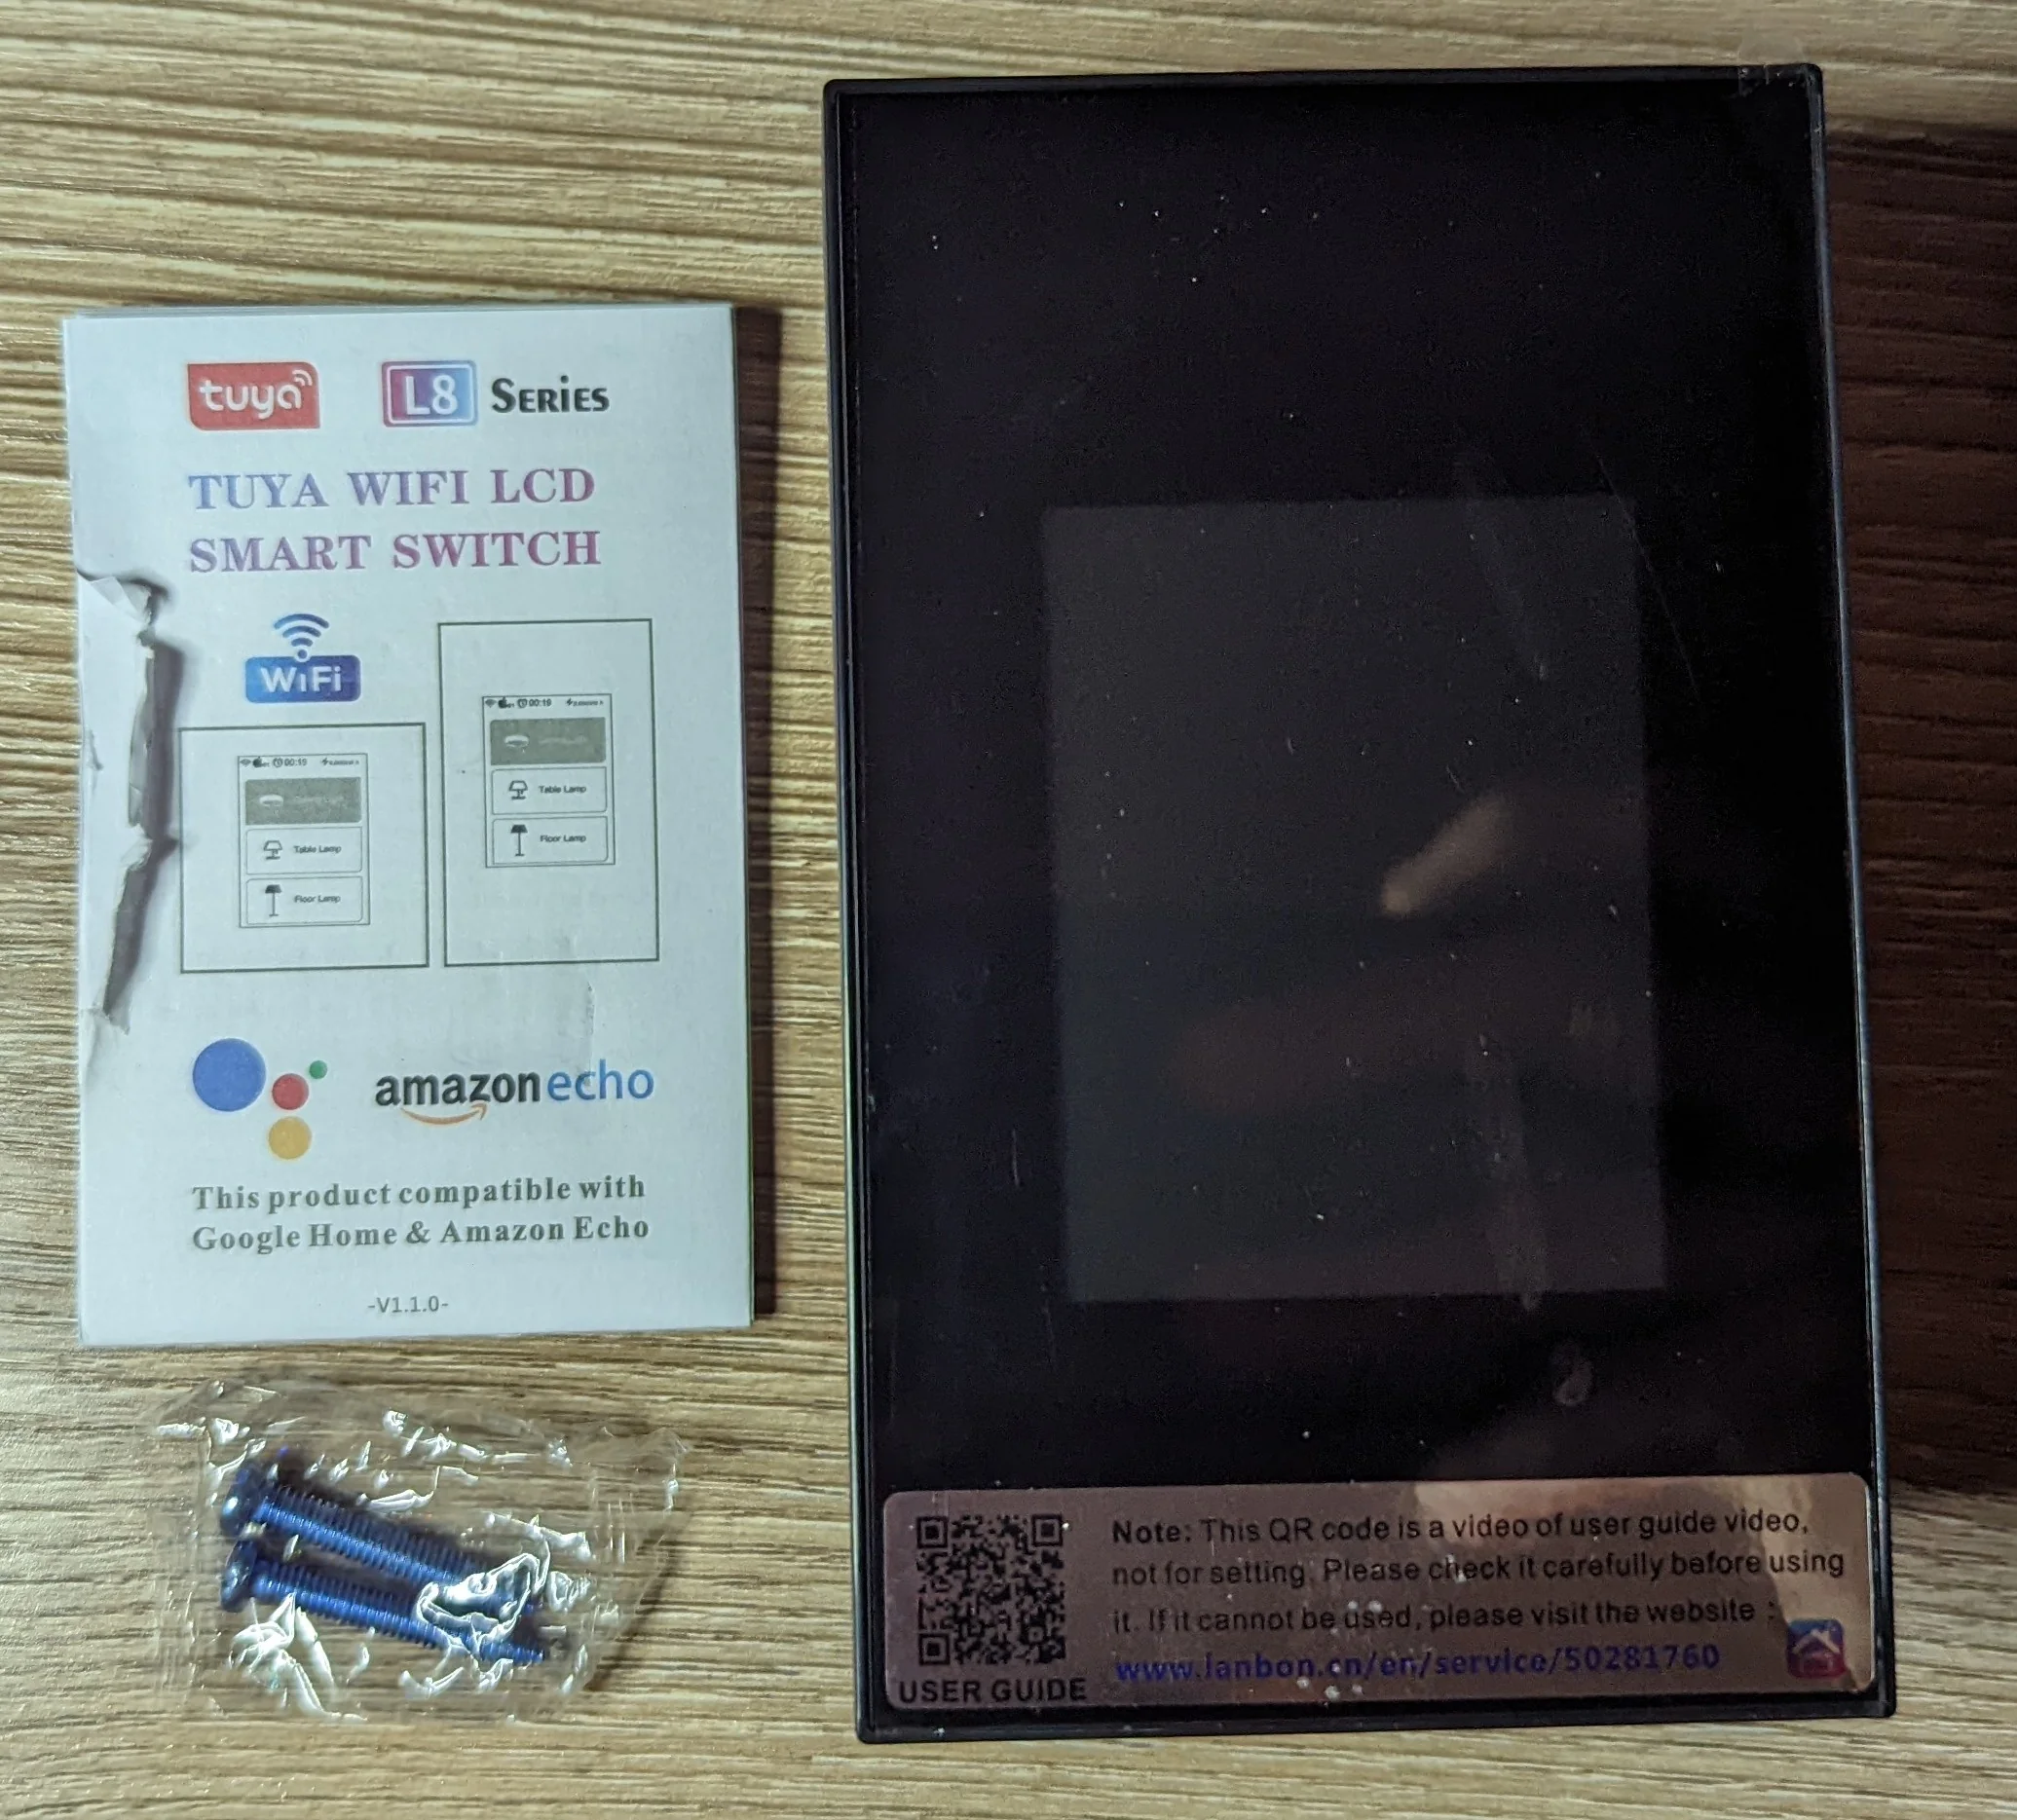
The provided screws are NOT the US standard #6 32 thread-per-inch. They are slightly larger and will strip out any screw holes in an electrical box!
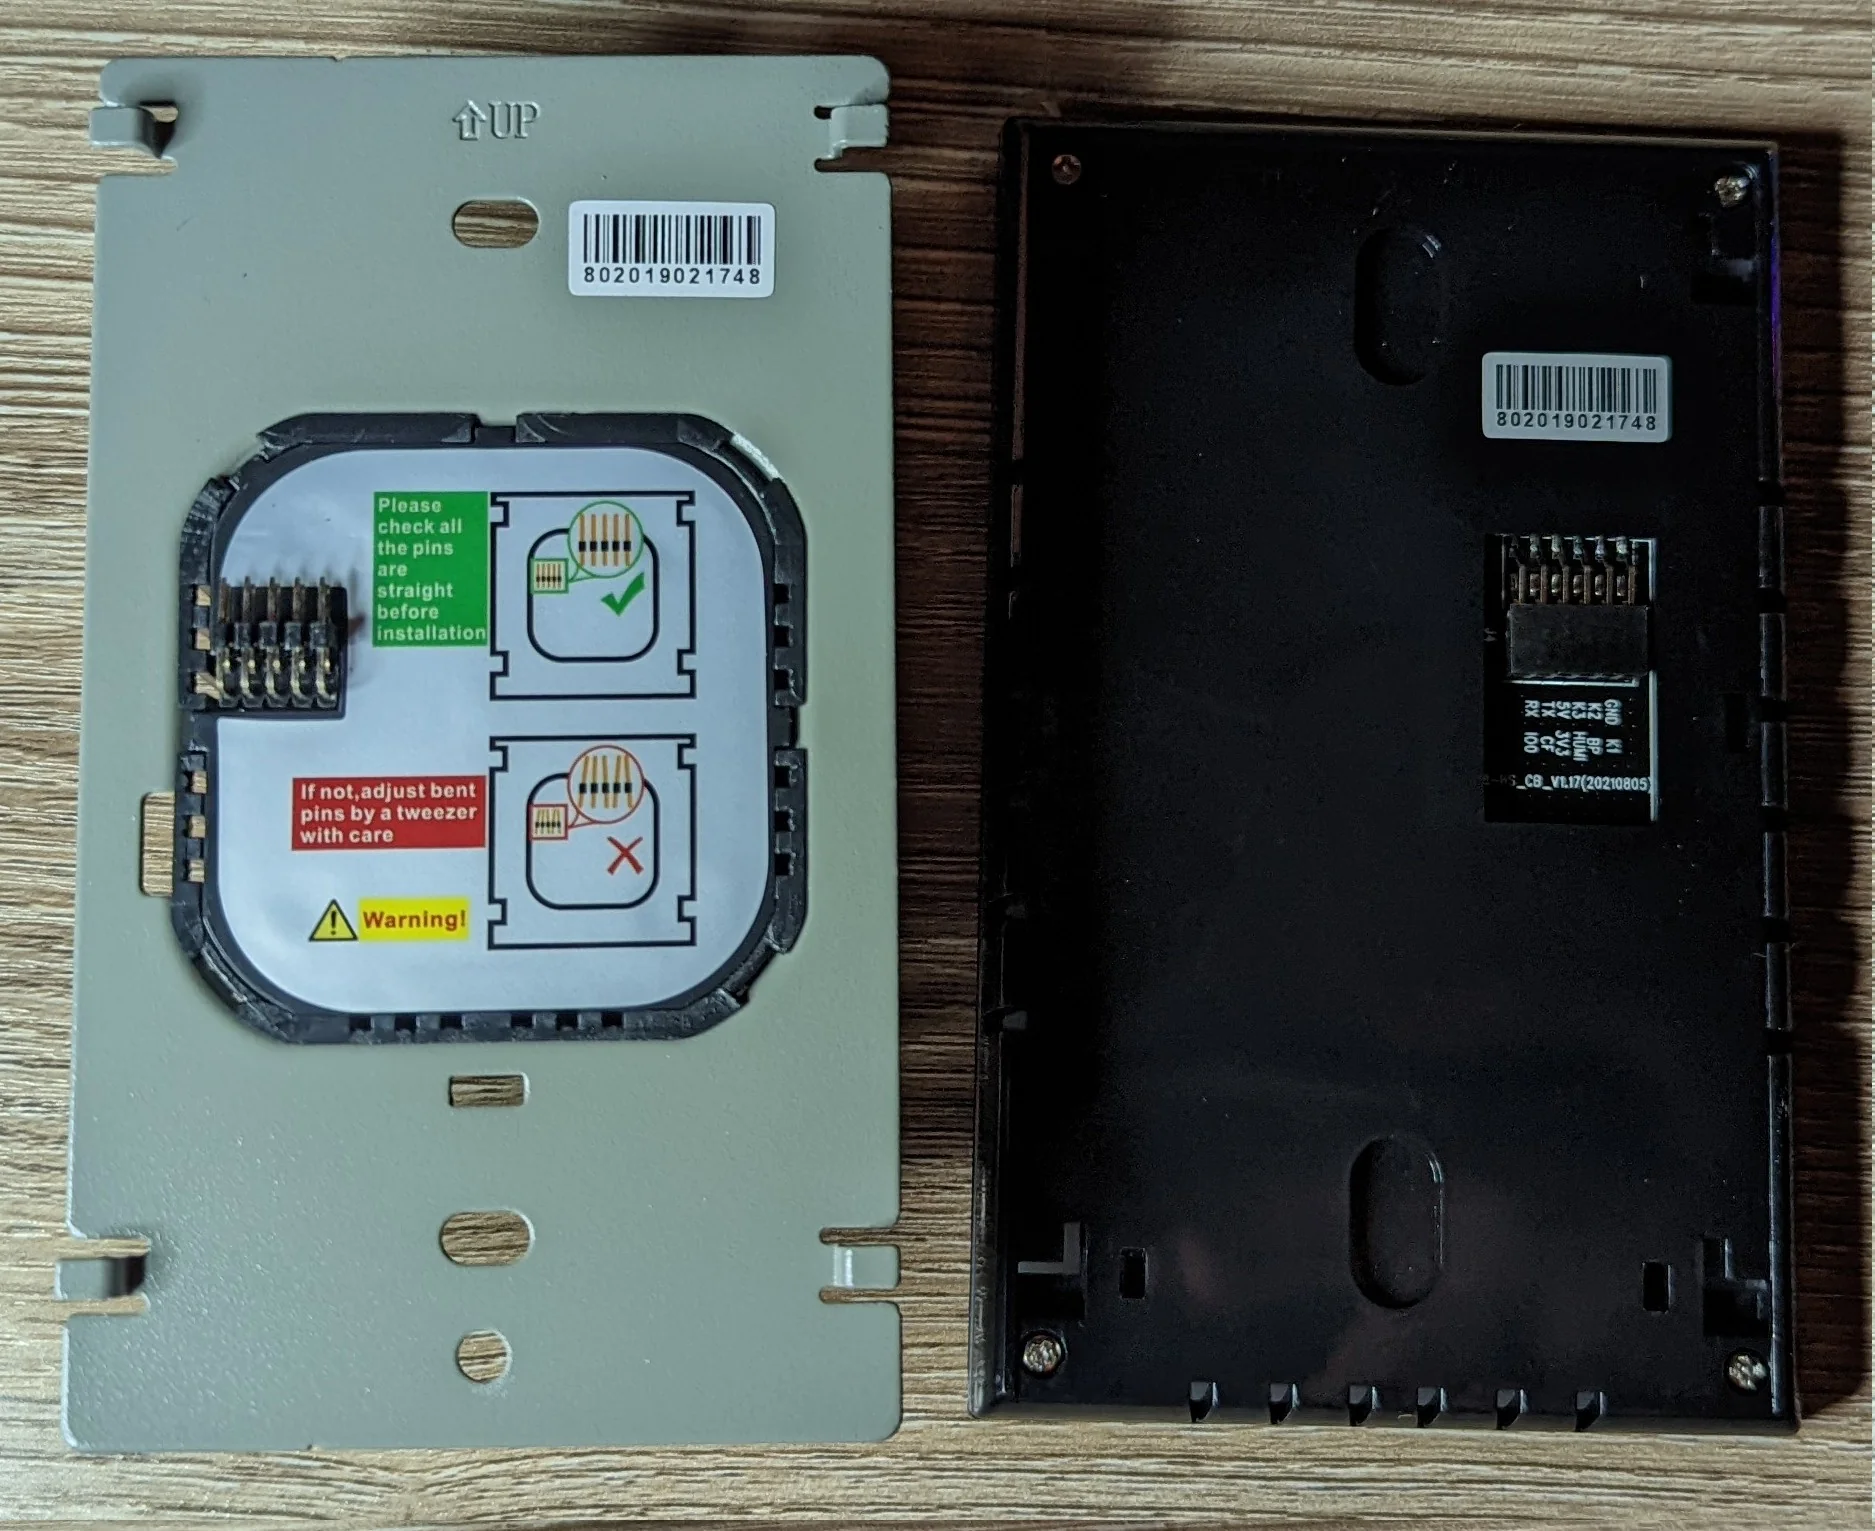
Internals
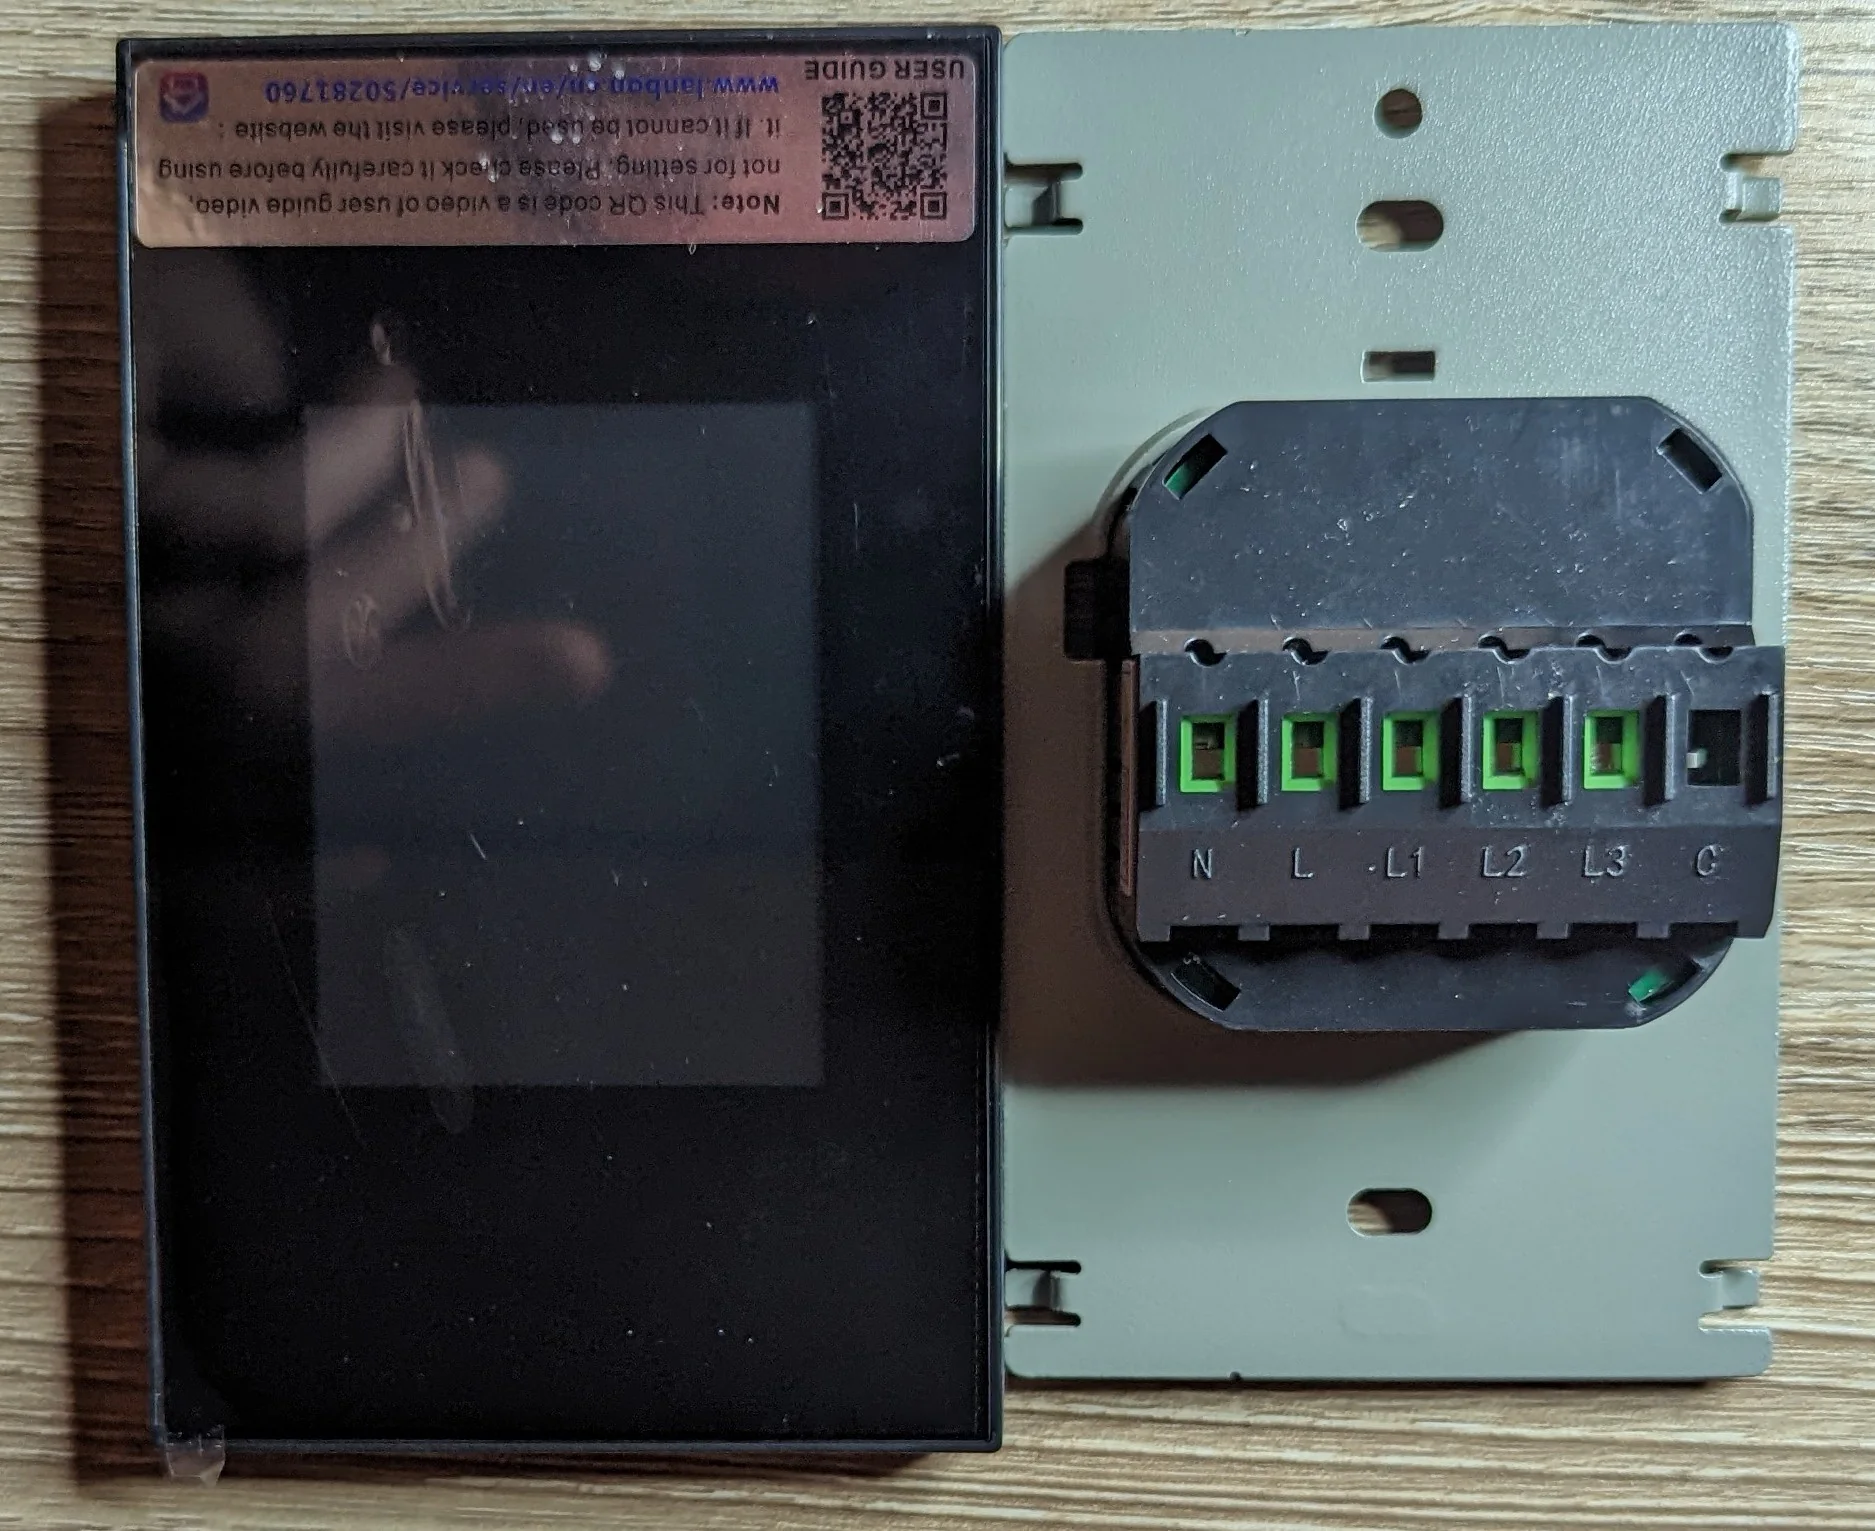
This particular model is the 3 relay version. Packaging claims 200W power. It's not clear if that is per channel or total. My money is on total.
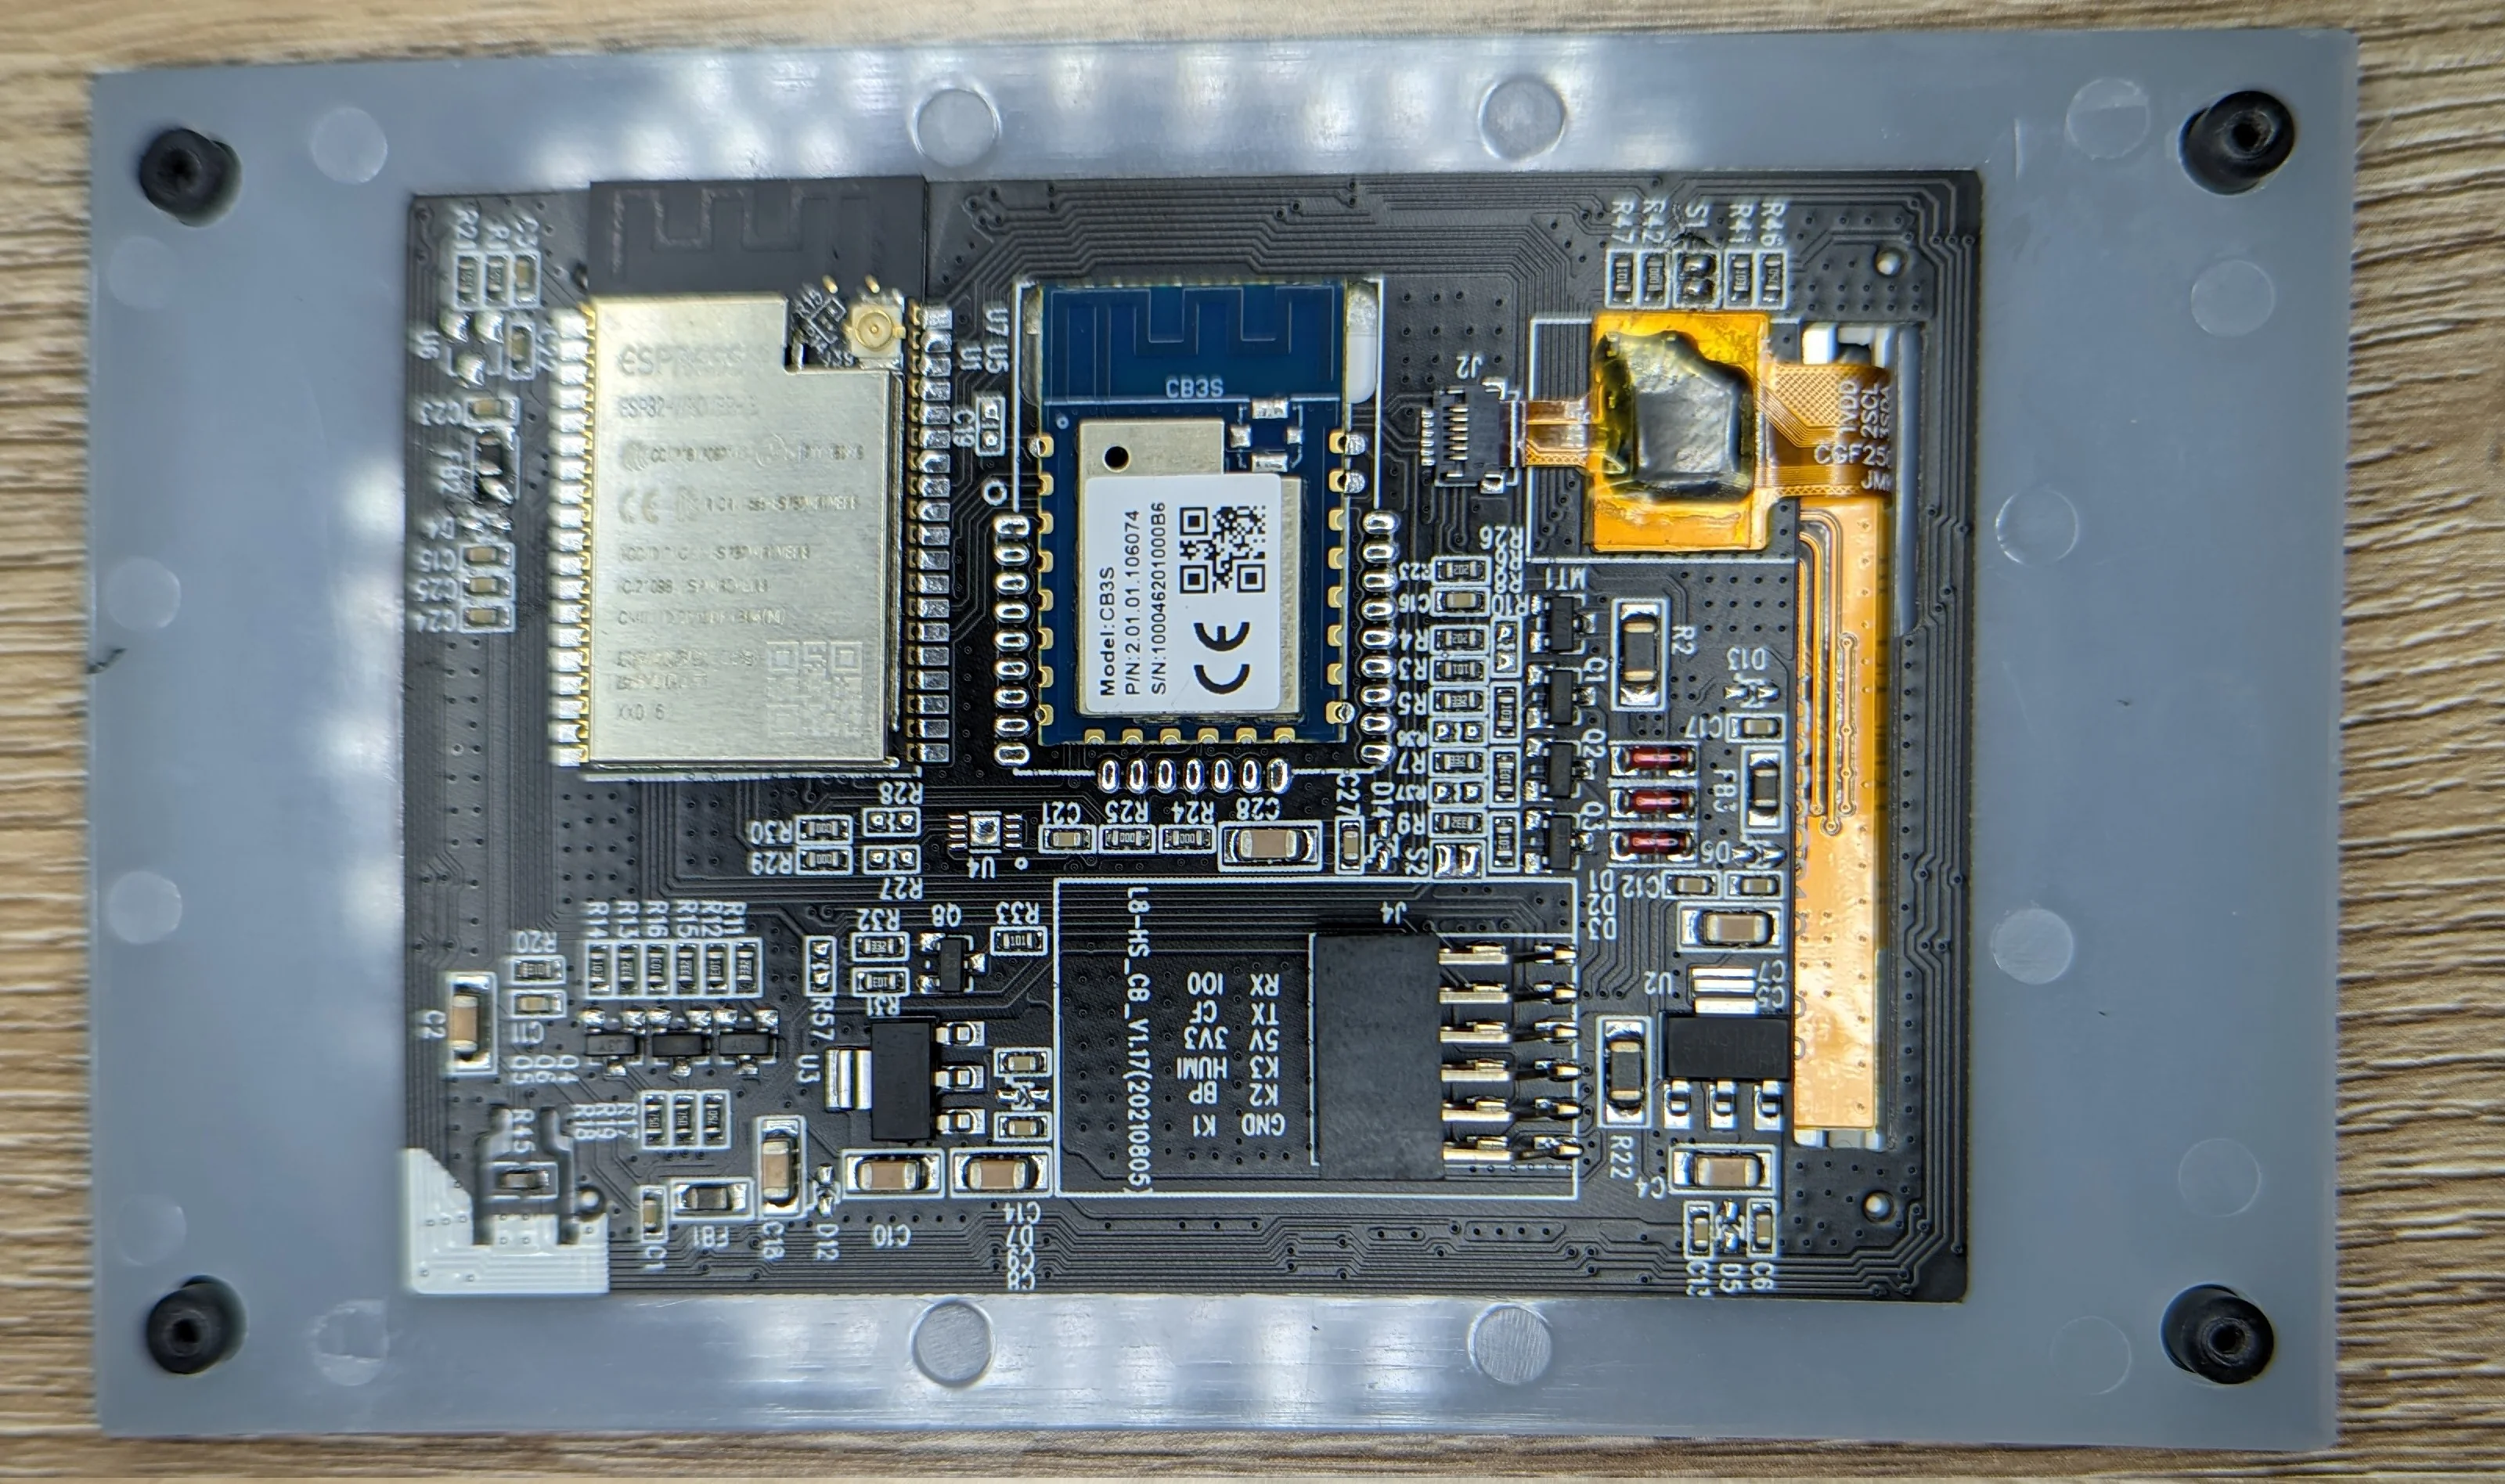
You can clearly see the revised PCB that is substantially different from the one featured on this blakadder post. My PCB has a parasitic TuYa module also attached. Almost none of the pins are connected to the PCB so the TuYa module is 100% self contained and commands the main ESP module via UART.
Removing the TuYa module is pretty painless with some hot air. It can also be left alone and the openHasp binaries will just ignore it. You can also place an order directly with Lanbon for units that do not have the TuYa module populated but this will require a minimum order quantity.
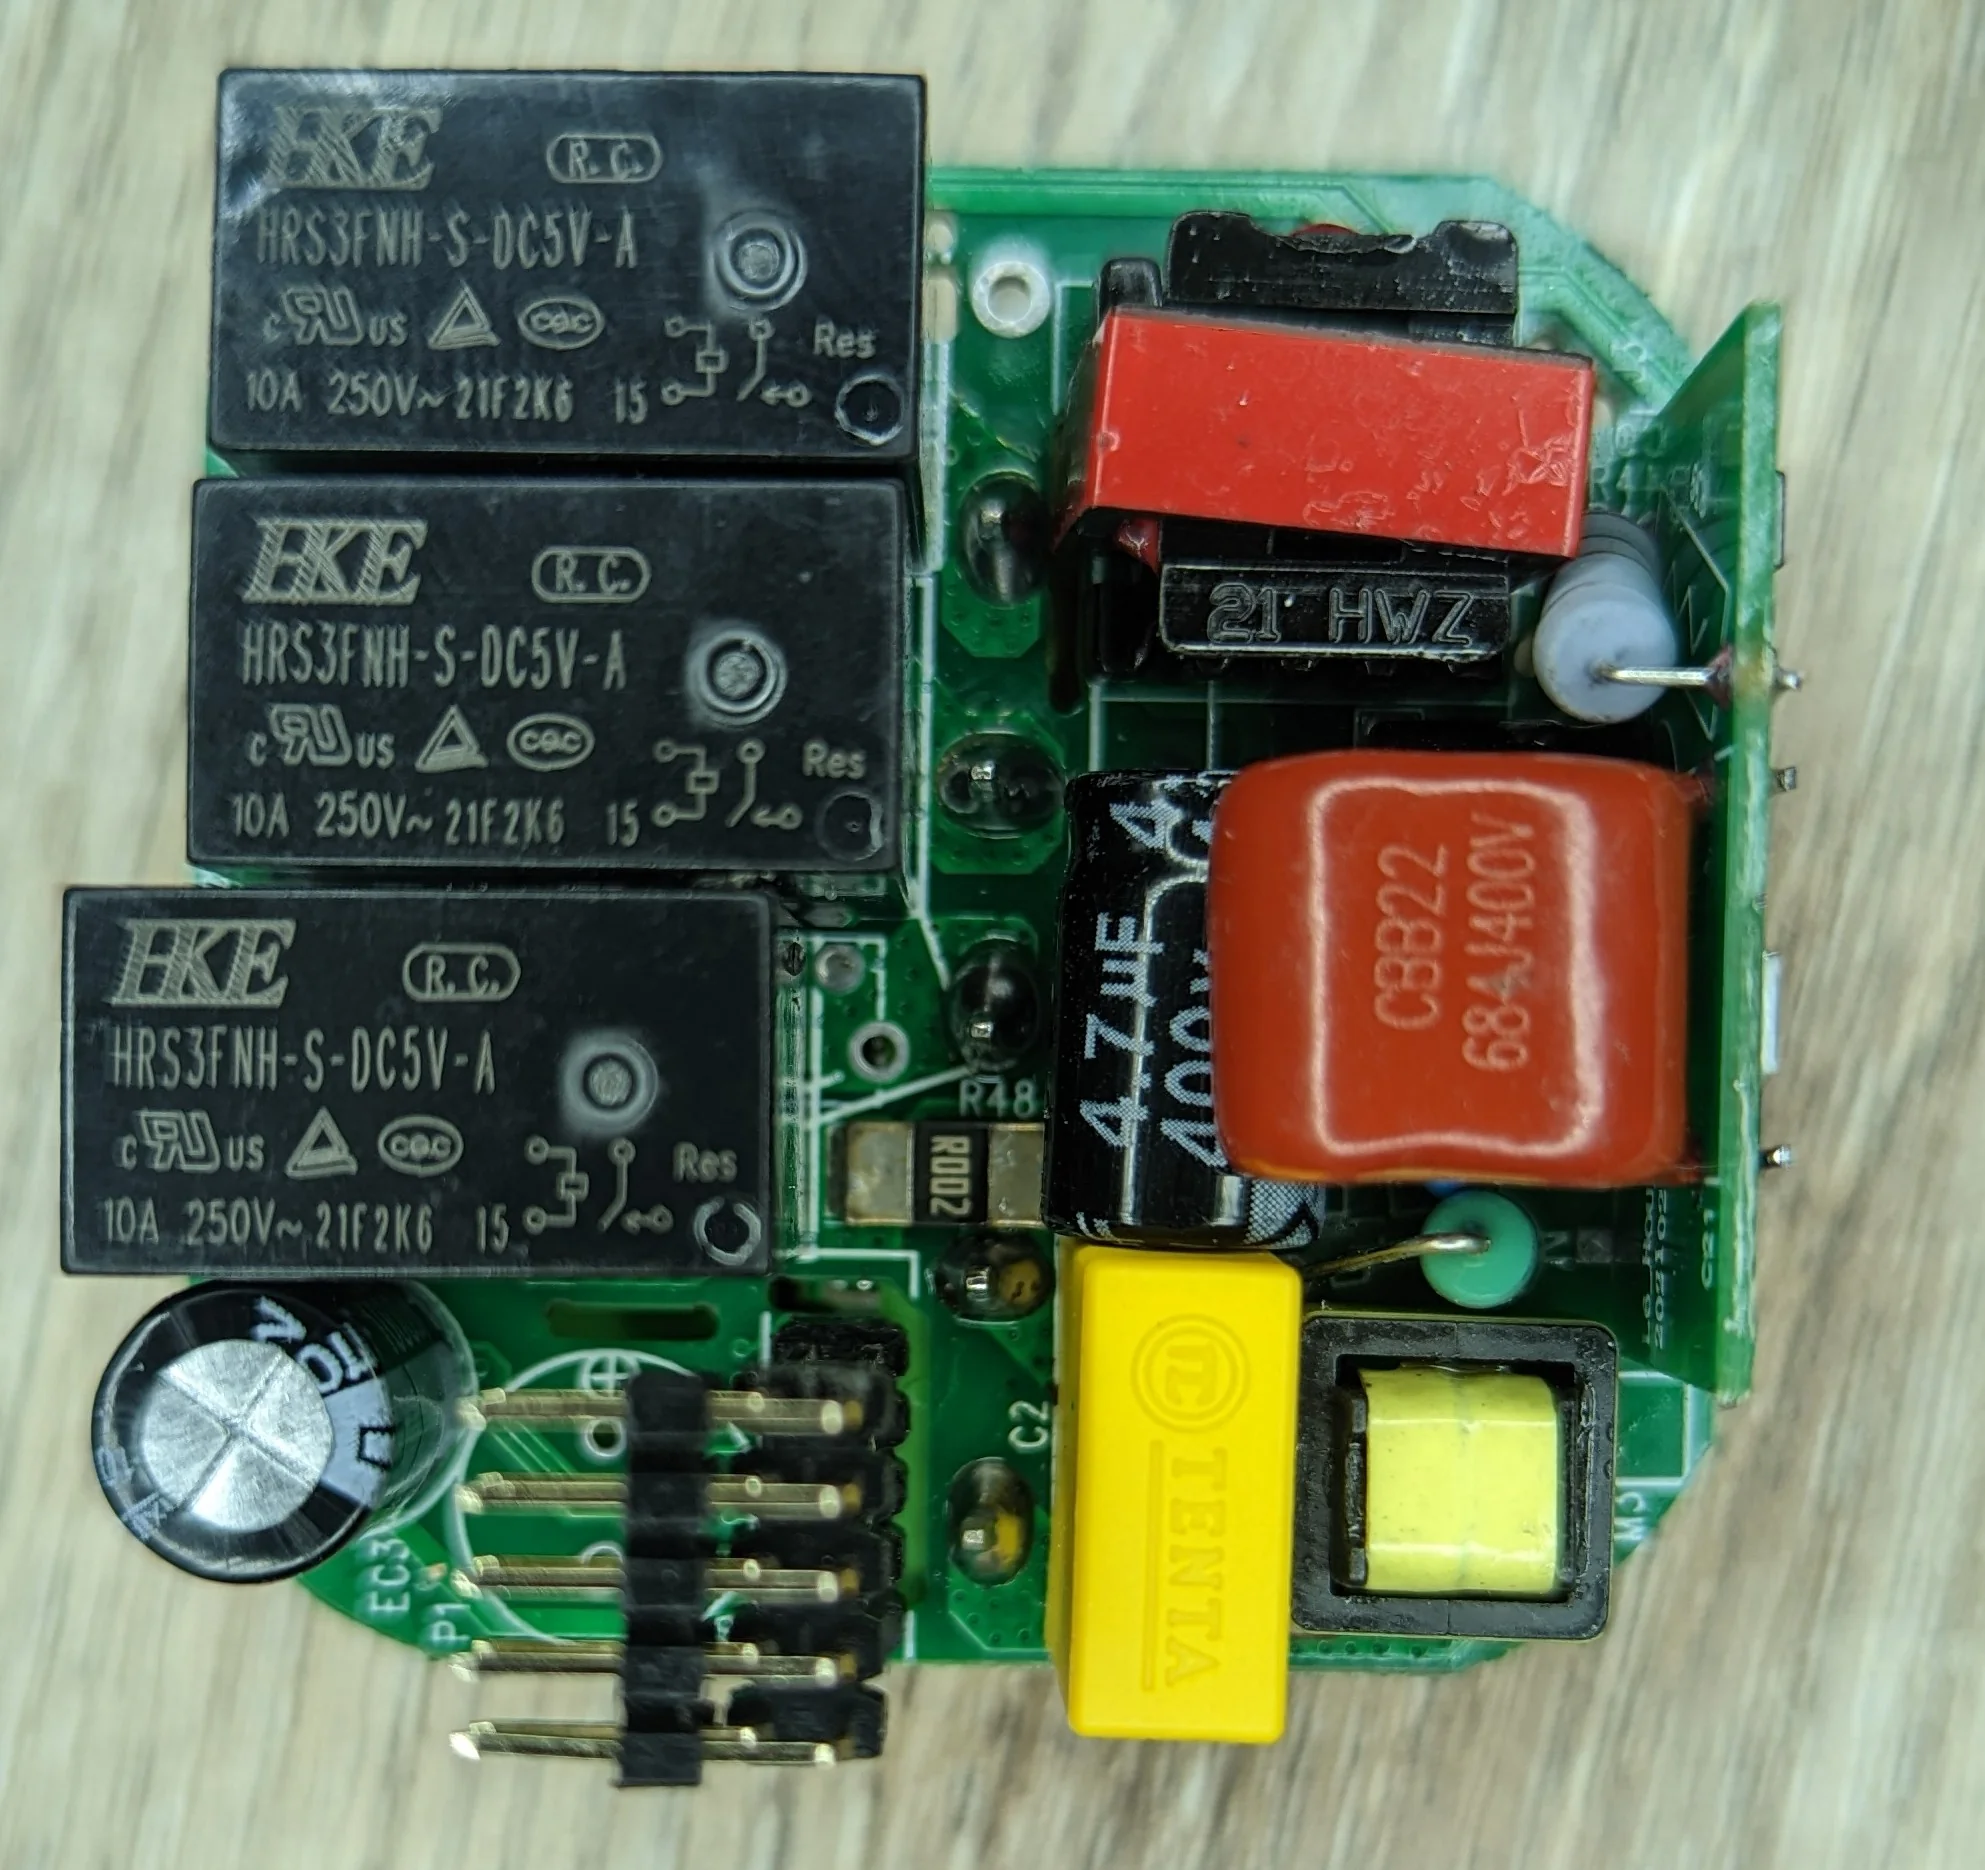
Generic relays, generic caps, generic transformers... don't switch any critical loads with this!
A closer look at what appears to be a dedicated power monitoring IC. It appears to monitor the aggregate of all three channels, not each individually. Very likely to make sure no more than 200W is switched at one time...
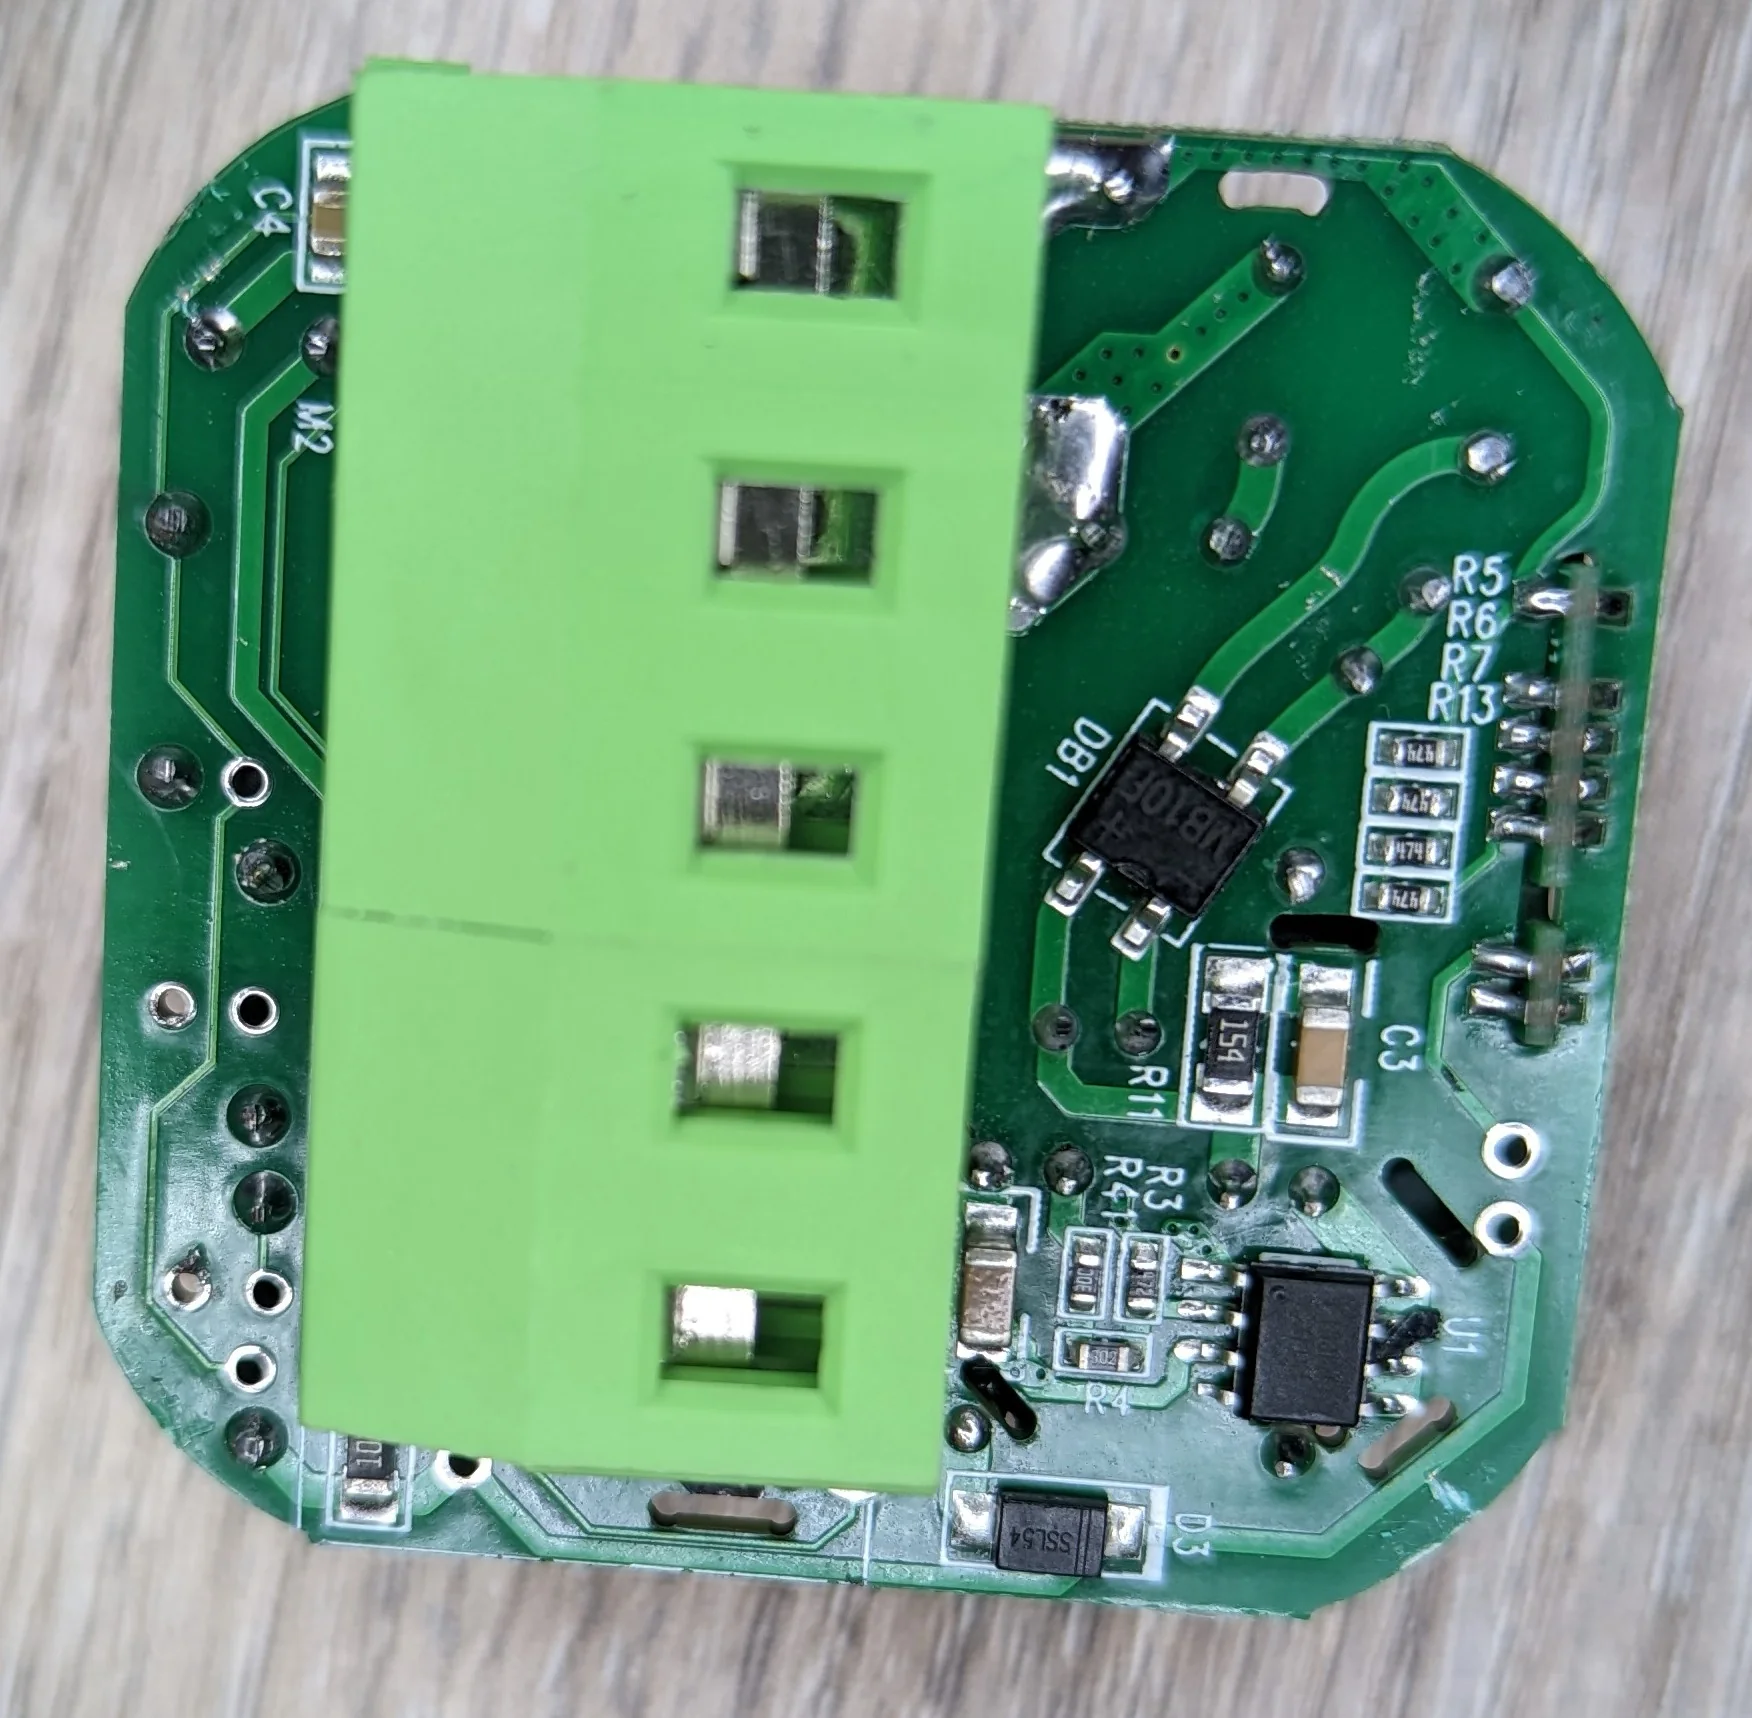
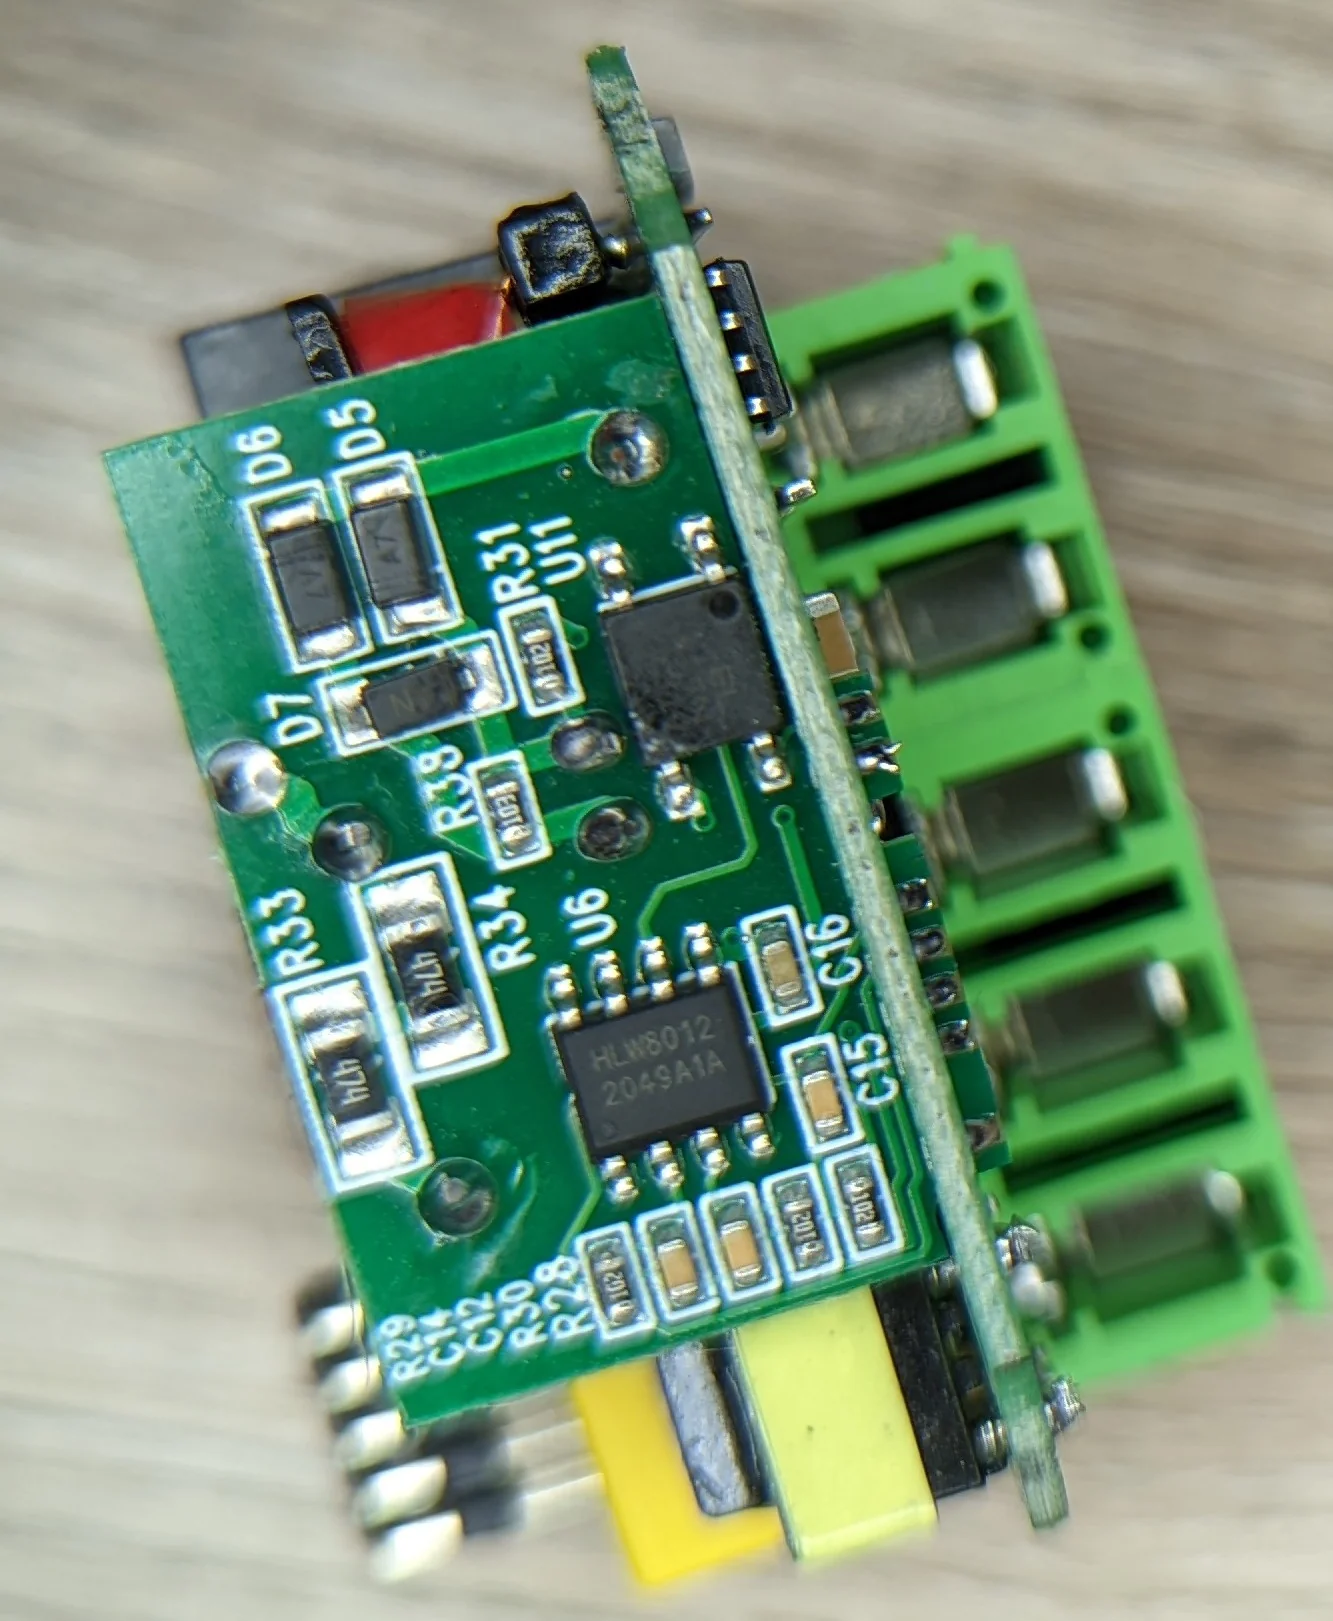
PCB/IC Markings
Some of the interesting ICs and PCB markings:
CB3S: TuYa wifi moduleHLW8012: Single phase energy monitor chipESP32-WROVER-IB: the primary ESP32 module that runs the showPrimary PCB is marked:
L8-HS_CB_V1.17(20210805)Daughter / ‘power’ board
L8-HS MB V1,14