Dynamic timers in ESPHome
As much as I love the ESPHome project, there are some features that seem like they’d be essential in an embedded/IoT firmware sdk yet their implementation remain left as an exercise to the user. This post is about one of those “Wait, that’s not built in?! How old is this project?” features: timers.
ESPHome, Timers and You
To be clear, ESPHome does have all of the primitives needed to build basic timers.
You can get basic non-blocking pauses in automations with the delay: action.
For simple cases where the interval is well known and fixed, this is sufficient.
delay: and !lambda
The delay: component does have one downside: the length of the delay can’t be adjusted after the fact.
You can use a lambda function to dynamically calculate the length of the delay, but there is no way to adjust the length of the delay once it’s been initiated.
This is already much better than a static delay that’s compiled into the binary, but this functionality is relatively new:
- Lambda Function for Delay?
- Need help to increase time delay by an automation - esphome
- Lambda value on delay:
Completely configurable timers
I have a few use cases that can’t be solved with basic lambda functions; I need to be able to adjust the delay timer dynamically - ideally through the Home Assistant web interface.
This also isn’t a new ask from the community:
A solution
As an example showcase for this particular solution/implementation, I’ll use portions of a configuration file that I use with a Sonoff SwitchMan M5 switch.
I want to implement basic “turn light off after $time” functionality with some additional requirements:
- The user should be able to arm/dis-arm this timer remotely
- The user should be able to adjust this timer up/down remotely
- The updated time should become active immediately
- Should live 100% on device not require working network to function
Other than the last point, this is trivial to do entirely within a basic Home Assistant automation. The dynamic nature of the timer essentially means we need a place to store a) the number of seconds that an output has been ON for and b) the number of seconds that a user wants the output on for. Additionally, we’ll need to increment / evaluate the two numbers at a regular interval.
Simple enough; we can implement this all with a few global vars and some basic scripts.
Below is an edited/partial yaml file showing the core components and how they’re wired together.
I have put clarifying comments throughout the file as there is some similar but unrelated arm/disarm functionality in this file.
The device shows up in HA like so:
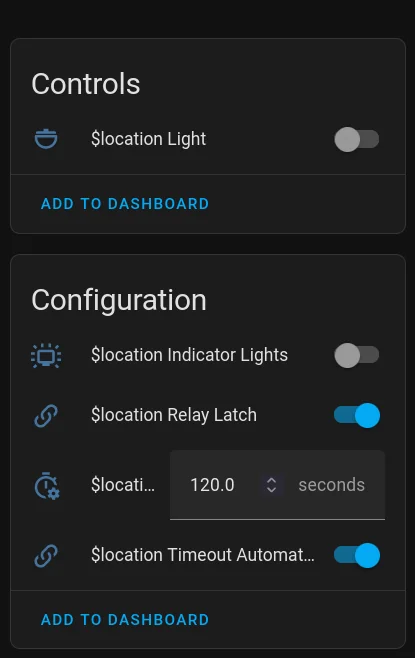
This is how my entity shows up in HA. I can toggle the timeout period and disable the functionality altogether.
The count-down timer can be engaged at any time; if the light is already on, the timer begins counting. The length of the timer can be adjusted at any time; the new value is used for the “turn off now?” calculation withing a second or so if it being updated.
In short, it does everything I need without having to write any HA automation :D.
Hopefully this helps somebody!
###
# The user-facing switch is not *directly* wired to the relay
#   which allows us to insert arbitrary logic between button press
#   and turning the relay on/off.
# When 'armed' pressing the button will toggle the relay.
# Regardless of arm/dis-arm state, the input event will be reported to HA.
#
# Shelly uses the terminology "linked/un-linked" but the concept is the same.
# You can insert a shelly module between a cheap wall switch with PIR sensor
#   and the load to squash nuisance triggers or simply expose the PIR sensor
#   to HA as a presence detection device.
##
# See: https://esphome.io/guides/automations.html#global-variables
globals:
  - id: glbl_relay_latched
    type: bool
    restore_value: yes
    initial_value: "true"

  # For the auto-off automation
  - id: glbl_timeout_armed
    type: bool
    restore_value: yes
    initial_value: "true"

  - id: glbl_timeout_length_ticks
    type: int
    restore_value: yes
    # 5 min * 60 seconds = 300
    initial_value: "300"

  # We ALSO need to keep track of the number of 'ticks'
  # add _prefix to indicate 'internal'
  - id: _glbl_timeout_ticks
    type: int
    restore_value: no
    initial_value: "0"

script:
    # End meaning the natural conclusion of the timer. Do whatever we're supposed to do when the timer fires off
  - id: on_timer_end
    mode: single
    then:
      - light.turn_off: light_1
      - logger.log: "on_timer_end: output should be off!"

    # Stop meaning the pre-mature ending of the timer
  - id: on_timer_stop
    # Do not start a new run. Issue a warning.
    mode: single
    then:
        # For now, just clean up the globals and stop the ticking.
        # This hook could be used to do so much more, though.
        ##
      - lambda: |-
          auto TAG = "script.on_timer_stop";

          id(_timer_tick).stop();
          id(_glbl_timeout_ticks) = 0;
          ESP_LOGD(TAG, "_timer_tick now stopped and _glbl_timeout_ticks is %d", id(_glbl_timeout_ticks));

  - id: _timer_tick
    # Start a new run after previous runs completes. This will happen until timer.stop() is called on us
    ##
    mode: queued
    then:
      # A single 'tick' is 1 second long
      - delay: 1s
      - lambda: |-
          auto TAG = "lambda._timer_tick";

          // First, update the number of ticks
          id(_glbl_timeout_ticks) += 1;

          // Then check if we have timed out
          if (id(_glbl_timeout_ticks) >= id(glbl_timeout_length_ticks) ) {

            // If we have timed out, run the script to handle the timer expiration
            // It's cleaner to call out to a script rather than put all the "what no?" code in here!
            id(on_timer_end).execute();

            ESP_LOGD(TAG, "_glbl_timeout_ticks is >= glbl_timeout_length_ticks  %d >= %d ", id(_glbl_timeout_ticks), id(glbl_timeout_length_ticks) );

            // And then re-set the internal counter
            id(_glbl_timeout_ticks) = 0;

            // And finally, stop the ticking timer
            id(_timer_tick).stop();
            ESP_LOGD(TAG, "_timer_tick now stopped!");

          } else {

            ESP_LOGD(TAG, "_glbl_timeout_ticks is < glbl_timeout_length_ticks  %d < %d ", id(_glbl_timeout_ticks), id(glbl_timeout_length_ticks) );

            // make sure we run again.. unless we're not supposed to
            if( id(glbl_timeout_armed) ) {
              id(_timer_tick).execute();
            }

          }

# Create a toggle in HA that allows us to arm/disarm the button <-> relay glue
# See: https://esphome.io/components/switch/template.html
switch:
  - name: "${friendly_name_short} Relay Latch"
    platform: template
    id: sw_relay_mode
    device_class: "switch"

    entity_category: "config"

    lambda: |-
      if (id(glbl_relay_latched)) {
        return true;
      } else {
        return false;
      }

    turn_on_action:
      - globals.set:
          id: glbl_relay_latched
          value: "true"

    turn_off_action:
      - globals.set:
          id: glbl_relay_latched
          value: "false"

    # UI toggle for the arm/disarm of the auto-off/timeout functionality
  - name: "${friendly_name_short} Timeout Automation"
    platform: template
    id: sw_timeout_arm
    device_class: "switch"
    entity_category: "config"

    lambda: |-
      if (id(glbl_timeout_armed)) {
        return true;
      } else {
        return false;
      }

    turn_on_action:
      then:
        # Update the global to store the new state
        # If the light is already on, also start the timer
        - lambda: |-
            id(glbl_timeout_armed) = true;

            auto TAG = "template.Timeout Automation.turn_on_action";
            if ( id(light_1).current_values.is_on() ) {
              id(_timer_tick).execute();
            } else {
              ESP_LOGD(TAG, "Timeout Automation ARMED, light NOT on. Nothing to do!");
            }

    turn_off_action:
      then:
        # Update the global and stop the ticking timer if needed
        - lambda: |-
            // Set the global to OFF, it will be checked next time the _tick fires if the on_timer_stop doesn't
            // kill the ticking
            id(glbl_timeout_armed) = false;
            id(on_timer_stop).execute();

# Give the user a graphical control over the timeout
# See: https://esphome.io/components/number/template.html
number:
  - name: "${friendly_name_short} Timeout"
    id: timeout_length
    platform: template
    entity_category: "config"
    # TODO: maybe it's a better UX to do this in minutes and do the conversion in esphome
    unit_of_measurement: seconds
    mode: box
    min_value: 30
    max_value: 21600
    step: 30

    lambda: |-
      return (int) id(glbl_timeout_length_ticks);

    set_action:
      then:
        - globals.set:
            id: glbl_timeout_length_ticks
            value: !lambda |-
              // TODO: we're relying on HA to pass an integer; perhaps we should do atoi() and catch any exceptions
              return (int) x;

binary_sensor:
  - name: ${friendly_name_short} Button
    platform: gpio
    entity_category: "diagnostic"
    pin:
      number: GPIO0
      inverted: true
    on_click:
      min_length: 50ms
      max_length: 150ms
      then:
        - if:
            # If the input -> output functionality is armed
            condition:
              lambda: 'return id(glbl_relay_latched);'
            then:
              - light.toggle:
                  id: light_1

            else:
              - logger.log:
                  level: DEBUG
                  format: "Button1 pressed but relays unlinked"

output:
  # See" https://esphome.io/components/output/ledc.html
  - platform: ledc
    pin: GPIO18
    id: gpio_18

  - platform: gpio
    id: relay_1
    pin:
      number: 23

# See: https://esphome.io/components/light/index.html#config-light
# See: https://esphome.io/components/light/monochromatic.html
light:
  - name: ${friendly_name_short} Indicator Lights
    id: relay_status_leds
    platform: monochromatic
    output: gpio_18
    # Classify this as a "config" entity rather than a primary entity
    entity_category: config


    # The LEDs technically do support some effects! Although there's really only one 'built-in' effect that looks
    #   any good on the tiny LEDs / switch.
    effects:
      - pulse:
          transition_length: 1s
          update_interval: 1s

  # See: https://esphome.io/components/light/binary.html
  - name: ${friendly_name_short} Light
    id: light_1
    platform: binary
    output: relay_1

    # Resume last state on boot if possible. Else, off
    restore_mode: RESTORE_DEFAULT_OFF

    # Wire in the count down timer automation if enabled
    on_turn_on:
      then:
        - if:
            condition:
              # If the countdown timer is enabled
              lambda: 'return id(glbl_timeout_armed);'
            then:
              # The light is already on, start counting the seconds.
              # When timer ends, light will be turned off
              - script.execute: _timer_tick

            else:
              - logger.log:
                  level: DEBUG
                  format: "Light1 turned on, countdown timer not armed"

    # This can be called by the natural end of the timer OR manually through any other source.
    # Regardless of the source, we just need to stop the ticking if it's running.
    on_turn_off:
      then:
        - if:
            condition:
              lambda: 'return id(_timer_tick).is_running();'
            then:
              - script.execute: on_timer_stop

            else:
              - logger.log:
                  level: DEBUG
                  format: "Light1 turned off, countdown timer not armed"